Add new users
To add a new user to the portal, follow these steps:
-
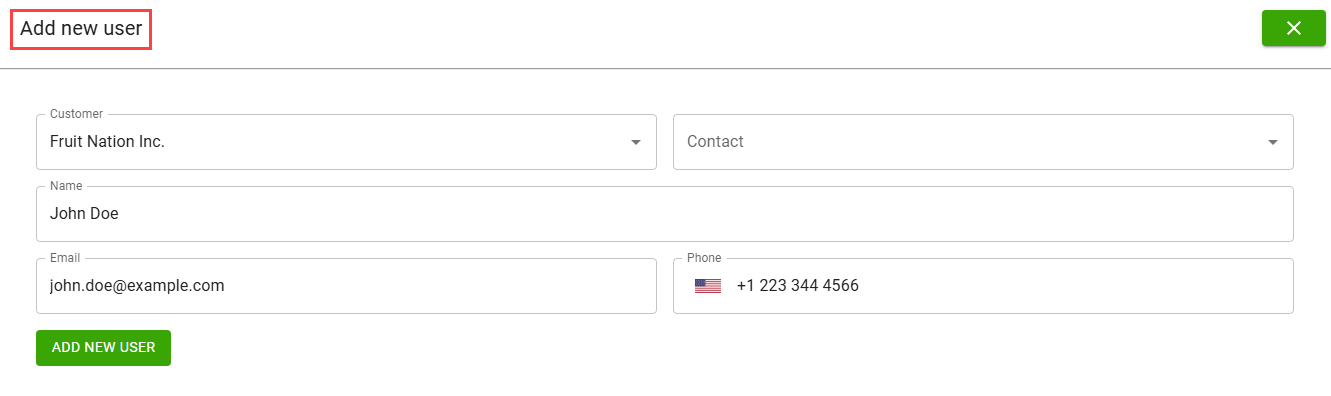
On the User management page, select the ADD NEW USER button.
The Add new user window opens.
-
Enter the required information in the following fields:
Field Description Customer Select the name of the customer. Contact Select the contact name of the customer configured on the Contact Card page in Business Central. When a contact is selected, the Name, Email, and Phone field values are automatically populated based on the Business Central data. Alternatively, you can leave the Contact field empty and manually enter the name, email, and phone information. Name Specifies the name of the selected contact. You can edit this value if required. Email Specifies the email address of the selected contact. Phone Specifies the phone number of the selected contact. -
Select ADD NEW USER.
A confirmation message appears as a notification.
After the user is added, the system sends an automated email to the specified address with a link and instructions to set up their login password.
Edit user configuration
To update user details, follow these steps:
-
On the User management page, double-click the required line created for the user role.
The Edit user window opens.
-
Edit or update the required field values.
You cannot edit the Customer and Contact field values.
-
Select the Inactive checkbox to block the user, preventing them from logging into the e-commerce platform.
You can clear the checkbox to unblock the user and restore login access. -
Select SAVE & CLOSE.
The system saves the recent changes.
-
Select the RESET PASSWORD button to reset the user password. This action triggers an email to the user with a link to set up a new password.
- Select the DELETE USER button to permanently remove the user from the system.
The system displays timestamps for user details, such as created, last modified, last password change, and last login.
Add admin users
To add a new admin user, follow these steps.
-
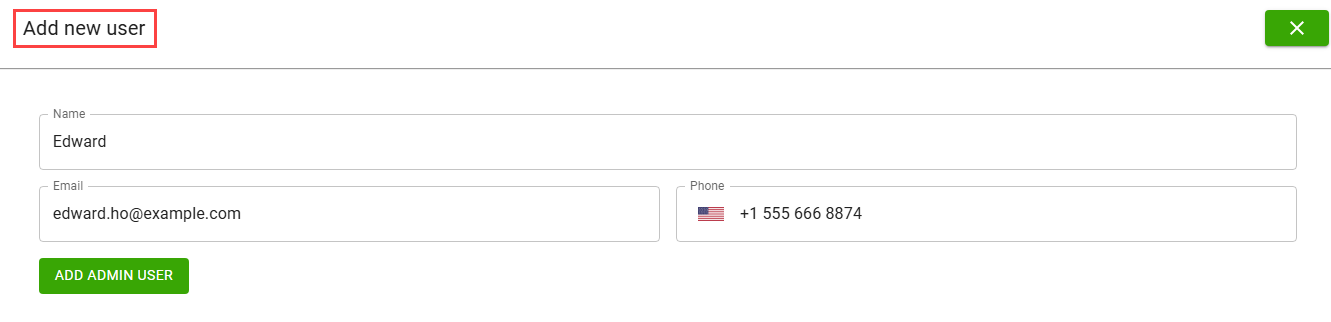
On the User management page, select the ADD ADMIN USER button.
The Add new user window opens.
-
Enter the required information in the following fields:
Field Description Name Enter the name of the admin user. Email Enter the email address where the admin user receives login instructions. Phone Enter the contact number of the admin user. -
Select ADD ADMIN USER.
A notification confirms that the user is created successfully.
The new admin user receives an email with a link to set up their password and gain access to the portal.
Admin users can be edited or deleted in the same way as regular user accounts. For more information, see Edit user configuration.
In Business Central, the E-Commerce User Email field value displays the email address of the authenticated e-commerce user who created the document. This field value is automatically populated during document creation and retained through conversions from quotes to orders and from orders to posted invoices.
You can view this field on the following pages:
- Sales Orders
- Sales Order
- Posted Sales Invoices
- Posted Sales Invoice
Import e-commerce users from a CSV file
To import users using a CSV file, follow these steps:
-
On the User management page, select IMPORT USERS.
The Import Users window opens.
-
Select the Choose File button to upload a CSV file to generate e-commerce user records. The CSV file should include the following columns in order:
- Customer number
- Contact number
- Name
- Email address
- Phone number (format: +<country code><phone number>)
-
In the Number of Header Rows field, use the (–) and (+) buttons to set how many header rows to skip from the CSV file while processing the user record.
If your CSV file includes headers (for example, column titles), enter the number of rows to skip in the Number of Header Rows field value before uploading.
-
Select UPLOAD AND REVIEW.
The system displays an error message if the file format or data is incorrect.
After a successful upload, the Review Import page opens, displaying the following information:
- Confirmation that the file was processed successfully.
- The total number of contacts to import.
- A preview of the contact records to be imported.
-
Select Yes to finish the import.
Subsequently, user accounts are created for all valid records, and a password reset email is sent to each user.
-
Select Cancel to cancel the import process.
- Rows with missing or invalid customer number or contact number are skipped.
- Duplicate users (based on existing email addresses) are not imported.
- Blank lines and header rows (based on the number specified) are ignored.