Create a vendor
Overview
This guide explains creating, adding, and updating vendor information on the Vendor Card page.
Prerequisites
Before creating a vendor, ensure to set up the following configurations in your system:
- Vendor numbering
- 1099 codes in the US systems
- Vendor templates
- Posting groups
- Payment terms and payment types
Create a vendor
-
Select the Search icon
 , enter Vendors, and then choose the related link.
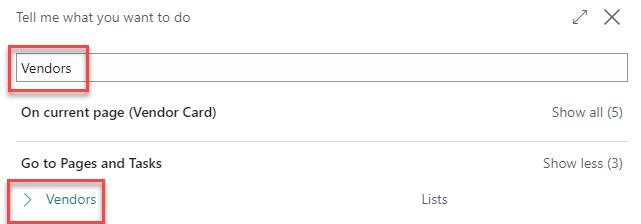
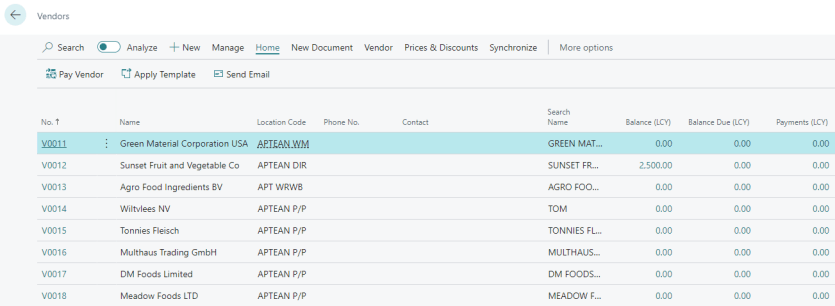
The Vendors list page opens.
-
On the action bar, select New.
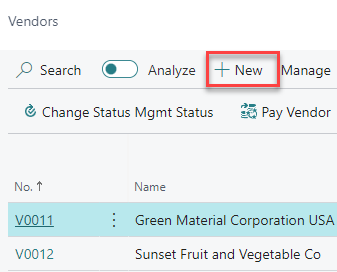
You can also use the vendor template created on the Vendor Templates page.
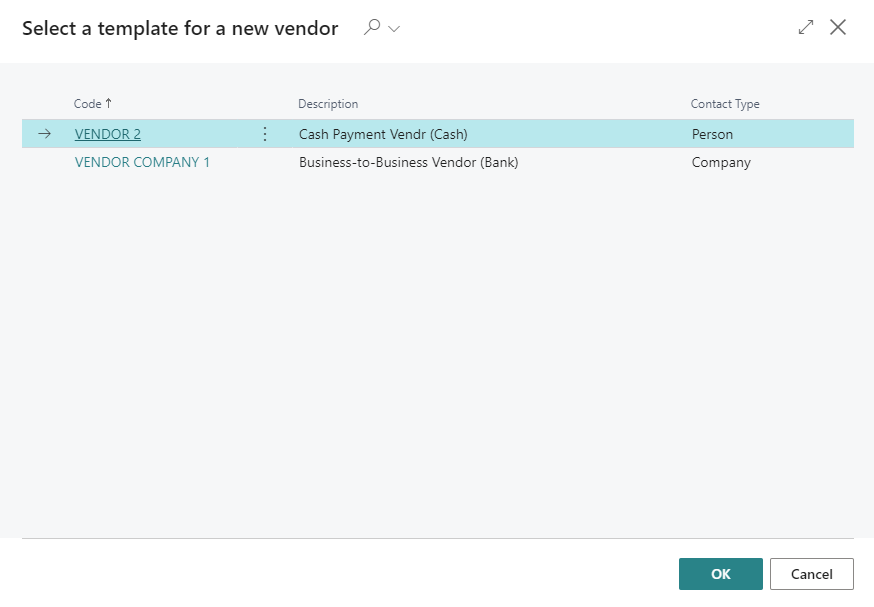
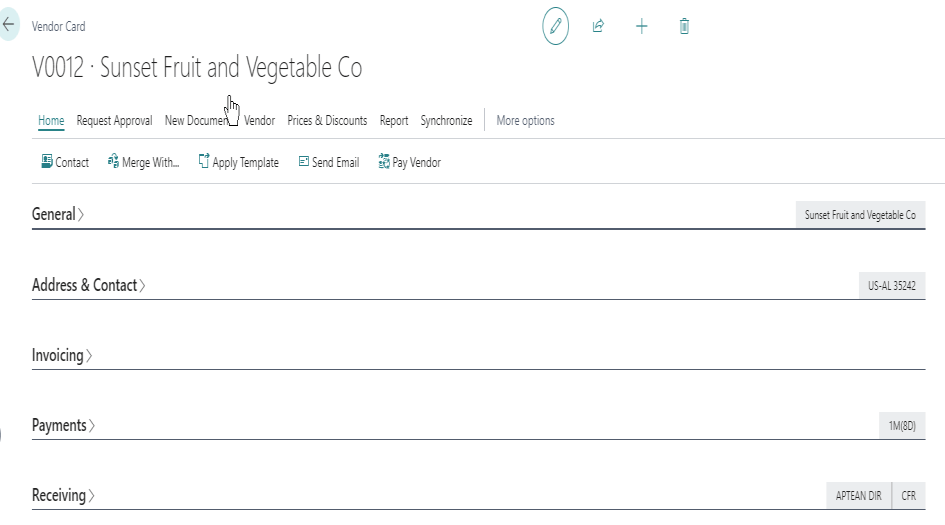
A new Vendor Card page opens.
-
On the General FastTab, select/enter the information in the following fields:
- No. - Select the number series for the Vendor Card. This field is either filled automatically from the number series, or you can enter the number manually if you have enabled manual number entry on the No. Series page.
- Name - Enter the name of the legal entity.
- Blocked - Provides you with the option to restrict the transaction with the vendor that cannot be processed. If payment must be blocked, select Payment. If all transactions must be blocked, select All. You can also choose to leave the field blank.
- Privacy Blocked (Toggle) - Turn on to limit access to data for the data subject during daily operations. Especially when protecting data from changes while it is under privacy review.
- Last Date Modified - Indicates the date of the most recent modification made to the vendor card.
- Balance (LCY) - Indicates the cumulative value of your finalized purchases from the vendor within the current fiscal year. This calculation is derived from amounts that exclude VAT on all completed purchase invoices and credit memos. By clicking this flow field value, the Vendor Ledger Entries page opens.
- Balance (LCY) As Customer - Indicates the outstanding balance owed by the customer, particularly pertinent in cases where the customer also serves as a vendor. This amount is derived from the netting of their payable and receivable balances.
- Balance Due (LCY) - Indicates the cumulative sum of outstanding payments for your purchases from the vendor within the current fiscal year. This calculation is derived from amounts that exclude taxes on all open purchase invoices and credit memos.
- Document Sending Profile - Select your preferred method of sending documents to a specific vendor. By doing so, you can avoid having to manually choose a sending option every time you post and send a document to that vendor. The selected Document Sending Profile will be used for all documents sent to that vendor and will take precedence over the default document-sending profile.
- Search Name - Enter an alternative name that can be used to search the record.
- IC Partner Code - Select the vendor’s Intercompany Partner Code.
- Purchase Code - Select the salesperson or purchaser accountable for handling purchases from the designated vendor.
- Responsibility Center - Select the code of the responsibility center, like a distribution hub, linked to the relevant user, company, or vendor.
- Disable Search by Name (Toggle) - Turn on to modify the vendor’s name within a document without affecting the search functionality. This will not impact the ability to locate or retrieve vendor information through searches.
- Company Size Code - Select the size of the vendor’s company.
- Lot No. Element - Enter the code of the vendor, limited to four characters, that can be presented as an integral part of a lot number when configured through Lot No. Profiles.
-
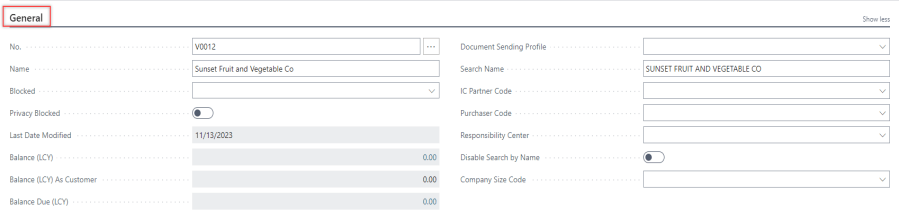
On the Address & Contact FastTab, select/enter the information in the following fields:
- Address - Enter the registered address of the vendor.
- Address 2 - Enter the additional address information of the vendor.
- Country/Region Code - Select the relevant country/region code of the address.
- City - Select the city of the vendor. You can also create a new entry by specifying the postal code associated with a city.
- State - Enter the state of the vendor.
- Zip Code - The associated postcode is auto-populated based on the selected city.
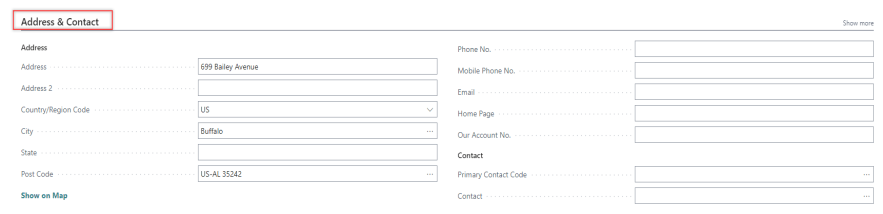
- Phone No. - Enter the telephone number of the vendor.
- Mobile Phone No. - Enter the mobile number of the vendor.
- Email - Enter the email address of the vendor or sales department.
- Fax No. - Enter the fax number of the vendor.
- Home Page - Enter the website address of the vendor.
- Our Account No. - Enter the account number of the vendor.
- Language Code - Select the language used to translate text on documents for foreign business partners, such as item descriptions on order confirmations.
- Format Region - Select the region formats for printouts related to the vendor.
- Primary Contact Code - Select the primary contact code, which includes the company and contact details of the vendor.
- Contact - Enter the name of the contact associated with the company. It is recommended to have a contact from the sales department.
-
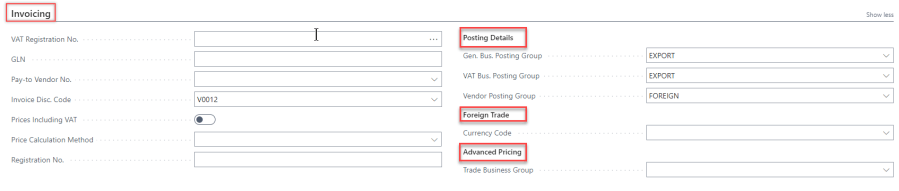
On the Invoicing FastTab, select/enter the information in the following fields:
-
TAX Registration No. - Select the vendor’s VAT registration number.
-
GLN - Enter the vendor in relation to receiving electronic documents.
-
Tax Liable - If non-liability has not been pre-established, set this value to indicate that taxation applies to purchases from this vendor.
-
Tax Area Code - Select the appropriate payable tax if you have turned on the Tax Liable toggle.
-
Vendor No. - Select the vendor number to whom you make payments for products delivered by the vendor listed on the Vendor Card. Ensure to create the pay-to vendor card in the same manner as any other vendor.
-
Invoice Disc. Code - Select the invoice discount code for the vendor. When configuring a new vendor card, the system automatically inserts the number entered in the No. field.
-
Bank Communication - Select the language for the check image.
-
Price Calculation Method - Select the default price calculation method. It determines if the vendor will use the Aptean Advanced Pricing extension logic or Business Central’s low price standard pricing. If any of the vendor’s documents are subject to trade plans from the Aptean Trade Management extension, Advanced Pricing must be used.
This field is visible only when the Aptean Advanced Pricing extension is installed.
- Registration No. - Enter vendor’s registration number, allowing entry of up to 20 characters comprising both numbers and letters.
- Posting Details
- Gen Bus Posting Group - Select the relevant posting group, such as selecting US for vendors based in the USA. It is the vendor’s trade type used to link transactions made for this vendor with the corresponding general ledger account based on the general posting setup.
- Vendor Posting Group - Select the relevant posting group to determine the AP account. Moreover, this field allows for the breakdown, analysis, and categorization of vendors, even though the options are consistently linked to the same AP account.
- Foreign Trade
- Currency Code - Select the default currency code inserted when creating purchase documents or journal lines for the vendor.
- Advanced Pricing
-
Trade Business Group - Select the trade business group linked to this vendor. This setting applies exclusively in a purchase document when utilizing the Advanced Pricing price calculation method.
-
This field is visible only when the Aptean Trade Management extension is installed.
-
-
On the Payments FastTab, select/enter the information in the following fields:
-
Prepayment % - Enter a prepayment percentage for all orders with this vendor, irrespective of the items or services listed on the order lines.
-
Application Method - Select the method of applying payments to entries for this vendor. It is recommended to choose the Manual option.
-
Payment Terms Code - Select a formula for calculating the payment due date, payment discount date, and payment discount amount.
-
Payment Method Code - Select the payment method, whether through bank transfer, cash, or check. Although the payment method table is commonly utilized for reference, it also links to G/L Balancing accounts.
-
Priority - Enter the priority of the vendor when suggesting payments through the Suggest Vendor Payments function.
-
Block Payment Tolerance (Toggle) - Specifies whether the vendor permits payment tolerance. It is applicable only if you have established global payment tolerances in the Finance Setup and intend to exclude this vendor from such tolerances.
-
Preferred Bank Account Code - Select the default vendor bank account for payment journal lines when exporting to a payment bank file.
-
Partner Type - Select the type of partner. It determines whether the vendor is an individual or a company.
-
Intrastat Partner Type - Provides you with the option to specify whether the vendor is an individual or a company for Intrastat reporting.
-
Cash Flow Payment Terms Code - Select a payment term utilized in the calculation of cash flow.
-
IRS 1099 Code - Select the suitable alpha-numeric code for payments made to US Consultants.
-
FATCA Filing Requirement (Toggle) - Specifies whether the vendor is configured to necessitate FATCA filing.
-
Federal ID No. - Enter the Taxpayer Identification Number (TIN) assigned to the vendor by the tax authorities.
-
Tax Identification Type - Select the customer’s tax identification type used for tax reporting, which depends on the classification of the customer as either a company or an individual.
-
Creditor No. - Enter the vendor number.
-
Check Date Format - Select the format for the date on the printed check image for this bank account.
-
Check Date Spectator - Select the character used to separate the Month, Day, and Year in the date printed on the check image.
-
Exclude from Payment Practices (Toggle) - Specifies the exclusion of the vendor from payment practice calculations.
-
Grower Accounting
-
Accounting Method - Select one of the accounting methods: Grade Out, Pack Out, Account Sale, Pooling, or blank for the vendor. The method chosen will be applied to the purchase orders of the vendor.
-
Default Cost Template - Select the cost template to apply to this vendor by default. A cost template represents a set of costs to include in an account sale type settlement or can be compared to a grower contract.
-
Settlement Grouping Type - Select whether the vendor will settle purchase orders in a single grouped settlement or settle each purchase order individually.
-
Invoice Grouping Type - Select whether the settlement will generate one invoice per vendor or one invoice per source document.
These fields are visible only when the Aptean Grower Return extension is installed and should be used only if the vendor is involved in grower settlements.
-

-
-
On the Receiving FastTab, select/enter the information in the following fields:
- Location Code - Select the default warehouse location for receiving items from the vendor. It is the primary receiving location. If multiple locations are employed for receiving, leave this field empty.
- Shipment Method Code - Select the delivery conditions for the associated shipment, such as Free On Board (FOB).
- Shipping Agent Code - Select the code for the shipping agent responsible for transporting the items.
- Lead Time Calculation - Enter the date formula for determining the replenishment lead time for the item.
- Base Calendar Code - Select a customized calendar for delivery planning, incorporating the working days and holidays of the vendor.
- Customized Calendar - Indicates whether you have established a personalized calendar for the vendor.
- Underdelivery Allowed (Toggle) - Specifies whether underdelivery is permitted for this vendor, and the allowed percentage of underdelivery is determined on a per-item basis.
- Overdelivery Allowed (Toggle) - Specifies whether Overdelivery is permitted for this vendor, and the allowed percentage of Overdelivery is determined on a per-item basis.
- Over-Receipt Code - Select the policy applied to the vendor when receiving more items than originally ordered.
The Underdelivery Allowed, Overdelivery Allowed toggles and the Over-Receipt Code field are part of the Aptean Over and Under Delivery extension.
- Logistical Time - Enter the expected time for the availability of items in the warehouse.

The vendor record has been created.