Quality Control Setup and Monitoring - Setup
In the setup which is available in the ‘Quality Control Setup and Monitoring’ app, you can configure all the basic data needed for a quality check, such as quality teams, warehouses, equipment, and units of measure.
General Overview
The following steps are involved in the Quality Control setup.
- Set up Quality Control in Business Central
- Assign the item, customer and vendor attributes code which you want to use in the setup of the quality triggers. This is not a mandatory step.
- Assign the quality check number series: Do not make this number too long due to the limited space of the QC number in the app.
- Assign a Job queue category for
- Creating recurring quality checks in shop floor production based on elapsed time or posted output quantity.
- Creating real-time quality checks in shop floor production which is done when:
- Starting/stopping a work center
- Starting/stopping a production order
- Starting after a failure
- Enable the Dataverse integration in Business Central
- Check if Job Queues are running
The job queues and their purposes are described as follows:
| Job Queue | Purpose |
|---|---|
| Codeunit 5339-CDSWAREHOUSEFDW | Synchronizing locations from Business Central to Dataverse to setup the Team Assignment |
| Codeunit 5339-CDSWORKCENTERFDW | Synchronizing locations from Business Central to Dataverse to setup the Team Assignment |
| Codeunit 5339-CDSQUALITYPLANFDW | Synchronizing Quality Plans from Dataverse to Business Central |
| Codeunit 5339-CDSQUALITYCHECKLINEA | Synchronizing Quality Line Attachments from Dataverse to Business Central |
| Codeunit 5339- CDSQUALITYCECKUSERF | Synchronizing Quality Control users from Dataverse to Business Central |
| Codeunit 70219393-CreateQualityCheckJQFDW | Create and synchronize Quality Checks from Business Central to Dataverse and sync results back to Business Central |
| Codeunit 70234069-SFPCreateQualityCheckJQFDW | Required when you want to use recurring Quality Checks in production in Shop Floor Production |
- Set up the Quality Control app (Power Apps, Aptean Quality Setup and Monitoring for Food and Beverage)
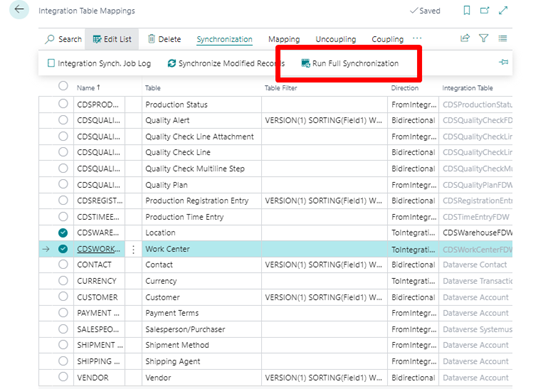
- Check in Quality Control app if work centers and locations are synchronized from Business Central. You can force this from Business Central through Dataverse setup by navigating to related Integration Table mappings:
- Create master data for Quality Checks
- Equipment (optional)
- Unit of Measures
- Options
- Measurements and Multi Measurements
- Create quality plans with the created master data
- Change the quality plan to certified
- Synchronize the quality plan to Business Central. This will be done by a job queue which is running every 60 minutes. Change this interval if required. You can also do this manually from the Integration Table Mapping in BC.
- Create quality triggers in Business Central and link the appropriate quality plan.
- Create in the Power Apps, Aptean Quality Setup and Monitoring, the Quality Teams:
- Create a Quality Team and Assign users to this Quality Team.
- Create the Team Assignment: A Quality Check will be automatically assigned to a team based on the Check Point in the Quality Plan (= Type of check, e.g. inbound check) and the location (warehouse) of the goods.
Next to the locations, you also can use work centers in the Team Assignment. This is used when quality checks are created from Aptean Shop Floor Production extension.
- Check in Quality Control app if work centers and locations are synchronized from Business Central. You can force this from Business Central through Dataverse setup by navigating to related Integration Table mappings:
If you have multiple companies on Business Central, you must setup the Team Assignment per company.
Quality Control Users
Quality control users refer to users who can register a quality check or an action plan.
- Select the Search icon
 , enter Quality Control Users, and then choose the related link.
 - Fill in the Office365 User field.
The Quality Control User is now set up.
If the user is not set up, you will see the following error in PowerApps: No valid license found for email address: [email protected].
Quality Teams
A quality team is a group of users who can register a quality check or an action plan. This quality team is linked to a quality plan via a check point or to an action plan line. A quality team can be set up with Office 365 users. It is possible to assign a user to multiple quality teams.
- Select the Search icon , enter Quality Teams, and then choose the related link.
- On the action bar, click New.
- Enter Name.
- On the action bar, click Save. Alternatively, press CTRL+S to save the entry. After saving, it is possible to add users to the quality team.
- On the action bar, click Add Existing User.
- Enter a name and select an option from the list. Only existing office 365 users can be selected.
- Click Add.
A quality team is now set up. For linking quality teams in a quality check, the quality team must be linked to a check point via a team assignment. See Team Assignments for more information.
Equipments
Pieces of equipment are the necessary tools for measurement, such as a thermometer or a scale. The equipment must be linked to a measurement to use in a quality check. This is purely for information in the quality check. It is possible to add a serial number to the equipment.
- Select the Search icon , enter Equipment, and then choose the related link.
- On the action bar, click New.
- Enter Name.
- Enter Serial Number.
- On the action bar, click Save. Alternatively, press CTRL+S to save the entry.
A piece of equipment is now set up and can be linked to a measurement.
Units of Measure
Units of measure are used for clarifying the measured values. The unit of measure can be linked to a measurement when setting up the measurement later on.
- Click on the item Units of Measure.
- Click on the menu item New.
- Enter Name. This name is displayed in the Quality Check app beside the measured value, so it is suggested to use, for instance, °F instead of ‘Fahrenheit.’
- On the action bar, click Save. Alternatively, press CTRL+S to save the entry.
A Unit of Measure is now set up and can be linked to a measurement.
Warehouses
A warehouse indicates where the measurement is being carried out. A warehouse must be linked to a team assignment in order to use it for a quality check. The warehouses created in Dynamics 365 Business Central are sent with the Dataverse connection to Microsoft Dataverse. These warehouses are shown for each company, so it is possible to link them to a team assignment.
- Select the Search icon , enter Warehouses, and then choose the related link.
All warehouses available on Business Central are shown for each company and can be linked to a team assignment.
Work Centers
When executing a quality check for production, it is possible to add work centers where the measurement is being carried out. A work center must be linked to a team assignment in order to use it for a quality check. The work centers created in Dynamics 365 Business Central are sent with the Dataverse connection to Microsoft Dataverse. These work centers are shown for each company, so it is possible to link them to a team assignment.
- Select the Search icon , enter Work Centers, and then choose the related link.
All work centers available on Business Central are shown for each company and can be linked to a team assignment.
Check Points
A checkpoint describes the type of quality check that must be performed, such as RECEIPT or PRODUCTION. A checkpoint needs to be linked to a quality plan. The checkpoint, in combination with the location and/or warehouse, is used to assign the quality check to a specific quality team.
- Select the Search icon ,,enter Check Points, and then choose the related link.
- On the action bar, click New.
- Enter Name.
- On the action bar, click Save. Alternatively, press CTRL+S to save the entry.
A check point is now set up and can be linked to a team, warehouse, or work center through a team assignment.
Team Assignments
With the team assignment, it is possible to link a quality team to a checkpoint, warehouse and/or work center.
- Select the Search icon , enter Team Assignments, and then choose the related link.
- On the action bar, click New.
- Select Quality Team.
- Select Warehouse.
- Select Check Point.
- If applicable, select Work Center.
- On the action bar, click Save. Alternatively, press CTRL+S to save the entry.
A team assignment is now set up.
Options
In the setup for ‘options,’ it is possible to create different options (for example, ‘Color Banana’). These options can have several option values (for example: ‘Yellow, ‘Brown’ and ‘Green’). A sequence needs to be attached to an option value (for example, Green=1, Yellow=2, Brown=3). It is important to know that the sequence is set up so that the lower limit warning is linked to the lowest value in the sequence, and the highest limit warning is linked to the highest value in the sequence. The options can be chosen if a measurement is of the measurement type ‘Option.’
- Select the Search icon , enter Options, and then choose the related link.
- On the action bar, click New.
- Enter Name.
- On the action bar, click Save. Alternatively, press CTRL+S to save the entry.
- On the action bar, click Add New Option Value.
- Enter Value.
- Enter Sequence. The option values are sorted by sequence. It is possible to have multiple option values with the same sequence.
- On the action bar, click Save & Close.
- Repeat these last steps to add as many option values as desired to the option.
An option value is now set up and can be used for measurement.
Languages
It is possible to select a language in the Quality control apps. The languages and translations first need to be set up in the Setup and Monitoring app.
- Select the Search icon , enter Languages, and then choose the related link.
The Languages list page opens. - On the action bar, click New.
- Enter LanguageCode. It is important that the LanguageCode is the two-character abbreviation for the language.
- Enter Description.
- Enter Windows Language ID. The Windows Language ID can also be included in the languages. This is the ID that is defined in Microsoft Dynamics 365 Business Central. This code is used to translate the data in the App that originates from Dynamics 365 Business Central, such as Item description. It is important that this translation is included in Dynamics 365 Business Central.
- On the action bar, click Save. Alternatively, press CTRL+S to save the entry.
The language is now set up and can now be selected in the Quality Control apps.
The date and time format fields on the Quality Control Power App change according to the selected language. The table below shows the languages and their respective date and time formats.
| Language Code | Language Name | Date Format | Date-Time Format |
|---|---|---|---|
| da-DK | Danish (Denmark) | dd-mm-yy | dd-mm-yy HH |
| de-DE | German (Germany) | dd.mm.yy | dd.mm.yy HH |
| en-US | English (United States) | mm/dd/yy | mm/dd/yy hh tt |
| en-AU | English (Australia) | dd/mm/yy | dd/mm/yy h |
| en-CA | English (Canada) | yy-mm-dd | yy-mm-dd h |
| en-GB | English (Great Britain) | mm/dd/yy | mm/dd/yy h |
| en-NZ | English (New Zealand) | yy/mm/dd | yy/mm/dd h |
| es-ES | Spanish (Spain) | dd/mm/yy | dd/mm/yy h |
| fr-FR | French (France) | dd/mm/yy | dd/mm/yy HH |
| fr-BE | French (Belgium) | dd-mm-yy | dd-mm-yy HH |
| fr-CA | French (Canada) | yy-mm-dd | yy-mm-dd HH |
| nl-NL | Dutch (Netherlands) | dd-mm-yy | dd-mm-yy HH |
| nl-BE | Dutch (Belgium) | dd/mm/yy | dd/mm/yy H |
App Settings
When there are multiple apps available that need to be linked to the Quality Control apps, for example, when opening the Aptean Quality Action Plans app from the Aptean Quality Control for Food and Beverage app, it is necessary to add the App ID. The following App IDs are available right now:

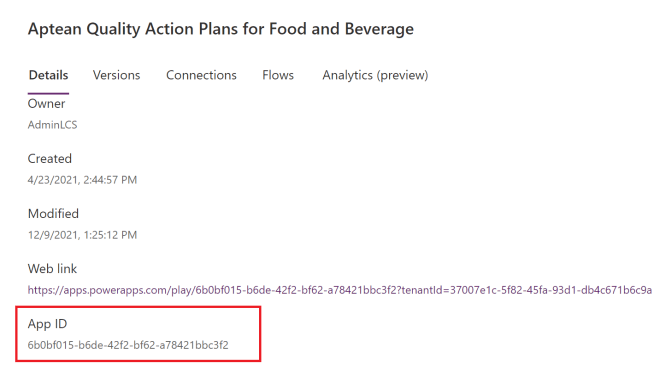
The App ID can be found on the details page of the app.
- Select the Search icon , enter App settings, and then choose the related link.
- On the action bar, click New.
- Enter App Name.
- Enter App ID.
- On the action bar, click Save & Close.
The app ID is now setup for linking between apps.
When selecting the app deeplinks, such as Quality Checks, an error message may display.
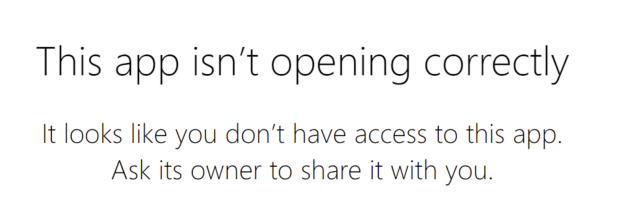
This error message will show when the App Settings are incomplete or incorrect.
-
Check if the App Name and App ID has been entered correctly.
-
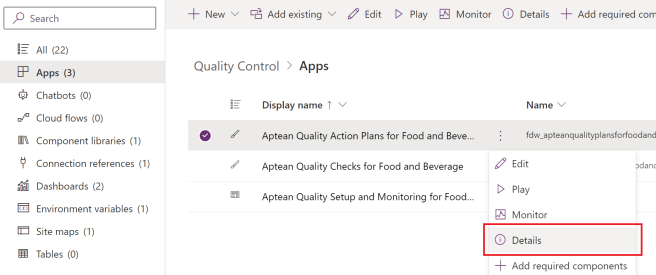
To view and copy the correct app ID, follow these steps.