Production Order Scheduling functions
The Production Order Scheduling page makes it possible to move the production orders and see the direct impact on the production plan. It will show, for example, if there are any overlapping issues and if all production orders fit in one day. The direct relations to the sales order and their due date can be viewed. It is also possible to use item attributes to ease sorting production orders. For more information about the fields on the page, see Production Order Scheduling.
- Select the Search icon
 , enter Production Order Scheduling, and then choose the related link.
The Production Order Scheduling page opens. - Select the
 icon to expand the FactBox pane.
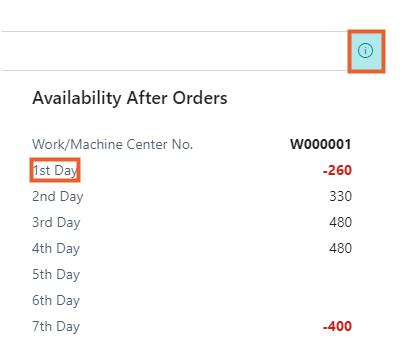
The FactBox on the Production Order Scheduling page shows the Availability After Orders and Simultaneous Users. The Availability After Orders FactBox shows how much capacity is left (on the selected work center or machine center) when the capacity needed for the planned operations is reduced from the total capacity. The Simultaneous Users FactBox shows which users are simultaneously planning Production Order Routing lines on the same work center or machine center. It's useful when multiple users are working on the page at the same time.
The 1st Day represents the entered start date in the date filter of the page. It shows the workload (overload and underload) of the selected Work Center/Machine Center. Based on this insight, the assigned workload can be moved to another starting date or another Work Center/Machine Center.
Automated Scheduling
The function Automated Scheduling changes the sequence of the production orders based on the setup of the Production Scheduling Attributes. The Production Scheduling Attributes can be set up to achieve a specific sequence of production routing lines. For more information on this setup, see Production Scheduling Setup.
When changing the sequence of the execution of the production order routing lines, various checks exist regarding Scheduling Flexibility. The function won't change the Start Date/Time for Production Order Routing lines that have Scheduling Flexibility Fixed or Locked (these lines will be skipped). When using the function for a Production Order Routing line with Scheduling Flexibility Restricted, the Start Date/Time is only changed if the reservation entries do not conflict with the new Start Date/Time.
- Navigate to the Production Order Scheduling page.
- On the action bar, select More options > Actions > Scheduling > Automated Scheduling.
- In the Schedule per field, select Day or Week per Work Center/Machine Center.
- Schedule per Day: Orders are sorted per day based on the linked Production Scheduling Attributes.
- Schedule per Week: Orders are sorted per week based on the linked Production Scheduling Attributes.
Only the production order within the function's date filter is adjusted.
- Select the Open the date picker field.
- Select a date in the calendar.
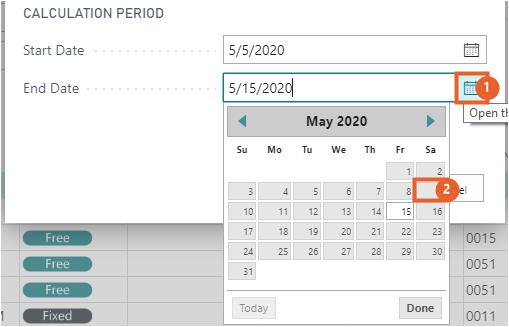
- Select OK.
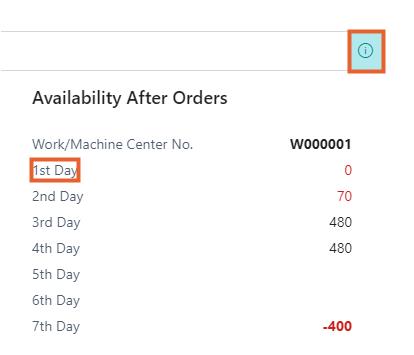
- Select the icon to expand the FactBox pane. The Availability After Orders for the 1st Day is now zero, which means that there is no overload for this Work Center anymore.
The function takes the specified working days and hours, shifts, holidays, and absences of the Shop Calendar of the Work Center/Machine Center into account according to its defined efficiency and capacity values.
The function Automated Scheduling has sorted the Production Order Routing lines based on the hierarchy of the Production Scheduling Attributes.
Automated Scheduling with Scheduled Downtime
The downtime is appropriately added to the production schedule based on the downtime scheduling matrices.
After performing the Automated Scheduling action for the desired Work Center or Machine Center,
- The system will sort all linked production routing lines based on the linked Production Order Scheduling attribute values.
- The Starting Date-Time is automatically set equal to the Ending Date-Time of the previously sorted production routing line.
- If the defined Production Scheduling Attribute value differs from the previous line for any of the five possible Production Scheduling attributes, an extra production downtime order is inserted. This occurs when the Downtime Duration is set up on the Downtime Scheduling Matrices page.
- Confirm that the run time of the Production Downtime Order is equal to the assigned Downtime Duration of the selected Downtime Scheduling Matrices line.
The system ensures that available capacity on the start day of the week is considered during the automated scheduling and not skipped unnecessarily.
The outcome of performing this action may vary depending on the following scenarios:
Scenario 1: Include Downtime for multiple Production Scheduling Attribute changes.
The system incorporates downtime consideration when multiple production scheduling attribute changes occur, utilizing the rebuild time specified on the Downtime Scheduling Matrices.
If multiple Production Scheduling Attribute values differ from the previous line after performing the Automated Scheduling action, then it is necessary to create a production downtime order. This order will use the Production Downtime Item and the associated downtime with the biggest scheduled downtime value.
Scenario 2: Include Downtime when switching between individual items.
On the Downtime Scheduling Matrices page, you can configure rebuild time to switch between individual items.
Now, the downtime is added as per the downtime scheduling matrix.
If two production routing lines that are sorted in a row have different scheduling attribute values and both of these lines use different item numbers that also have scheduled downtime set up on the Scheduled Downtime Matrices, then the biggest scheduled downtime is used.
Scenario 3: Execution of Automated Scheduling multiple times.
You can also perform the Automated Scheduling action multiple times for the same period, whether a day or a week.
After performing the action, if the downtime duration is the same between attributes and items, the production orders created for the downtime, known as the Production Downtime Orders, are marked with the Scheduled Downtime checkbox selected.
When you execute the Automated Scheduling action multiple times for the same period, such as in the case of scheduling for a week, the new production orders are added after the first execution. When you rerun the Automated Scheduling action to integrate these new orders, the initial Scheduled Downtime Orders are deleted, and new downtime orders are created to reflect the changes accurately.
Scenario 4: Time taken in the Downtime Scheduling Matrix is the same between attributes or between attributes and items.
When you perform the Automated Scheduling action, the system considers the downtime scheduling, where the downtime duration can be the same between attributes or attributes and items.
In a production order where multiple attributes are changing, and the order has a Downtime Scheduling Matrix with the same Downtime Duration, but the Production Downtime Item used is different, the system will refer to the hierarchy and select the Downtime Item with the highest hierarchy. If both attributes and items are changing in the production order, the system will give priority to the item change over the attribute change. To know more about hierarchy, see Setup Production Scheduling Attributes.
Manual Scheduling
The Manual Scheduling action can be used to change the Start and End Date/Time of one or more Production Order Routing lines by placing it directly before or after another Production Order Routing line. Manually changing the sequence will cause the rest of the Production Order Routing lines within the date filter of the function to be rescheduled.
- Select one or more Production Order Routing lines.
- On the action bar, select More options > Actions > Scheduling > Manual Scheduling.
- The Number of Selected Lines field shows how many Production Order Routing Lines are selected.
- The Total Needed Capacity field cumulates the Needed Capacity of the selected lines.
The selected lines can be placed directly before or after another Production Order Routing line. - Select the Move Selection field.
- Select the item After in the list.
The Start and End Date/Time of all the Production Order Routing lines that fall between the Start Date and End Date filter will be automatically changed due to executing the function. They are rescheduled per day or week, depending on the setup of the Work Center/Machine Center. The Start Date/Time of the lines are rescheduled but keep the same chronological order. The Start Date/Time of Production Orders with Scheduling Flexibility Fixed or Locked will not change. The Start Date/Time of Production Orders with Scheduling Flexibility Restricted will only change if the new Start Date/Time does not conflict with the reservation entries. - Select the Open the date picker field.
- Select a date in the calendar.
- Select the Production Order Routing line where the previously selected Production Order Routing lines should be placed after.
- Select OK.
The Production Order Routing lines that fell between the Start Date and End Date filter of the function Manual Scheduling are now rescheduled per day or week, based on the setup Schedule per field on the Work Center/Machine Center page.
You can also perform the Manual Scheduling action to create the new downtime order as per the Downtime Scheduling Matrices setup, which deletes the previously created downtime orders. To know more about Hierarchy, see Setup Production Scheduling Attributes.
Manual Move
The Manual Move action can be used to change the start date and/or time of a Production Order Routing line to solve for example a planning conflict. The function won't change the Start Date/Time for Production Order Routing lines that have Scheduling Flexibility Fixed or Locked. When using the function for a Production Order Routing line with Scheduling Flexibility Restricted, the Start Date/Time is only changed if the reservation entries do not conflict with the new Start Date/Time.
- Select one or more Production Order Routing lines.
- On the action bar, select More options > Actions > Scheduling > Manual Move.
- In the Starting Time field, enter the value.
- Select OK.
- The Starting Date-Time of the selected Production Order Routing Line has changed to 1/11/2020 9:40 AM, which was selected during the Manual Move. Note that if there were already one or more other Production Order Routing lines planned during (a part of) this time period, those lines are not affected.
If multiple lines were selected when using the Manual Move function, the Production Order Routing line that had the first Start Date/Time will change to the entered starting date/time. The second, third, and subsequent Production Order Routing lines are then placed chronologically after the first one. If the starting time is blank, the system will plan the production order on the assigned starting date and the first available time according to the calendar.
Change Scheduling Flexibility
One or more production orders within a given timeframe can be ‘Locked’ to ensure that the production order routing line can't be moved anymore when using the function Automated Scheduling, Manual Scheduling or Manual Move. This can be done by changing the Scheduling Flexibility to Locked. It is also possible to ‘Unlock’ a production order or a set of production orders to make it possible to move these production orders again. For more information about Scheduling Flexibility, see paragraph Icon Setup in the chapter Production Preparation and Scheduling Setup.
When changing the Scheduling Flexibility to Locked, it will automatically change the Planning Flexibility of the Production Order line to None. When changing the Scheduling Flexibility back to Free or Restricted, it will automatically change the Planning Flexibility back to Unlimited.
- Select one or more Production Order Routing lines.
- On the action bar, select More options > Actions > Scheduling > Change Flexibility.
- Select the item Locked.
- Select Yes.
The selected Production Order Routing lines are now changed to Scheduling Flexibility Locked.
A production order routing line with Scheduling Flexibility Fixed cannot be changed to another Scheduling Flexibility since there are already Item Ledger Entries and/or Capacity Ledger Entries for the production order.
Change Status of the Production Order
After scheduling (firm) planned production orders, their status can be changed to Released so the consumption items can be picked and output can be posted. It is possible to adjust the status of multiple production orders simultaneously.
- Select one or more Production Order Routing lines.
- On the action bar, select More options > Actions > Functions > Change Status.
- In the New Status Field, select Released.
- Select Yes.
- In the Status field, select the line with the value Released.
Create Warehouse Pick
A Warehouse Pick can be created directly from the Production Order Scheduling page.
- On the action bar, select More options > Actions. > Warehouse > Warehouse Pick.
- Select OK to create a Warehouse Pick.
Warehouse documents
The Put-Aways, Pick lines, Movement lines and Registered Pick Lines of the Production Order can be opened directly from the page.
- On the action bar, select More options > Related > Warehouse > Put-away/Pick Lines/Movement Lines to view the list of ongoing inventory put-aways, picks, or movements for the order.
- Select Registered Pick Lines to view the list of warehouse picks that have been made for the order.