Consolidated Pick and Consolidated Consumption
Two processes have been added in the extension to consolidate the pick and consumption of production consumption.
The consolidated pick makes it possible to create a movement of selected component items from multiple production orders in one go. With consolidated picking, the user can consolidate production orders and do the consumption picking as one trip through the warehouse instead of picking consumption items for each production order. It must be indicated per item/stock keeping unit whether a consolidated pick from the warehouse bin to the production bin is enabled.
The process of consolidating (grouping) production component lines into one consolidated pick gives the possibility to simplify the picking of goods and perform picking in an efficient way. This is achieved by consolidating several consumption items, within the same warehouse, to be picked together
When using the consolidated pick method, it is necessary to use the consolidated production movement to move items from the warehouse to the production area, as the other functions that can be used in a released production order to move items will skip items that are set up with a consolidated pick method.
This method makes the warehouse employee responsible for correct consumption posting because they need to make sure that at the end of a shift or at the end of a day, the items that are still physically available in the production bin are moved back to the warehouse.
On the other hand, consolidated consumption posting can be useful in hectic production environments where there is no time for shop floor operators to manually post consumption. So a consolidated consumption posting routine is required.
Through consolidated consumption posting, the total bin content of the bin code used in selected production component lines is assigned pro rata to these lines and posted as consumption.
Set up consolidated pick and consolidated consumption
The setup for Consolidated Pick and Consumption exists of the following topics:
- Process Manufacturing Setup
- Item card
- Shop calendar working day
Process manufacturing setup
The Process Manufacturing Setup contains the setup regarding the journal template used during the consolidated consumption and the warehouse worksheet regarding consolidated picking on a WMS location.
- Select the Search icon
 , enter Process Manufacturing Setup and then choose the related link.
The Process Manufacturing Setup page opens. - In the Consolidated Consumption Journal Template field, select an Item Journal Template from the dropdown menu.
In the Consolidated Pick Whse. Worksheet Template field, select a warehouse worksheet template. - In the Scrap Inclusion Mode field, select whether the Scrap % field value should be included in the calculation of the Output Quantity per Batch and Output Quantity per Batch (WU) field on the Production BOM page. The available options are: Exclude and Include.
Item card
It must be indicated per item/stock keeping unit whether consolidated consumption picking and posting is enabled.
- Select the Search icon , enter Items and then choose the related link.
The Items list page opens. - Select the required No.
The Item Card page opens. - On the Replenishment FastTab, in the Component Pick Method field, select Consolidated.
With consolidated component picking, it is possible to consolidate several consumption items for multiple production orders, within the same warehouse, to be picked together. The field can be filled with Consolidated when the Flushing Method field is either Manual or Backward. When the Flushing method is set to Backward, then the Consolidated Consumption toggle cannot be turned on. When setting the Component Pick Method to Consolidated, it is advised to use an Item Tracking Code for the item with the Lot Warehouse Tracking toggle enabled. This will make sure that the bin codes will be considered when calculating the available inventory when the consolidated pick takes place.You can also use the Catch Weight Item in Consolidated Pick on integration of the Aptean Process Manufacturing extension with the Aptean Catch Weight extension. To know more, see here.
- Turn on the Consolidated Consumption toggle to specify that a consolidated consumption posting routine is required. Through consolidated consumption posting, the total bin content of the bin code used in the production component line is assigned pro-rata to these lines and posted as consumption. The toggle can only be enabled when the Component Pick Method field is set up with Consolidated.
Alternatively, these fields can also be set up on the Stockkeeping Unit Card page. -
Turn on the Use Open Shop Floor Bin toggle to assign the Open Shop Floor Bin Code from the Work Center/Machine Center associated with the routing line to the bin code of the production order component line.
Alternatively, this field can also be set up on the Stockkeeping Unit Card page.
When a new Stockkeeping Unit is created for an item, the Use Open Shop Floor Bin toggle within the Stockkeeping Unit Card page is automatically set with the same value as the selected item.
If the routing line is linked with the component line using the Routing Link Code field value, the component line's bin code is inherited from the Open Shop Floor Bin Code of Prod. Order Routing Line.
If the Routing Link Code is empty in the component line, the bin code is inherited from the Open Shop Floor Bin Code from the first Work Center/Machine Center of the Prod. Order Routing line.
When the Open Shop Floor Bin Code field is empty in the Prod. Order Routing line, the following information will be inherited to the bin code field of the component line.Page Field Is blank Bin code inherited from Prod. Order Routing Open Shop Floor Bin Code 🗸 The Open Shop Floor Bin Code from the Location Card page. Location Card Open Shop Floor Bin Code 🗸 The To-Production Bin Code from the Prod. Order Routing. Prod. Order Routing To-Production Bin Code 🗸 The To-Production Bin Code from the Location Card page. When no Prod. Order Routing lines are found, and then the bin code is inherited from the Open Shop Floor Bin Code associated with the selected location. If it is blank, then the bin code is inherited from the To-Production Bin Code.
The system automatically inherits the Use Open Shop Floor Bin, Component Pick Method, Consolidate Consumption, and Default Weight Calculation Type field values on the Item Template page field values are inherited from the associated fields on the Item Card page. Additionally, you can manually select the field values.
Shop calendar working day
To split the inventory that will be used as consolidated consumption for the production orders that belong to a specific work shift, the assigned suffix is added to the bin code in the production order component line when it's used for consolidated consumption posting. The suffix is assigned when the shop calendar working day applies to the first routing line of a production order.
- Select the Search icon , enter Shop Calendars and then choose the related link.
The Shop Calendars page opens. - Navigate to the required calendar.
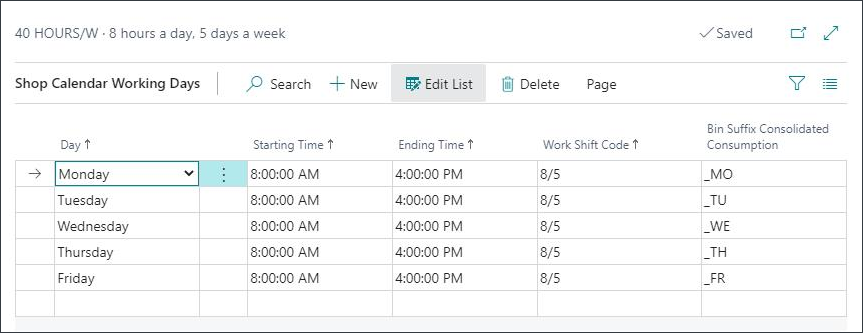
- On the action bar, select More options > Related > Shop Cal. > Working Days.
- In the Bin Suffix Consolidated Consumption field, enter the value. When filling in this field, keep in mind that the bin code, including the bin suffix, can only contain 20 characters. When the setting Consolidated Consumption is enabled on the production order component line, the Bin Code will be replaced with the initial value + the Bin Suffix of the associated Shop Calendar Working Day line.
Enhancements on production order
When refreshing the consumption lines of a production order or manually entering a production component line, the value of the Component Pick Method and Consolidated Consumption fields are inherited from the associated stockkeeping unit (SKU)- or item card of the component item to the production order component line. A distinction is therefore made on the production order component lines between consumption items that should or should not be placed in a consolidated pick/consumption.
Also, when refreshing the routing lines of a production order, the Work Shift Code field is filled on the production order. The work shift code is retrieved by checking the shop calendar working day that is associated with the routing line. The Shop Calendar is selected on the Work Center/ Machine Center card of the first Production Routing line. To decide which work shift code of this shop calendar applies, it is checked which starting date/ time of the first production routing line falls between the Starting time and Ending time of the Shop Calendar Working Day.
- Select the Search icon , enter Released Production Orders and then choose the related link.
The Released Production Orders list page opens. - Select the required No.
The Released Production Order page opens. - On the General FastTab, the Work Shift Code field is automatically filled on the production order header when creating the production routing lines of a production order. This field specifies the work shift that this production order refers to.
The Work Shift Code is retrieved by checking the associated Shop Calendar Working Day line. The associated Shop Calendar Working Day line is the line that is linked to the Shop Calendar set up on the Work Center/ Machine Center of the first Production Routing line. The starting date/ time of this first production routing line must fall between the Starting time and Ending time of the Shop Calendar Working Day.
If the ending date-time of the first production order routing line falls after the end time of the corresponding shop calendar workday, the Exceeds Shop Calendar Working Day field on the production header is automatically enabled.
It is not possible to assign a Shop Calendar Code to a Machine Center. In such a case, the shop calendar of the work center linked to the machine center is used.
This work shift code will be captured in the item ledger entries that are created as a result of an output posting. The Work Shift Code can be changed manually, except when the Status of the Production Order is Finished. When changing the dates on the production line, production header or in the first production order routing line, the work shift code is changed accordingly as well. - On the Lines FastTab, on the action bar, select Line > Routing.
The Prod. Order Routing page opens.
On the Routing Lines page, the first routing line is assigned with Work Center W000001. This determines which Bin Suffix will be added to the production component lines that must be consumed in a consolidated manner.
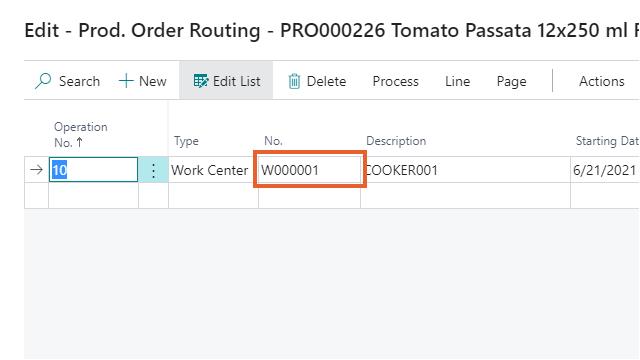
The Shop Calendar Code for the work center W000001 is assigned 40 HOURS/W.
On the Shop Calendar Working Days page for 40 HOURS/W, the Bin Suffixes are assigned with an abbreviation of the particular day.
- Select Close.
- On the Lines FastTab, on the action bar, select Line > Components.
The Prod. Order Components page opens.

Both the Component Pick Method and Consolidated Consumption fields are copied from the production order component line of the item card.
The Bin Codes with the Consolidated Consumption setting enabled are replaced with the composed Bin Code equal to the initial value + the Bin Suffix of the associated Shop Calendar Working Day line. The Bin Code has changed to COOKER001, as this is the To-Production Bin Code set up on the Work Center, and it now also includes the Bin Suffix of the starting day, Monday, so it results in COOKER001_MO.
Integration with shop floor logistics
The Aptean Process Manufacturing extension is integrated with the Aptean Shop Floor Logistics extension. The Shop Floor Activities page from this extension supports the planning in the warehouse and it shows an overview of all outstanding warehouse activities. The consumption of a released production order can contain an outstanding warehouse activity. However, when the released production order only contains prod. component lines that must to be picked in a consolidated manner, this warehouse request won't be shown on the Shop Floor Activities Page as the consumption should be handled with a consolidated pick instead.
Add component items to the line
The component items (with Make-To-Order as Manufacturing Policy) that are linked to the main items (with Make-To-Stock as Manufacturing Policy) are added as secondary lines to a production order as well as on the planning worksheet. When the component items are added to the production order or planning worksheet, the quantity of the component items will be reflective of their demand requirement to the main item with which it is associated.
Pre-requisites
- On the Process Manufacturing Setup page, the MTO Production Depends Only on Components toggle should be enabled.
- On the Item Card page, the Manufacturing Policy field should be set to
- Make-To-Stock for the main item.
- Make-To-Order for the component items.
- On the Item Card page, the Replenishment System field should read Prod. Order for both main and component items.
To add the component items to the production order line
- Select the Search icon , enter Released Production Orders, and then choose the related link.
The Released Production Orders list page opens. - On the action bar, select New.
The Released Production Order page opens. - On the General FastTab,
- In the Source Type field, select the Item from the options.
- In the Source No. field, select the desired No.
- In the Quantity field, enter the value of the quantity.
- On the action bar, select Process > Refresh Production Order.
- Select OK.
You can now see the component items appear as secondary lines on the production order.
To add the component items to the planning worksheet line
- Select the Search icon , enter Planning Worksheets, and then choose the related link.
The Planning Worksheets page opens. - On the action bar, select More options > Actions > Functions and then choose any of the following actions.
- Calculate Net Change Plan
- Other > Calculate Regenerative Plan
- Choose the appropriate parameters on the above pages to calculate the demand.
- Select OK.
The main items are filtered along with the component items in the planning worksheet line based on the filters you choose on the above respective pages.
Consolidated pick
First, the consolidated pick is used to move the items from the warehouse to the production bin. The image below shows schematically how the demanded inventory and available inventory will be calculated. The explanation is given in detail in the image below.
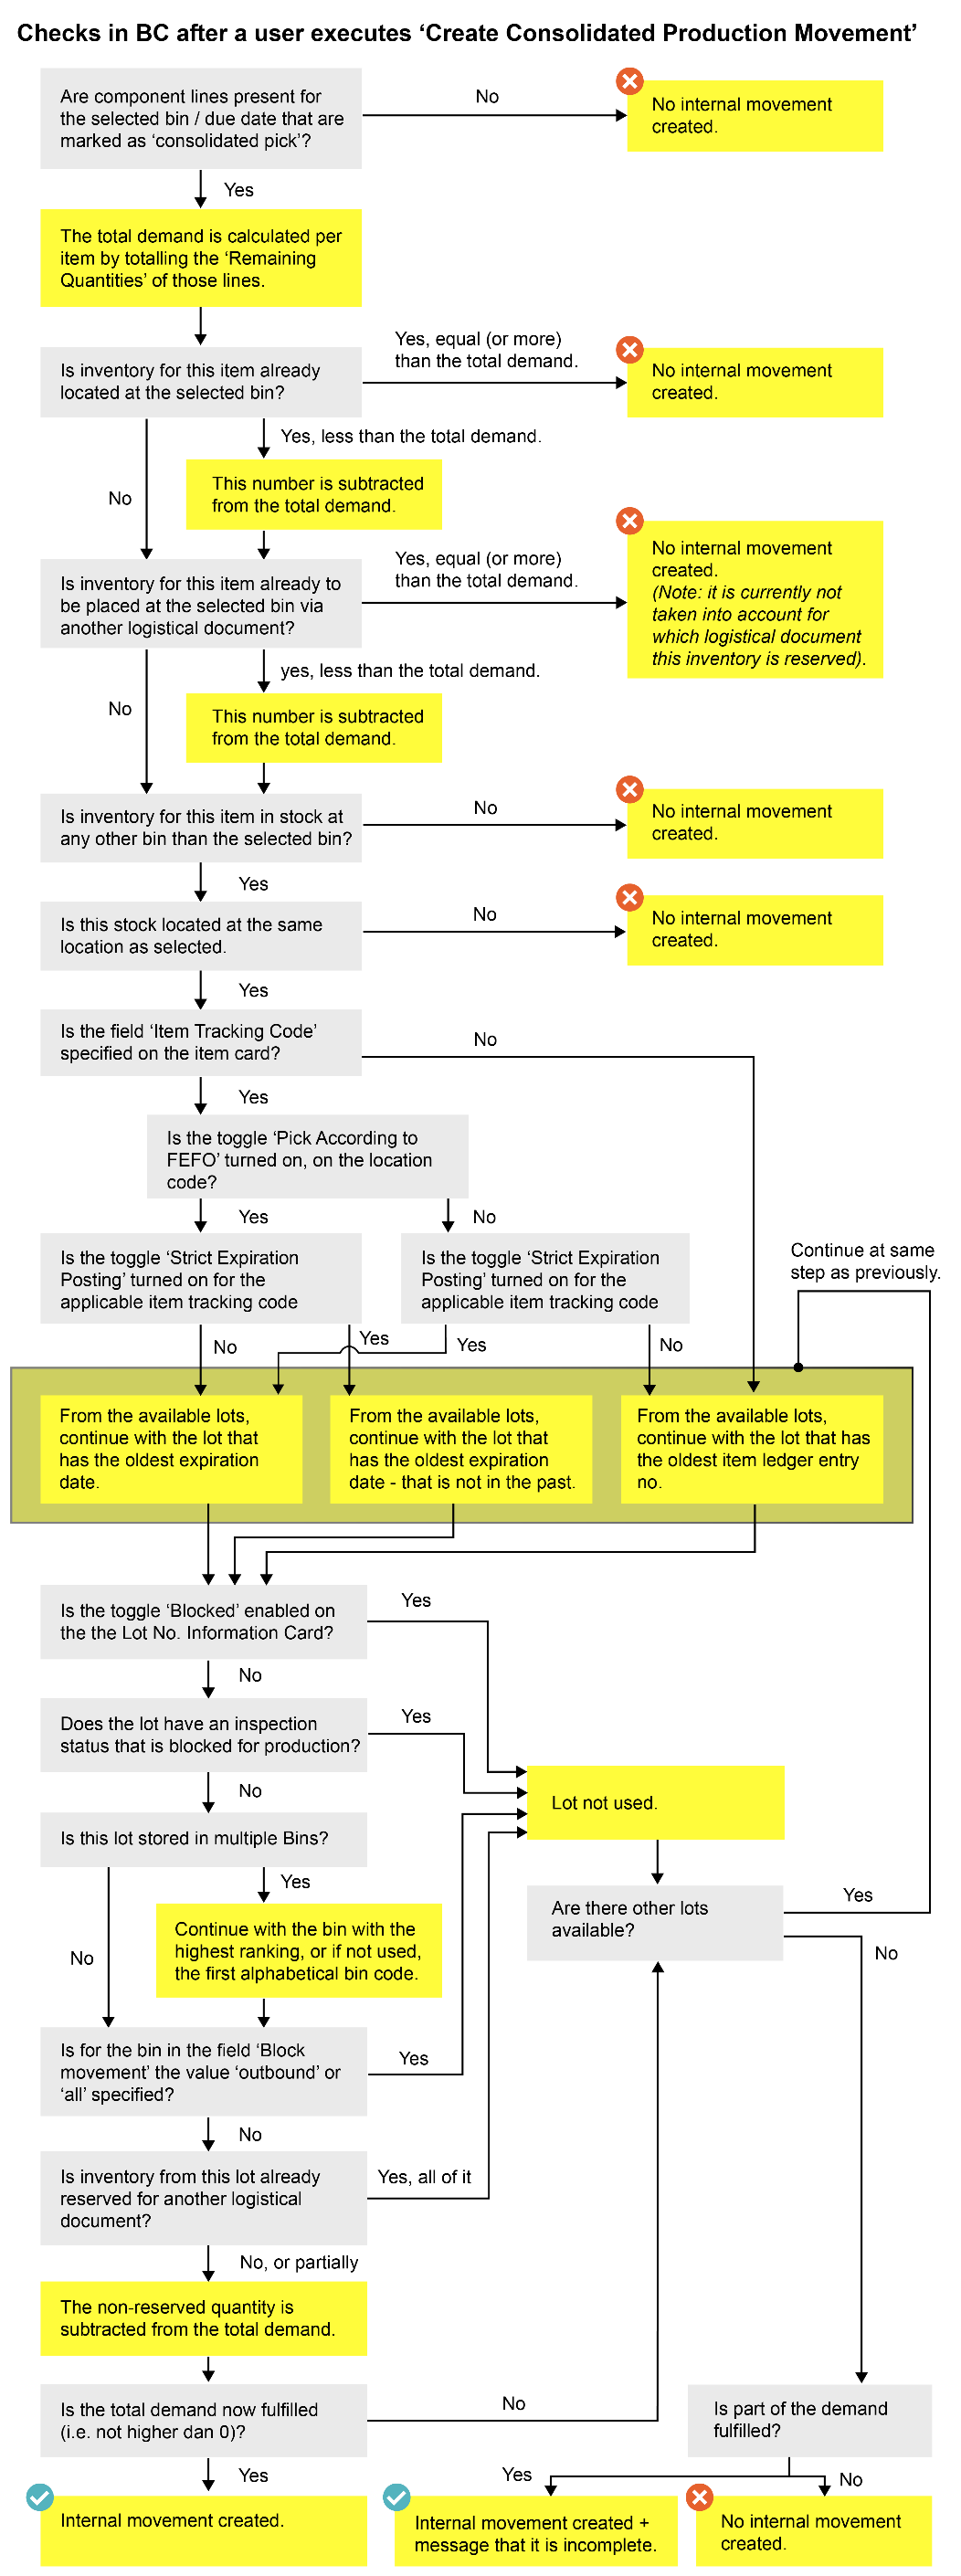
For the production order component lines that are marked to place in a consolidated pick (which is the case when the field Component Pick Method = Consolidated), the total needed inventory (demand) is calculated by totaling the Remaining Qty. (Base) of the filtered Prod. Order Component lines per item number/variant code. The production order component lines will be filtered with the values entered by the user: Location/ Bin code until a selected due date/ time of all Prod. Order Component lines.
If inventory needs to be moved to the selected bin, it will be checked if the selected location contains enough available inventory. This will be reduced from the amount of inventory that needs to be moved to the requested bin.
It is also checked whether the available inventory will already be increased by other logistical documents that 'places' the demanded item/variant on the requested Location Code/Bin Code. This can for example occur when an inventory movement already exists and will place the item/variant in the requested Bin Code. This reduces the amount of inventory that needs to be moved to the requested Bin Code.
It could be the case that there is no needed inventory (demand). This can be caused when no production component lines are present for the selected Bin/Due date, the selected bin already contains enough inventory to fulfil the remaining quantities of the consumption items, or enough inventory will be placed in the requested bin due to warehouse activities.
When the inventory shortage for the Item/Variant/Bin code-combination is calculated, the next step is to calculate which lot numbers on the requested location code could be used to fulfil the needed inventory. For Lot tracked items, the FEFO principle is applied. The bin where the first to expire lot is stored will be used to take items from. If this first to expire lot is stored in multiple bins, then the bin with the highest bin ranking is used. If bin ranking isn't used, then the first alphabetical bin code is used applying sorting to the bin codes.
The following situations will exclude inventory from available stock:
- The Lot No. Information Card has the setting Blocked enabled.
- The Expiration date has passed. This is only considered when the Item Tracking Code assigned to the item, is set up with the setting Strict Expiration Posting enabled.
- If the Inspection Status of the lot number is blocked for Production Consumption Pick and/or Production Consumption Availability
- Bin Codes that are set up with Block Movement = Outbound or All cannot be used to take items from.
Each time a suitable lot number is found, it is checked whether any logistical document is already reserving inventory from this lot number and the bin code. This can be, for example, an inventory- or warehouse pick created for a sales order. This reserved quantity will therefore not be taken into account when creating the consolidated pick. Depending on the selected setting in the Create Consolidated Production Movement function, an internal movement will be created that contains the bin codes where the suitable lot numbers with corresponding quantities are stored. If the setting is enabled to automatically create an inventory movement, and the location has the setting enabled to pick according to FEFO, the suitable lot numbers are automatically selected in the document as well.
The Create Consolidated Production Movement functionality also helps you over-pick more than the outstanding quantity in an inventory movement. When the shipping container/pallet load is higher than the requested quantity, the entire container/pallet will be moved to the production bin.
Using this functionality, you can increase the quantity you want to handle in an inventory movement, even if it is more than the outstanding quantity. When you increase the quantity to handle, the total and outstanding quantities will also increase accordingly.
For example,
On the Inventory Movement page, the inventory movement line is filled with the following values:
- Quantity = 30
- Qty. to Handle = 0
- Qty. Outstanding = 30
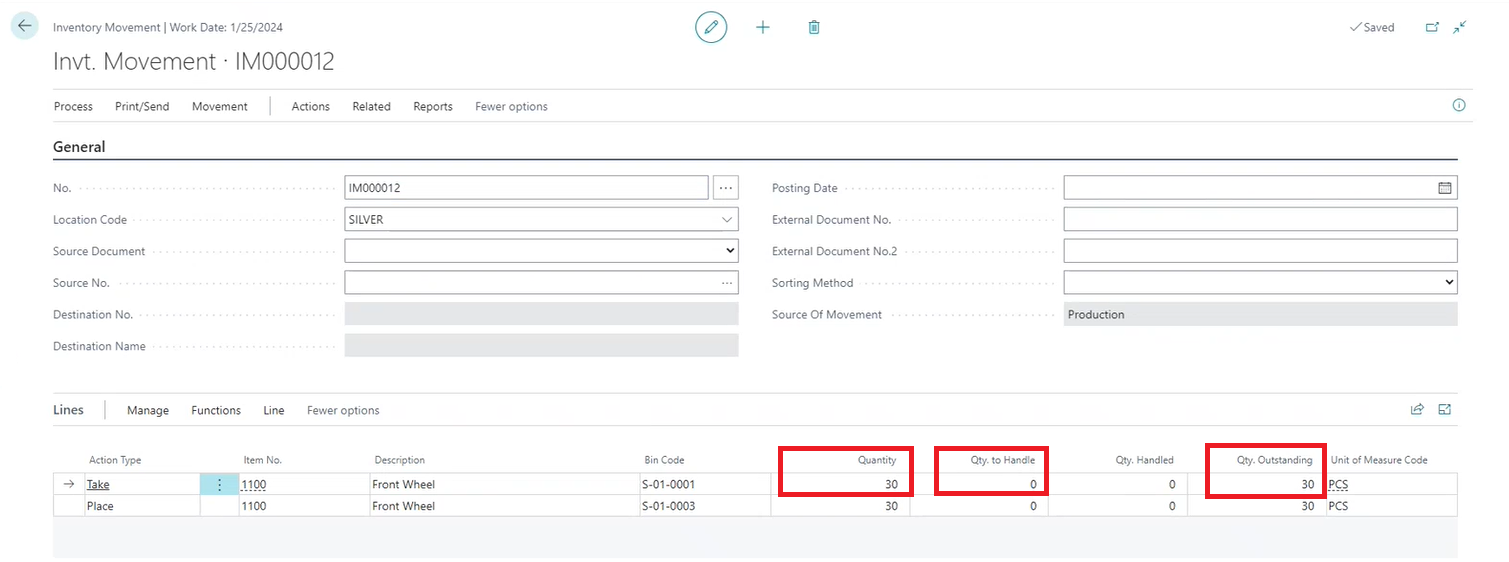
When you enter a value greater than the outstanding quantity in the Qty. to Handle field, the values in the Quantity and Qty. Outstanding fields will change accordingly.
- Quantity = 36
- Qty. to Handle = 36
- Qty. Outstanding = 36
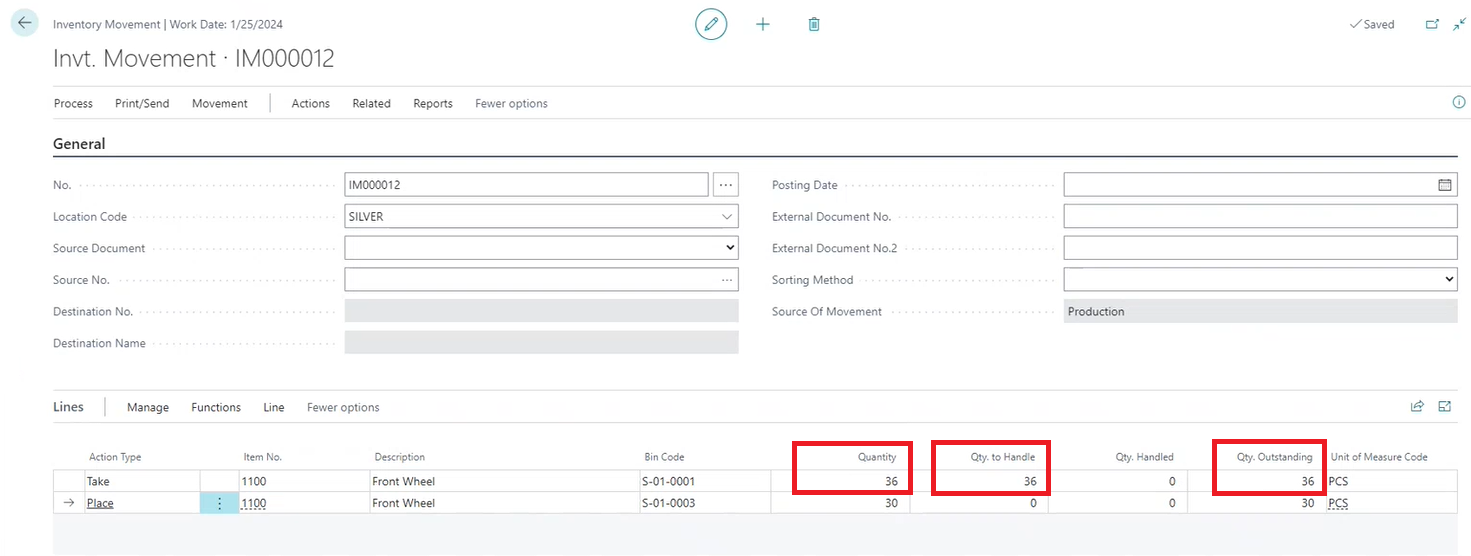
The quantity will be adjusted only on the specific line for which you are changing the value.
It could be the case that there is no available inventory. This can be caused by the following situations:
- No inventory at all exists for the item in the selected location.
- Inventory exists for the item, but it's not useable (for example, due to a blocked lot number information card).
- The existing inventory is already totally reserved in warehouse activity lines.
The function creates an Internal Movement for P/P and WM locations, and it fills the Movement Worksheet for WMS locations.
The Create Consolidated Production Movement report is designed for use in any material requisition process, not only for production order component lines marked as Consolidated in the Component Pick Method field. You can apply filters on the report request page, such as location, bin, due date, or pick method, to include only the relevant component lines in the inventory demand calculation.
It is important to configure these filters carefully to ensure that the correct inventory requirements are calculated. While filtering by bin code is mandatory, other filters such as pick method or consumption method can be used to further narrow down which production order components are included. You can consider the specific requirements of the inventory processes when applying these filters.
To generate this report, follow these steps:
- Select the Search icon , enter Create Consolidated Production Movement and then choose the related link.
The Create Consolidated Production Movement page opens. - In the Location Code field, select the required code.
- In the To Bin Code field, select the AssistEdit button to select the required code.
This field is editable only when the Use Prod. Order Component Bin Code toggle is turned off.
- Select OK.
- Turn on the Use Prod. Order Component Bin Code toggle to transfer the inventories to the bin code that is assigned to the production order component lines.
When this toggle is turned on, only one internal movement is created for all the relevant released production orders based on the selected location code.
You can turn on the Ignore Zone Filter toggle to allow the system to search for available inventory across different zones within the same location.
If the toggle is turned on, the system will take inventory from any available bin from other zones.
If toggle is turned off, the system will only check for inventory in the zone associated with the bin code added in the component line of the production order. This toggle is turned off by default.
- Turn on the Ignore Contents of To Bin Code toggle to transfer the entire required quantity to the place bin regardless of the quantity that already exists in the place bin.
- Enter the starting and ending due dates in the respective fields.
The ending due date cannot be earlier than or the same as the starting due date.
-
Turn on the Use Different Zone toggle to exclude bins that belong to the same zone as the bin selected in the To Bin Code field value on the Prod. Order Components page.
- When the Ignore Zone Filter and Use Different Zone toggles are turned off, the system considers only the bins associated with the same zone as the value in the To Bin Code field on the Prod. Order Components page when during inventory movement.
- When the Ignore Zone Filter toggle is turned on and the Use Different Zone toggle is turned off, the system considers bins from all zones, including the bins in the same zone as the To Bin Code field value on the Prod. Order Components page, during inventory movement.
- When both the Ignore Zone Filter and Use Different Zone toggles are turned on, the system considers only the bins from different zones and excludes bins associated with the zone specified in the To Bin Code field on the Prod. Order Components page when during inventory movement.
- When the Ignore Zone Filter toggle is turned off and the Use Different Zone toggle is turned on, the system displays an error message.
-
Turn on the Create Inventory/Warehouse Movement toggle to directly create an inventory movement. If a location is selected that has the setting Directed Put-away and Pick enabled, a Warehouse Movement will be created automatically.
The system displays a notification if the Aptean Warehouse Management System extension is installed indicating that the default value of Create Inventory/Warehouse Movement field is determined based on the Release Consolidated Movement to Scanner field value on the Process Manufacturing Setup page.
-
Turn on the Use Put-away Unit of Measure Code toggle to calculate the quantities and express them in the Put-away Unit of Measure Code of the item. It also rounds up the required quantity of the inventory to its nearest value based on the following scenarios:
For example, consider an item for which the base unit of measure is LBS and the unit of measure is CASE, where 1 CASE = 100 LBS.
i. Scenario 1: If bin A needs 150 LBS of the item and bin B contains 1000 LBS of the same item, an inventory movement for the relevant item is created from bin B to bin A for the total quantity of 200 LBS.
ii. Scenario 2: If bin A needs 150 LBS of the item and bins B, C & D each contain 50 LBS of the same item, an inventory movement for the relevant item is created by transferring 50 LBS from each take bin to bin A for the total quantity of 150 LBS.
iii. Scenario 3: If bin A needs 150 LBS of the item and bins B & C each contain 100 LBS of the same item, an inventory movement for the relevant item is created by transferring 100 LBS from each take bin to bin A for the total quantity of 200 LBS.
iv. Scenario 4: If bin A needs 150 LBS of the item and bins B contains 100 LBS, and bin C contains 90 LBS of the same item, an inventory movement for the relevant item is created by transferring 100 LBS from bin B and 50 LBS from bin C to bin A for the total quantity of 150 LBS. If any one of the take bins has insufficient inventory to round up to the nearest value, this scenario will take place.- When the Use Put-away Unit of Measure Code toggle is turned on:
- The system rounds the quantity based on the put-away UOM.
- The rounded quantity value is updated in the Quantity and Unit of Measure Code fields on the Internal Movement page.
- Any residual quantity that cannot be converted to the put-away UOM is listed on a separate line using the base UOM.
- The movement respects lot tracking and bin priority, as per the location setup.
- If the selected lot contains more than required quantity but rounds to a full put-away UOM, the system includes the entire rounded quantity in the movement.
For example,
- On the Item Card page, the Item field value is set to COMP ITEM, the Base Unit of Measure field value is set to KG, and the Put-away Unit of Measure field value is set to PCS.
1 PCS = 73 KG - On the Prod. Order Components page, the Required Quantity field value is set to 310 KG, which is equivalent to 4.25 PCS, and the Rounded Quantity field value is set to 5 PCS (365 KG).
Bin and lot availability in location
| Bin | Lot No | Quantity (KG) | UOM equivalent |
|---|---|---|---|
| Bin 1 | LOT0001 | 290 KG | 3.97 PCS |
| Bin 1 | LOT0002 | 10 KG | 0.13 PCS |
| Bin 2 | LOT0003 | 180 KG | 2.46 PCS |
The system will:
1. Round the required 4.25 PCS to 5 PCS.
2. When the Pick According to FEFO toggle is turned on, the system selects lots based on the FEFO.
3. Create the movement in two lines:
- 5 PCS (Put-away UOM) = 365 KG
- Any remaining residual not required will not be picked, unless overpicking is allowed.
FEFO based internal movement behavior
- If the Pick According to FEFO toggle on the Location Card is turned off, the system picks items based on the bin ranking field value on the Bins page.
-
If the Pick According to FEFO toggle on the Location Card is turned on, the system picks items based on the FEFO lot expiration.
-
On the Include Lines for Shortages toggle to create the internal movement lines indicating any demand exceeding the available supply. These lines will be generated without any value in the From Bin Code field, serving as a notification of insufficient supply. You may need to manually edit or delete these lines to create inventory movement. The system retains the Quantity field value on the Internal Movement page when you select a value for the From Bin Code field, even if the From Bin Code was initially left blank and the quantity was entered first.
- On the Filter: Prod. Order Component FastTab, select the bin code that is assigned to the relevant production order component line in the Bin Code field. You can also filter the production order component lines based on the filters you apply.
- In the Component Pick Method field, select an option to filter the production order component lines based on their pick method.
- Blank: Filters the production order components for which the Component Pick Method field value is blank on the Prod. Order Components page.
- Consolidated: Filters the production order components for which the Component Pick Method field value is set to Consolidated on the Prod. Order Components page.
- In the Consolidated Consumption field, select an option to filter the production order component lines based on their consumption method.
- Blank: Filters the production order components regardless of whether the Consolidated Consumption checkbox is selected or cleared on the relevant Prod. Order Components page.
- No: Filters the production order components for which the Consolidated Consumption checkbox is cleared on the Prod. Order Components page.
- Yes: Filters the production order components for which the Consolidated Consumption checkbox is selected on the Prod. Order Components page.
- Select OK to confirm.
- Select the Search icon , enter Internal Movements, and then choose the related link.
The Internal Movements list page opens. - Select the required No.
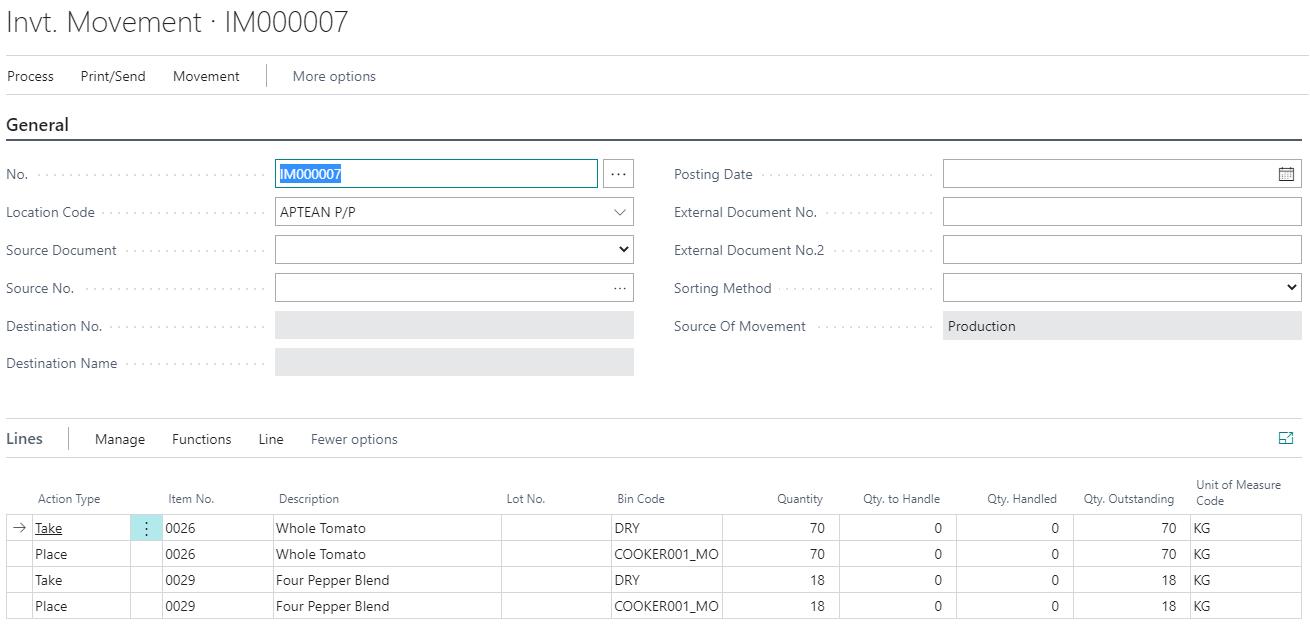
The Internal Movement page opens.
Two lines are created for the items that must be moved to the production bin.
For item number 0029, in total, 18 pieces must be moved (5 from the first production order and 13 from the second) from the DRY Bin Code to the COOKER001_MO. For item number 0026, in total 70 pieces must be moved (20 from the first production order and 50 from the second). -
On the action bar, select Create Inventory Movement.
The internal movement lines that have values in the From Bin Code and To Bin Code fields are considered while creating inventory movement.
-
Select Yes to confirm.
To prevent ending up with large inventory movements, the function Create Inventory Movement (on the Internal Movement page) has the ability to apply several filters (Item No., From Bin Code) to reduce the size of that inventory movement. - In the Item No. field, select a value.
-
In the To Bin Code. field, select a value.
You can create internal inventory movements on the Create Consolidated Production Movement page, based on the Available Qty. to Take field values on the Bin Contents page.-
Scenario 1: Lot-by-lot movement
- The Pick According to FEFO toggle on the Location Card page is turned on.
- The Strict Expiration Posting toggle on the Item Tracking Code Card page is turned on.
The internal inventory movement is processed based on the Available Qty. to Take field values on the Bin Contents page by lot number, ensuring items are picked based on lot number FEFO order and expiration controls.Expired lots will not be considered. If all lot expiration dates are the same, inventory movement is created based on Bin Ranking field value on the Bin Contents page.
-
Scenario 2: Movement based on bin ranking
- The Pick According to FEFO toggle on the Location Card page is turned off.
- The Strict Expiration Posting toggle on the Item Tracking Code Card page is turned off.
The internal inventory movement is based on Bin Ranking and Available Qty. to Take field values from the Bin Contents page.
-
Scenario 3: Movement based on available quantity to take
- The Pick According to FEFO toggle on the Location Card page is turned on.
- The Strict Expiration Posting toggle on the Item Tracking Code Card page is turned off.
The internal inventory movement is based on the Available Qty. to Take values on the Bin Contents page by lot number, ensuring items are picked based on lot number FEFO order and includes expired lots.If all expiration dates of the lots are the same, inventory movement is created based on Bin Ranking on the Bin Contents page .
-
- Select OK. If no item number/and or bin code is selected, the inventory movement will be created for the complete internal movement.
A new Inventory Movement is created based on the item number/bin code filter and the lines are deleted from the existing Internal Movement.
- Select the Search icon , enter Inventory Movements and then choose the related link.
The Inventory Movements list page opens. - Select the required No.
The Inventory Movement page opens.
When different items are listed on the Lines FastTab of the Internal Movement page, the Item No., From Bin Code, To Bin Code, Due Date, and Unit of Measure Filter fields appear on the Create Inventory Movement page after executing the Create Inventory Movement action. Based on the selected filters, only the internal movement lines that match the filter criteria is submitted for inventory movement creation.
The Inventory Movement is created to move the items in a consolidated matter from the warehouse to the production area.
The system automatically assigns the lot number and updates the To Bin Code and Quantity field values on the Internal Movement page based on the assigned lot number when a consolidated production movement is created and when the Pick According to FEFO toggle on the Location Card page is turned on.
Case 1: FEFO enabled with strict expiration
- The Pick According to FEFO toggle on the Location Card page is turned on.
- The Strict Expiration Posting toggle on the Item Tracking Code Card page is turned on.
When an internal movement is created at the lot level with item tracking lines, the system automatically ignores expired lots during selection.
Case 2: FEFO disabled with no expiration
- The Pick According to FEFO toggle on the Location Card page is turned off.
- The Strict Expiration Posting toggle on the Item Tracking Code Card page is turned off.
The system creates internal movement at the bin level, without including item tracking lines. Items are selected according to the Bin Ranking field value on the Bins page.
Expired lots are included during the selection process.
Over-pick in an inventory movement
Prerequisites
- On the Process Manufacturing Setup page, the Allowed Over pick Consolidated Movement toggle should be turned on.
- The relevant inventory movement should be created using the Create Consolidated Production Movement function.
- On the Inventory Movement page, the Source Of Movement field should read Production.
To over-pick in an inventory movement:
- Select the Search icon , enter Inventory Movements, and then choose the related link.
The Inventory Movements list page opens. - Select the relevant inventory movement created using the Create Consolidated Production Movement function.
The Inventory Movement page opens. -
In the Qty. to Handle field, enter the quantity you want to handle, which is greater than the outstanding quantity.
Now the values in the Quantity and Qty. Outstanding fields will change accordingly.The quantity will be adjusted only on the specific line for which you are changing the value.
- On the action bar, choose Process > Register Invt. Movement.
Consolidated consumption
With consolidated consumption, the user can consolidate production component lines and do the consumption posting in one go instead of posting consumption for each production order. In hectic production environments where there is no time for shop floor operators to manually post consumption, a consolidated consumption posting routine is required.
Via consolidated consumption posting, the total bin content of the To Bin code used in selected production component lines is assigned pro rata to these lines and posted as consumption. This method makes the warehouse employees responsible for correct consumption posting.
The Calculate Consolidated Consumption action creates consumption journal lines for all selected production component lines for a specific bin and it calculates the consumption quantity on each line where the bin content of the selected bin is divided pro rata, based on normative quantities, to all these component lines.
When the Calculate Consolidated Consumption function is executed, the production component lines are filtered where the Consolidated Consumption setting has been enabled, and the values are entered by the user: Location/ Bin code until a selected due date/time.
The function also has the option to print a Test Report to identify significant deviations between normative consumption quantities versus the calculated consumption quantities.
The Calculate Consolidated Consumption action takes the actual output or expected output into account based on the selected value in the Calc. Based On field. For actual output, the output for the items needs to be posted before executing the following steps.
For expected output, where the actual output has not yet been posted or only partially posted, the system uses the remaining quantity from the production order component line to proportionally allocate bin content across component lines. This allows warehouse teams to perform timely and consolidated consumption postings based on planned production quantities.
To calculate the consumption:
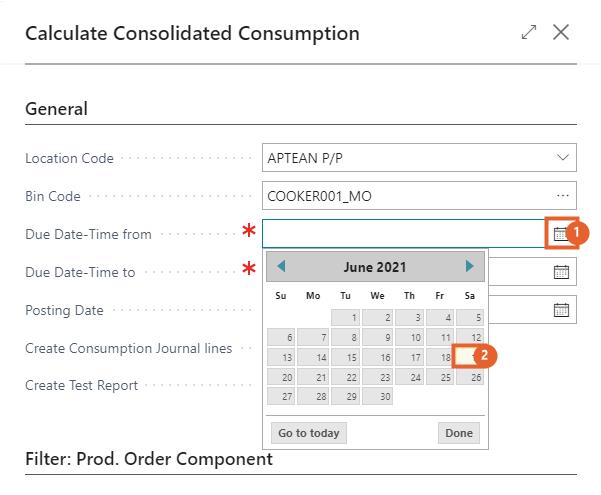
- Select the Search icon , enter Calculate Consolidated Consumption and then choose the related link.
The Calculate Consolidated Consumption page opens. - In the Location Code field, select the required Code from the list.
- In the Bin Code field, select the AssistEdit button to select the required Code.
- Select OK.
- In the Due Date from and Due Date to fields, select the date from the calendar.
-
In the Due Time from and Due Time to fields, enter the time.
- Turn on the Create Consumption Journal Lines toggle to generate consumption journal lines for all selected production component lines using the bin content of the selected bin. The consumption quantity per component line is calculated, based on the selected value in the Calc. Based On field.
- If the Actual Output option is selected, the system calculates normative consumption using the posted output quantity.
- If the Expected Output option is selected, the system calculates normative consumption using the remaining quantity on the production order component line, allowing consolidated consumption posting before the output is posted.
- Turn on the Print Report toggle to print the report.
- In the Rounding Source field, select the required value from the following options to round off the consolidated consumption quantity.
- Per Item: The system uses the rounding precision value from the Item Card page.
- User-Defined: The system uses the rounding precision value entered in the Rounding Precision field.
-
In the Rounding Precision field, enter the value to round off the consolidated consumption quantity. This configuration determines how the quantity is calculated and recorded in the consumption journal and displayed in the printed report.
This field is editable only when the Rounding Source field value is set to User-Defined and the value can be up to five decimal places.
- In the Calc. Based On field, select how the system should calculate the consolidated consumption quantity for each component line.
- Actual Output: The system calculates consumption based on the quantity of the posted output for each production order. This is the default option.
- Expected Output: The system calculates consumption based on the remaining quantity on the production order component line.
- Select OK.
If the Create test report toggle is turned on, a new dialog is shown where the report can be opened. -
Select Preview & Close button to create the report.
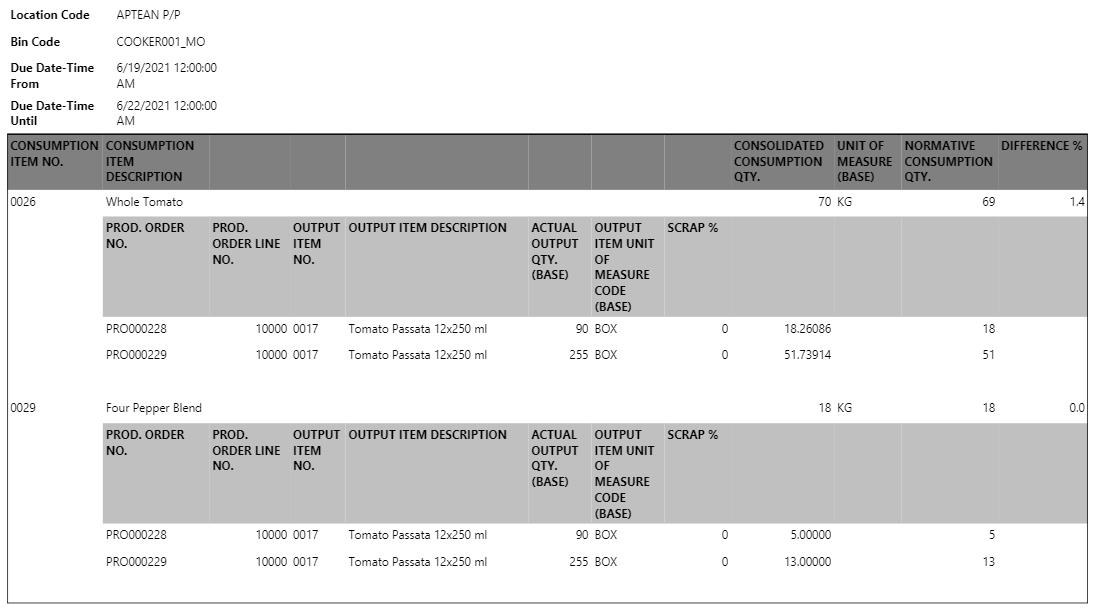
It shows that there are two consumption items, number 0026 and 0029. The consolidated consumption quantity stands for the bin content, which was 18 pieces for item 0029 and 70 pieces for item 0026. The whole bin content for this item will be used to distribute quantities pro rata among the production consumption lines that post consumption from the bin code. The consolidated consumption quantity will be entered on the consumption journal lines, so that the consumption will be divided in a consolidated manner.
The normative consumption quantity indicates which quantity, according to the system, would be consumed according to the posted output. It is calculated by taking the actual output of the production orders, which was 90 for the first production order and 255 for the second and multiplying it with the Quantity Per from the corresponding production BOM line, increased with the Scrap %. The result is expressed in the Base Unit of Measure of the component item. According to the BOM setup for item number 0026, normally 18 and 51 pieces would have been consumed, which makes a total of 69. Compared to the consolidated consumption quantity of 70, there is a small difference of 1,4% more consumption, which could be acceptable.
The goal of the report is to see if there are any big differences between what the system suggests as consumption (normative consumption) and what the function suggests as consolidated consumption. If there are big differences, they can be acted upon by checking, for example, if the bin content is correctly registered. If the consolidated consumption is based on expected output (i.e., no actual output posted), the test report will still calculate normative consumption based on expected quantities and BOM setup.You can use this report to identify any significant differences and ensure bin content distribution is appropriate, especially when operating without finalized output postings.
-
Select Close to close the report.
A message appears stating that consumption journal lines have been created. - Select OK.
- Select the Search icon , enter Consumption Journals and then choose the related link.
The Consumption Journals page opens. - In the Batch Name field, select the AssistEdit button to select the item journal batch template.
- Select OK.

A consumption journal line has been created per production order and per component line with the calculated consolidated consumption quantities. If the item is lot-tracked, the lot numbers are assigned accordingly as well.
If you also use the Aptean License Plating extension, when the consumption journal line and their item tracking lines are created, the license plate number(s) assigned to the lot number are also added.
After reviewing the quantities, the user can post the consumption journal manually. The bin content for the Monday-bin would be completely emptied and the consumption is posted for the production orders that were planned on that day and linked to this specific bin suffix.
Ability to post consumption on component line without the usage of warehouse pick
In standard Business Central, you can post consumption on a production component line without using a warehouse pick by configuring the Prod. Consumption Whse. Handling field on the Location Card page. This field offers the following options:
- No Warehouse Handling
- Warehouse Pick (optional)
- Inventory Pick/Movement
- Warehouse Pick (mandatory)
To override the warehouse pick process during the consumption posting on the production component line, follow these steps:
- Navigate to the desired Location Card page.
- On the Warehouse FastTab, in the Prod. Consumption Whse. Handling field, choose either the No Warehouse Handling or Warehouse Pick (optional) option.
This provides more flexibility in managing production processes within Business Central.
You can also use Catch Weight Item in Consolidated Consumption on integration of the Aptean Process Manufacturing extension with the Aptean Catch Weight extension. To know more, see here.