Aptean Mobile Warehouse Registration Activity
If the user opens the Planned Move activity by clicking the icon on the Aptean Mobile Warehouse Registration home screen, the application will initially present a list of movement activities to which that user’s ID has been assigned. Depending on various configuration settings, this may be a combination of inventory movements, put-aways, and picks.
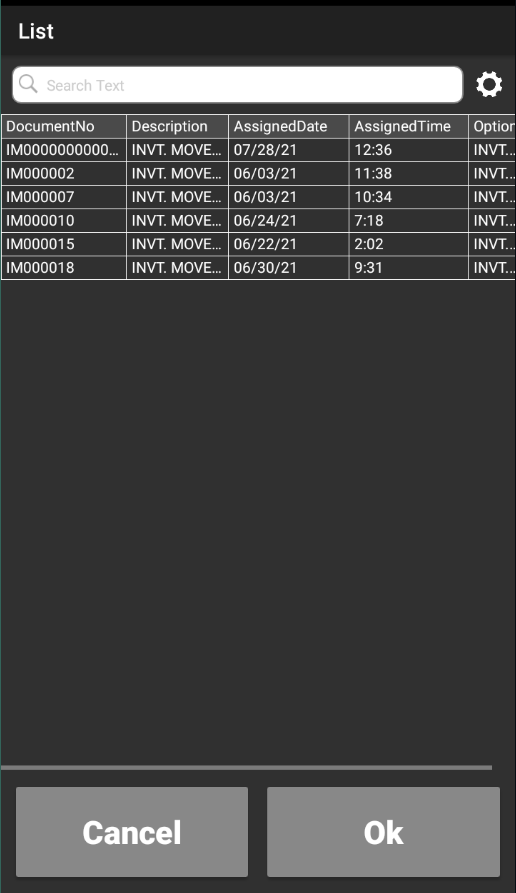
The user can select the desired document. The Planned Move page is opened with the relevant document assigned.
This list of user-assigned movements is only displayed when the activity is launched through clicking the icon on the home screen. If the Planned Move activity is launched through the Action menu or via a quick scan, the application will immediately begin with the Planned Move page. If the entered movement was not previously assigned to the user, its assigned user ID will be automatically updated by the program. At any point, a movement can be re-assigned by choosing the Assign to User option. The program presents a list of available Dynamics users. When a new user is selected from this list, the movement will re-assigned accordingly.
The user may change the currently-entered transaction to a different inventory movement by manually entering or scanning the document number in the Inventory Movement No. field, then physically pressing the Enter button on the handheld device.
Additional information about the items that have been assigned to the currently-entered warehouse movement can be obtained on the Lines tab.
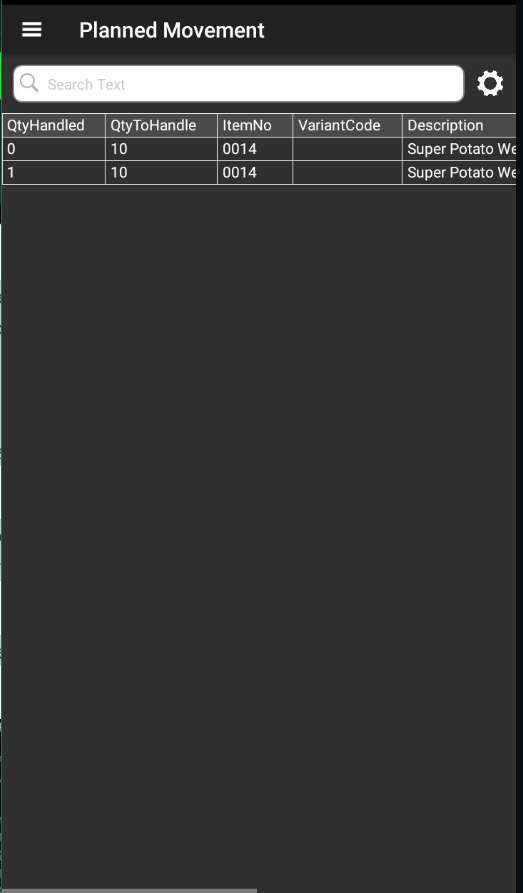
This screen presents the items that appear on the warehouse movement. A pair of lines is included for each item that appears on the warehouse movement. The first line represents the “take” activity in which the removal of the item from its current bin is recorded, and the second line represents the “place” activity in which the placement of the item into a new bin is recorded. Information such as the quantity to be moved and any recorded movement quantities is included in these lines, as well.
Information about the individual activities that have been recorded for the movement can be obtained on the Scanned tab.
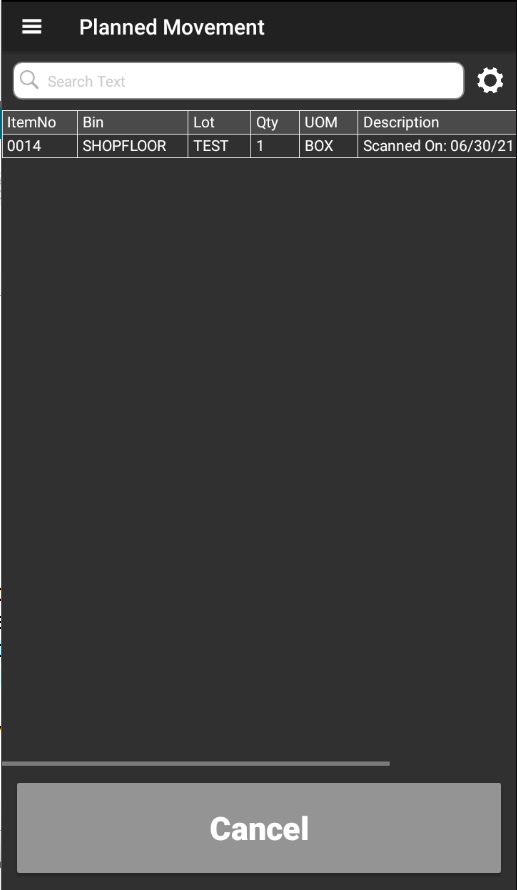
This screen presents each movement activity that was recorded. As with the Lines tab, both take and place activities are displayed on the Scanned tab. Basic information such as item number, lot number, and quantity is included.
You can select the desired item line and then select OK to update the Planned Movement screen with the corresponding bin, item, and quantity details. When the scan is complete, the system automatically suggests the next item in the line.
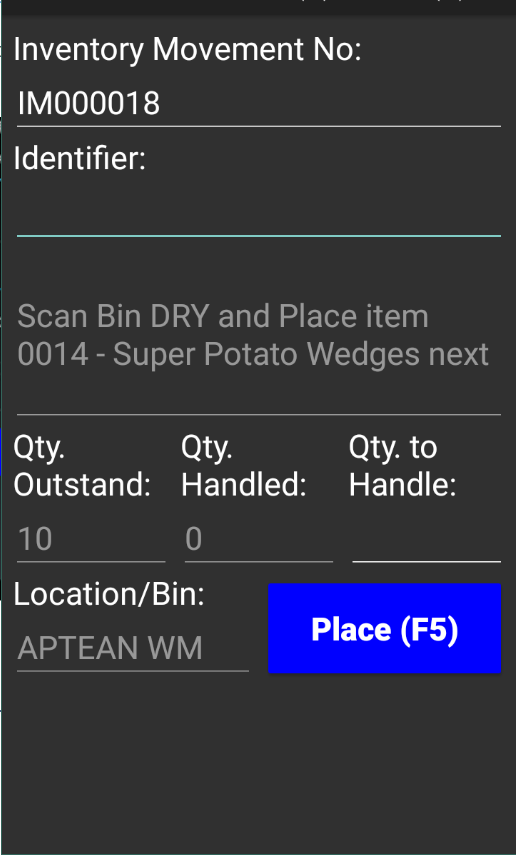
The application will attempt to direct the user’s planned move activities by instructing him or her as to what information should be recorded in the Identifier field.
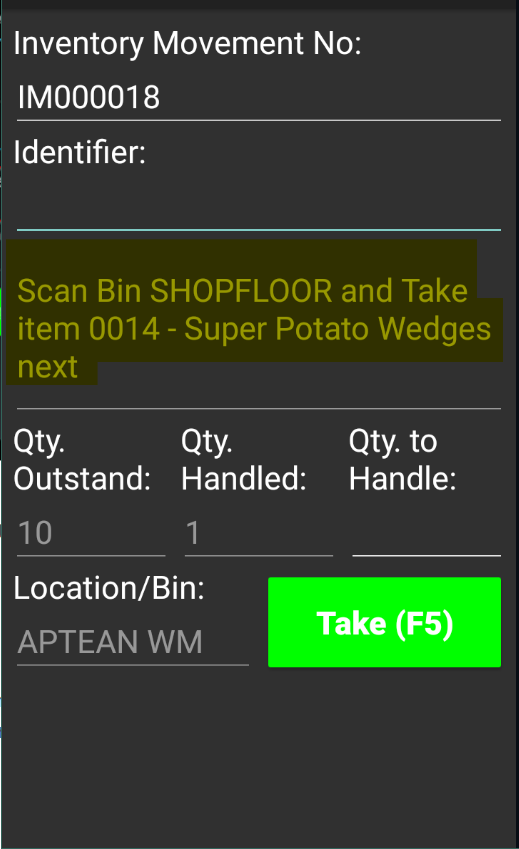
For example, in the above screenshot the user is instructed to scan bin SHOPFLOOR and take item 0014 for placement. The application obtains these values by selecting the first line with an outstanding quantity to handle on the relevant movement document.
To record planned move activity
- In the Identifier field, enter or scan the bin code from which an item will be moved. The bin code must appear on one of the inventory movement’s take lines. If the entered bin code is assigned to multiple lines, the application will select the first applicable line.
- In the Identifier field, enter or scan the item number that will be moved from the assigned bin. The entered item must be present in the bin.
You can view information about the currently-entered item by clicking the Item Info. (F6) option at the bottom of the screen or physically pressing the F6 button on the handheld device. The Item Information page will open for the relevant item.
If the item is lot tracked, you must specify the lot number of the item that will be moved in the Identifier field.
When the item number (and lot number, if applicable) is entered, information about the item is displayed in the area beneath the Identifier field.

In addition, information about the item’s outstanding quantity to move and quantity already moved is displayed on the page.
Depending on how the activity has been set up, mobile users may not be able to specify the quantity of the item to move. If this capability is not available, the program will automatically default a quantity of 1 unit following the entry of an item/lot number.
- If the ability to manually specify a movement quantity is available, enter the quantity of the item to take in the Qty. to Handle field. The entered quantity cannot be greater than the outstanding quantity to move. The quantity handled value will be updated accordingly.
It is possible to enter activity against the same item more than once. Depending on how the activity has been set up, each additional quantity you specify will be either absolute or cumulative. If the activity has been configured to treat entered quantities as absolute, the movement quantity will always be updated with the latest quantity to handle. For example, if we entered a quantity to handle of 2 units, the movement quantity would also update to 3 units. If entered quantities are cumulative, each subsequent quantity to handle will be added to the total. Using our previous scenario, entering a quantity to handle of 2 units would result in a movement quantity of 2 units, but entering a quantity to handle of 3 units would update the movement quantity to 5 units.
If it is necessary to cancel an entered movement quantity for an absolute quantity, the user can open the Scanned tab, select a line, and click the Cancel button. The application will ask if you want to cancel the scan entry.

- Repeat the previous steps to move additional items. The Aptean Mobile Warehouse Registration activity will not maintain bin code or item number, so it is necessary to specify this information every time.
When you have finished specifying the items that you wish to move, you can proceed to the Place phase. Click the Take (F5) button on the screen to switch between phases.
The system over-picks the complete quantity of a license plate during inventory movement for consolidated movements without requiring a new license plate scan on the Planned Move screen. It provides flexibility when the actual quantity on the license plate is greater than the quantity specified on the inventory movement when creating the consolidated production movement for the internal movement. This functionality works when the Allowed Over Pick Consolidated Movement toggle on the Process Manufacturing Setup page is turned on.
If you also use the Aptean Food and Beverage License Plating extension, when handling items that are license plate tracked, the license plate number should be scanned or entered in the Identifier field instead of the bin code from which an item will be moved.
In case that a homogeneous license plate (only contains one item and one lot number) is entered, the mobile device automatically skips the steps to enter the item and lot number. If the quantity stored on the license plate is equal to or lesser than the requested quantity on the inventory movement line, the mobile device also automatically skips the step to enter the quantity, so only scanning the license plate number suffices to register the inventory movement line.
However, when a mixed license plate (contains one or more items and/or one or more lot numbers) is entered, or if the quantity stored on the homogeneous license plate is more than the requested quantity on the inventory movement line, the user receives an error, since you’re not allowed to only move a part of the license plate to another bin.
You must split the required quantity and store it on a new license plate number, while the remainder of the items will stay on the ‘old’ license plate number. The new license plate number should be scanned or entered in the Identifier field, and it must match with the New License Plate No. Pattern field on the Mobile Setup page. Otherwise, when entering a different number, the mobile device will not recognize it as a new license plate number.
After scanning or entering the New License Plate No., scan or enter the license plate number where the items must be taken from. When scanning or entering a homogeneous license plate to take items, the next step is to enter the required quantity in the Qty. Handled field. When scanning or entering a mixed license plate to take items from, both the item number and lot number must be entered as well, before entering the required quantity in the Qty. Handled field.
The processing routine of the Place phase is identical to the Take phase. The only difference is the specified bin represents the bin into which items will be placed, rather than taken.
To complete Place phase
- In the Identifier field, enter or scan the bin code into which an item will be moved. The bin code must appear on one of the inventory movement’s place lines.
- In the Identifier field, enter or scan the item number that will be moved into the assigned bin. The entered item must be one of the items that were moved during the Take phase.
- If the item is lot tracked, you must specify the lot number of the item that will be moved in the Identifier field.
- In the Qty. to Handle field, enter the quantity of the item that will be moved into the assigned bin.
- Repeat the previous steps to move additional items. The Aptean Mobile Warehouse Registration activity will not maintain bin code or item number, so it is necessary to specify this information every time.
Depending on how the activity has been set up, the user may have the ability to register the inventory movement through the Aptean Mobile Warehouse Registration application. If this feature has been enabled, a user may register the document by clicking the Register (F9) option at the bottom of the screen or physically pressing the F9 button on the handheld device. The recorded scan data will be transferred to the Qty. to Handle field on the warehouse document within Business Central, and then registered.
Access the take and place bins in planned movement
You can manage planned movements to operate similarly to warehouse pick, where scanning the take bin (or license plate) auto-populates the rest of the required information.
Follow the steps below to set up the Scan both Take and Place Bins description.
- Open the Mobile Profile Setup page.
- On the Page field, select PLANMOVE.
The Scan both Take and Place Bins description is set to Yes by default. Consequently, you must scan both bins and manually switch between the take and place modes.
You can also change the value to No to scan only the take lines.
You can manage inventory movement on the Planned Movement screen by accessing both the Take Bin and Place Bin field values, ensuring clarity on where to place items after picking them up.
Follow the steps below to streamline the inventory movement process in planned movements.
-
Open the Planned Movement screen.
When the Scan both Take and Place Bins description is set to No on the Mobile Profile Setup page, you can scan only the Take Bin field, and the system automatically fills in the corresponding Place Bin field and related details. This eliminates the need for repetitive scans and manual mode switching, making the inventory movement process faster.
-
Select the assigned inventory movement.
-
Scan the required fields.
The Location/Bin field name is displayed as Location on the Planned Movement screen. This change is applicable only when the Scan both Take and Place Bins description is set to No on the Mobile Profile Setup page.
-
Scan the Take Bin field when prompted.
The system updates the Take Bin field, and the Place Bin field value is auto-populated when opening the Planned Movement screen.
- Scan the item number and lot number (if applicable).
- Enter the quantity to be moved.
-
In the Place Bin field, confirm the bin code to complete the movement task.
The configuration of take and place bins varies by inventory movement type: internal movements have different take bins but the same place bin. In contrast, consolidated movements may have differing bins.
The app confirms the entry and updates the take lines accordingly.
When the Transfer Scan Data action is executed, the system automatically updates the corresponding place line and adjusts entries for both take and place lines in Business Central.
If the Scan both Take and Place Bins description is set to Yes on the Mobile Profile Setup page for planned movements, the system prompts you to scan both bins and displays an error if the place bin is not scanned.
Scan a lot from a different bin in inventory movement
To scan a lot from a different bin during inventory movement, follow these steps:
- Open the Planned Movement screen.
The system suggests scanning the bin, item number, and lot number. -
Scan a different bin that exists in the inventory movement but is linked to a different item.
You can also scan a bin code that is not listed in the inventory movement for the item. The system then updates the bin code on inventory movement.
Based on the setup on the Mobile Profile Setup page,- If Scan both Take and Place Bins description is set to Yes, the bin is updated in the Location/Bin field.
- If Scan both Take and Place Bins description is set to No, the bin is updated only in the Take Bin field.
The system then suggests scanning the item associated with the scanned bin.
- Scan the actual item number you need to move and the lot number from the scanned bin.
- Enter the quantity to move.
The system confirms the handled quantity and automatically splits the take line to reflect the new bin and lot.
After completing the inventory movement, the take and place lines are automatically adjusted based on the scanned bins and lot numbers. Additionally, the Qty. Outstanding and the Qty. Handled fields are updated accordingly.
You can also perform the planned movement activity by scanning a license plate from a different bin, even if it is not suggested in the inventory movement. The system accepts the license plates that exist in inventory, whether they are linked to a different item or not listed in the inventory movement. It then automatically adjusts the take and place lines, ensuring accurate inventory tracking.
If the scanned bin does not have inventory for the selected lot, the system displays an error after the quantity is entered.
Skip items in the planned movement
The skip functionality in planned movement allows you to skip specific items during the inventory movement process. This ensures smoother workflow by accommodating exceptions, such as temporary unavailability of items or operational constraints.
This action can be performed only when the Scan both Take and Place Bins description is set to No on the Mobile Profile Setup page.
Follow the steps below to skip items in the planned movement activity.
- Open the Planned Movement screen.
- Scan the required details.
- Select the kebab menu.
- Select Skip when the system suggests scanning an item.
The system displays a confirmation message: Do you want to skip this item?
If multiple items exist, the system suggests scanning the next available item. If the inventory movement includes multiple bins for the same item, the system will suggest scanning a different bin when an item is skipped.
Configure application identifier quantity sequence in planned movement
To set up the application identifier quantity sequence in the planned movement, follow these steps:
- Open the Mobile Profile Setup page.
- In the Page field, select PLANMOVE.
- In the Description field, select Application Identifier Quantity Sequence.
-
In the Value field, enter your preferred sequence of AIs.
The Application Identifier Quantity Sequence description includes the following AIs, separated by a semicolon.- 37
- 31
- 32
- 33
- 34
Examples of allowed entries,
- 37
- 37;31
- 37;32
- 37;31;32
- 37;32;31
The system displays an error if you enter an invalid value.
Scan GS1 barcodes in inventory movement
To scan GS1 barcodes in inventory movement, follow these steps:
- Open the Planned Movement screen.
- Scan the GS1 barcode for lot-tracked item.
-
Scan the item reference number, lot number, and quantity.
The system populates the mobile scan entry with the item number, lot number, and quantity.
The system works similarly when you scan the barcodes for license plate-tracked items.
For accurate parsing, scan GS1 barcode elements in the following sequence:- (00) License Plate Number
- (01) Item Reference Number
- (10) Lot Number
- (37)/(31)/(32) Quantity
However, the system does not display weight fields for catch weight items.
The system displays an error under the following conditions:
- If the quantity in the barcode does not match the license plate quantity.
- When scanning a mixed pallet barcode without a new license plate.
- If the barcode quantity is greater than the inventory movement line quantity.
Parse GS1 quantity in inventory movement
You can scan the GS1 barcodes containing quantity-related AIs, such as AI 37, AI 31, and AI 32.
The system evaluates and determines quantity based on the scanned barcode using the following criteria:
- AI 37 - If found, this is used as the quantity.
-
AI 31 - If AI 37 is missing, the system checks for AI 31.
- If the item base unit of measure is kilograms (KG), the system uses the quantity without conversion.
- If the base unit of measure is pounds (LBS), the system converts the quantity.
- If neither, AI 31 is ignored.
-
AI 32 - If both AI 37 and AI 31 are missing, the system checks for AI 32.
- If the item base unit of measure is pounds (LBS), the system uses the quantity without conversion.
- If the base unit of measure is kilograms (KG), the system converts the quantity.
- If the base unit of measure is different, the system ignores AI 32.
If none of the above AIs are present in the scanned barcode, the Quantity field value field remains blank, and you must enter it manually on the Planned Movement screen.
The system populates the Quantity Handled field value in the inventory movement based on the first valid AI encountered as per the configured AI sequence.
To print License Plate label from planned movement
If you have generated a new pick License Plate in the planned movement process due to a partial movement, a new label will be printed automatically for this License Plate after the inventory movement is registered if the Page field is set as PLANMOVE and Auto Print License Plate Label is set as Yes in the Mobile Profile Setup page.
- Select the Planned Move icon on the Aptean Mobile Warehouse Registration home screen.
- In the Inventory Movement No. field, enter or scan the inventory movement number.
- In the Identifier field, enter or scan the new Take License Plate number from which you want to take the items.
- In the Identifier field, enter or scan the item number.
- In the Identifier field, enter or scan the lot number.
- In the Qty. Handled field, enter the quantity of items that are handled.
The system confirms that the Take is completed.
A Mobile Scan Entry is created in Business Central containing the License Plate No. and From License Plate No. fields. An empty License Plate Card is also created automatically for the License Plate No. - Select the Take button.
The activity will now be changed to the Place phase on the Aptean Mobile Warehouse Registration application. - In the Identifier field, enter the newly created License Plate number.
A notification will display that the Place is completed.
A new License Plate is created automatically in Business Central by moving the inventory from the License Plate to the New License Plate before the actual registration of inventory movement. When the inventory movement is registered, the item quantity is transferred to the New License Plate and then moved to the Bin.
The new pick license plate label will be printed automatically for this License Plate after the inventory movement is registered if the Page field is set as PLANMOVE and Auto Print License Plate Label is set as Yes on the Mobile Profile Setup page.
If you also use the Aptean Food and Beverage License Plating extension, when handling items that are license plate tracked, after the take activity is performed, to perform the place activity, fill in the bin code to which the item that must be moved.
Then enter the License Plate No. that was entered during the Take-activity. In case that a New License Plate No. has been used, this number must been entered instead of the ‘old’ license plate number to perform the place activity. This automatically fills in the item no., lot no. and quantity.
When registering the inventory movement, the scanned item(s), lot(s) and their quantities will be automatically transferred to the new license plate number. The new license plate number will be temporarily stored in the user-specific bin. The shipping container code for this new license plate number will be assigned with the value that has been selected in the Default Shipping Container Pick LP field from the License Plating Setup page. Then, the new license plate number replaces the old license plate on both the activity types take and place inventory movement lines. This will ensure that the new license plate is moved from the user-specific bin to the place-bin that was selected in the inventory movement.