Labels
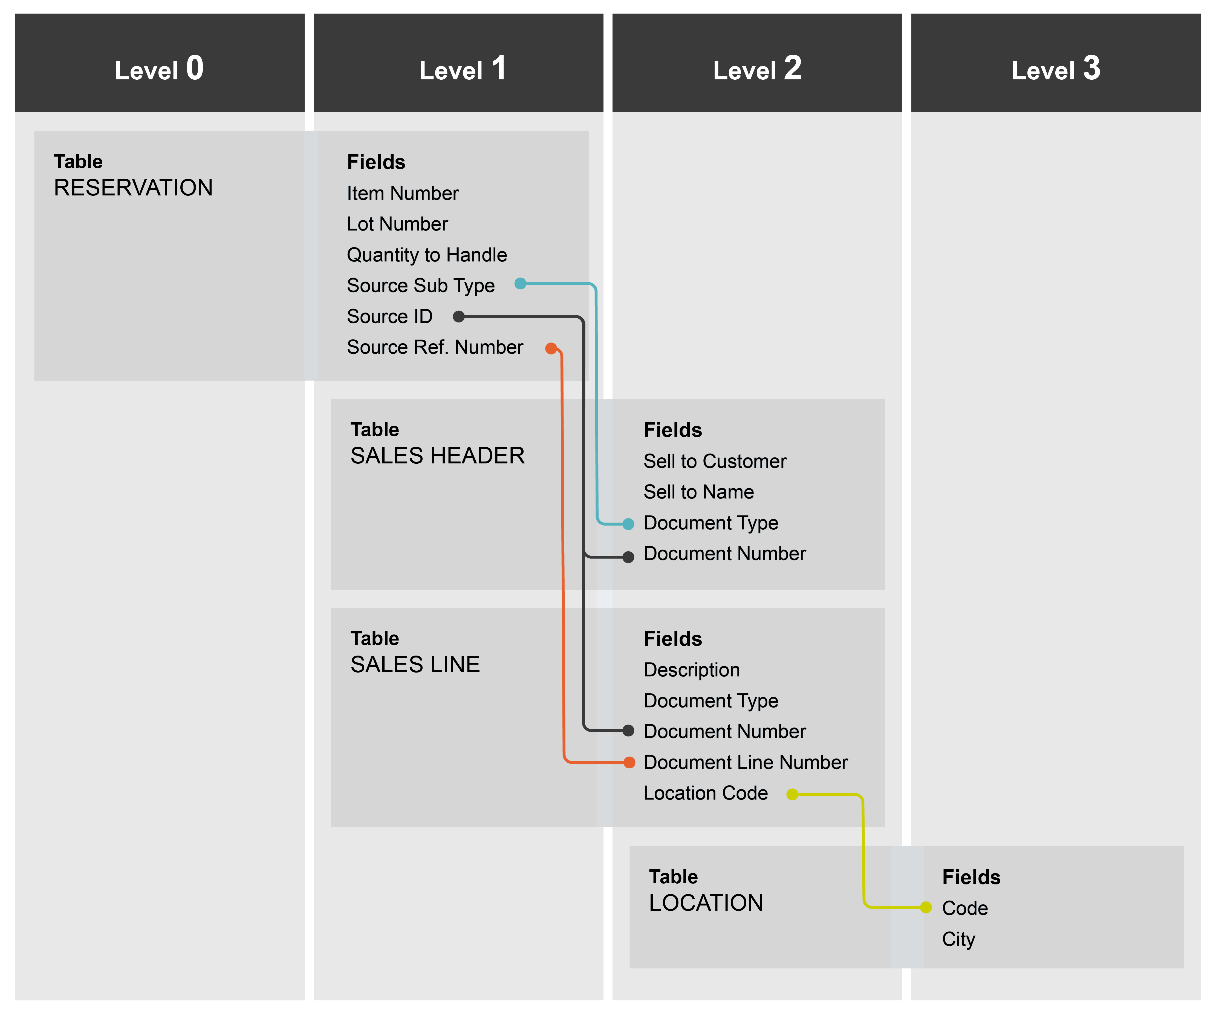
Before being able to print a label, it is necessary to set up the content of the label on the Labels page. The content of the labels comes from the tables in Dynamics 365 Business Central. The image below shows an example of what the structure of a label content could look like. By defining levels of a hierarchy and setting relationships between tables, it is possible to display the correct values on the label.
For a number of standard labels, a package is already created. The package "APTFB 26 LBL Labels" can be imported on the Configuration Packages page in Dynamics 365 Business Central. Some of the labels in the package make use of tables from Aptean extensions. If these extensions are not installed, a warning will be displayed during import. This message can be ignored and the labels can be created without these tables.
The steps below show an example of an imported label.
-
Select the Search icon
 , enter Labels and then choose the related link.
The Labels list page opens. It consists of an overview of all labels. In this example, all labels from the package "APTFB 26 LBL Labels" are shown.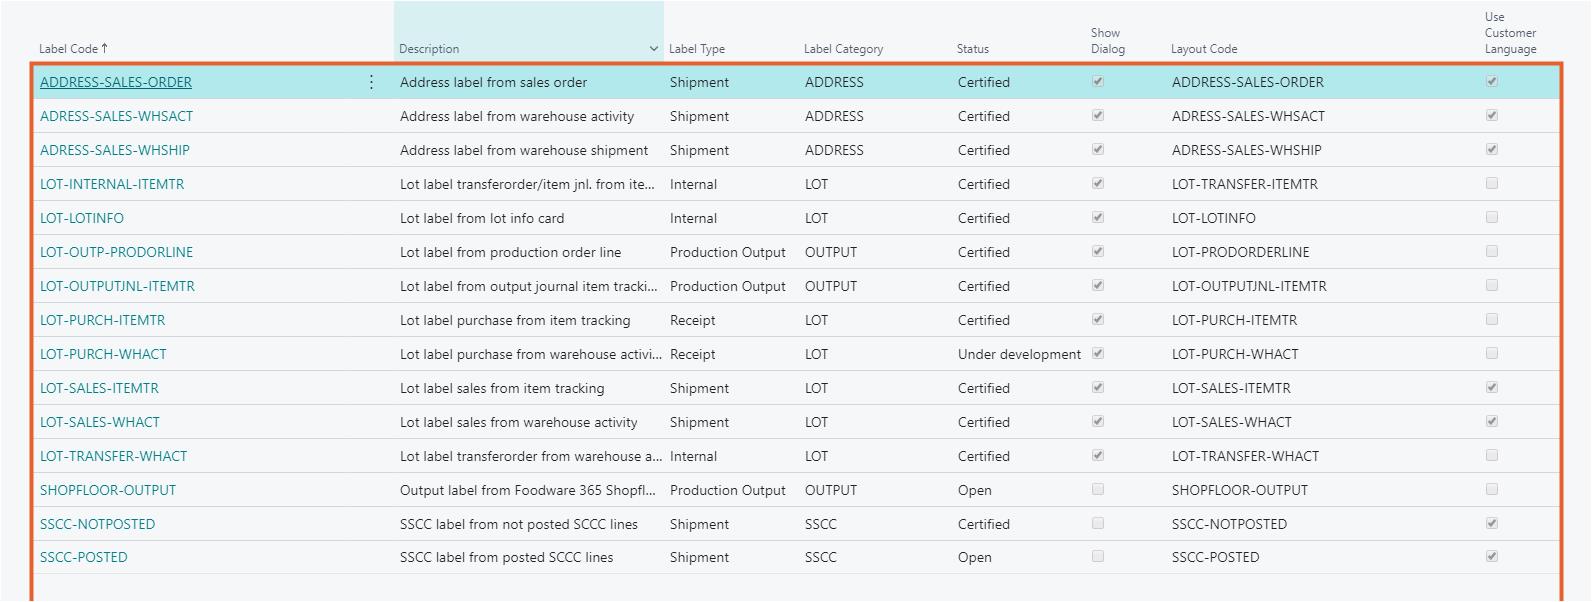
-
Click the required Label Code. Alternatively, on the action bar, click New to create a new one.
The Label card page opens.
Label header
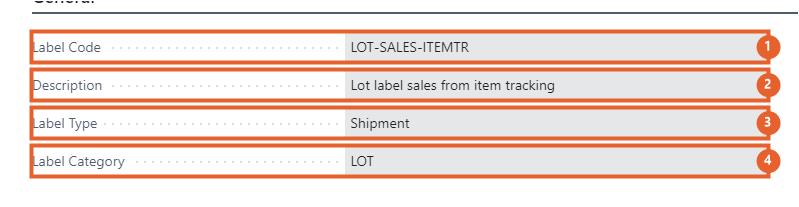
The Label Header on the Label card page has the following fields:
- Label Code: Specifies the code of the label.
-
Description: Specifies the description of the label.
-
Label Type: Specifies for which type of document the label is used. (See the table below to understand which documents belong to which label type).
If the label print function is outside the standard pages in Dynamics 365 Business central, the label type Custom must be selected. Information for printing the label(s) is then stored in a temporary table via an API or the Interface Management extension. This table must be entered as the highest in the hierarchy in the Label Setup Lines (Level 0). An example of a Custom label is a SSCC label that must be print from the SSCC extension.
-
Label Category: Specifies a label category. For more information about creating a label category, see Label categories.
-
Output Option: Specifies the output option of the label. The available options are: Label Output File, and Report.
When you select Report option, the Report ID field value is updated from the Default Report ID field associated to the Labeling Setup page.The system displays a notification message when the Default Report ID field value is left blank on the Labeling Setup page.
-
Report ID: Specifies the ID which is used to print labels. The system automatically updated this field value from the Default Report ID field associated with the Labeling Setup page.
- Report Layout: Specifies the default report layout for label printing. This field value is updated from the Default Report Layout field associated with the Labeling Setup page.
-
Label Subtype: This field is available when the Label Type field value is set to Custom. In the Label Subtype field, you can specify the type of custom document that uses the label. Ensure the subtype value you enter matches the subtype sent from the related API (external system) or the Aptean Interface Management extension.
- The following custom APIs are available for the Aptean Mobile Warehouse Registration extension.
- License plate line: 70241434
- Lot number information: 6505
- Warehouse receipt line: 7317
- The following custom API is available for the Aptean Shop Floor Production extension.
- Production registration entry: 70234053
- The following custom APIs are available for the Aptean SSCC extension..
- SSCC header: 70219093
- SSCC line: 70219091
- Posted SSCC header: 70219094
- Posted SSCC header: 70219090

- The following custom APIs are available for the Aptean Mobile Warehouse Registration extension.
-
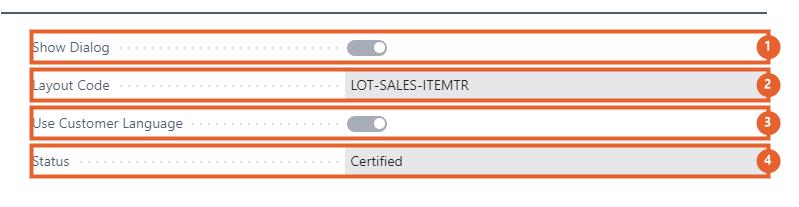
When the Show Dialog toggle is turned on, a printing dialog will be displayed when printing the labels in which it is possible to adjust the number of labels to print.
-
In the Layout Code field, enter the code of the layout. The layout code is used so that the external label printing program knows which layout should be printed. If the labels are printed from different labels but with the same content, these labels can get the same layout code.
For BarTender Cloud, enter the full path of the label in this field. For example: Librarian://main/Test/LabelTest.btw
> For Loftware Cloud Print, copy the label path from Loftware and enter it in this field. For example: /!NiceLabel-Samples/v1/Test-Print-To-Cloud-Printers/AryanTest.nlbl - When the Use Customer Language toggle is turned on, the customer language will be used for the values on the label. This toggle can only be turned on if the Label Type is equal to Shipment or Production Output. When no customer is available in the source document that the label is printed for, the default company language will be used on the label.
- The Status of the label is shown. The status can be changed by executing the Change Status function. This function is described in the next topic. When changing the status to Certified, a number of checks take place, to check if the label lines are entered correctly. Only labels with the status "Certified" are printed.
| Label Type | Receipt | Shipment | Production Output | Internal | Custom | Warehouse |
|---|---|---|---|---|---|---|
| Printed From | This option is available only when the Aptean Beverage Advanced Warehouse Management, Drink-IT Edition and Aptean Warehouse Management System extensions are installed. |
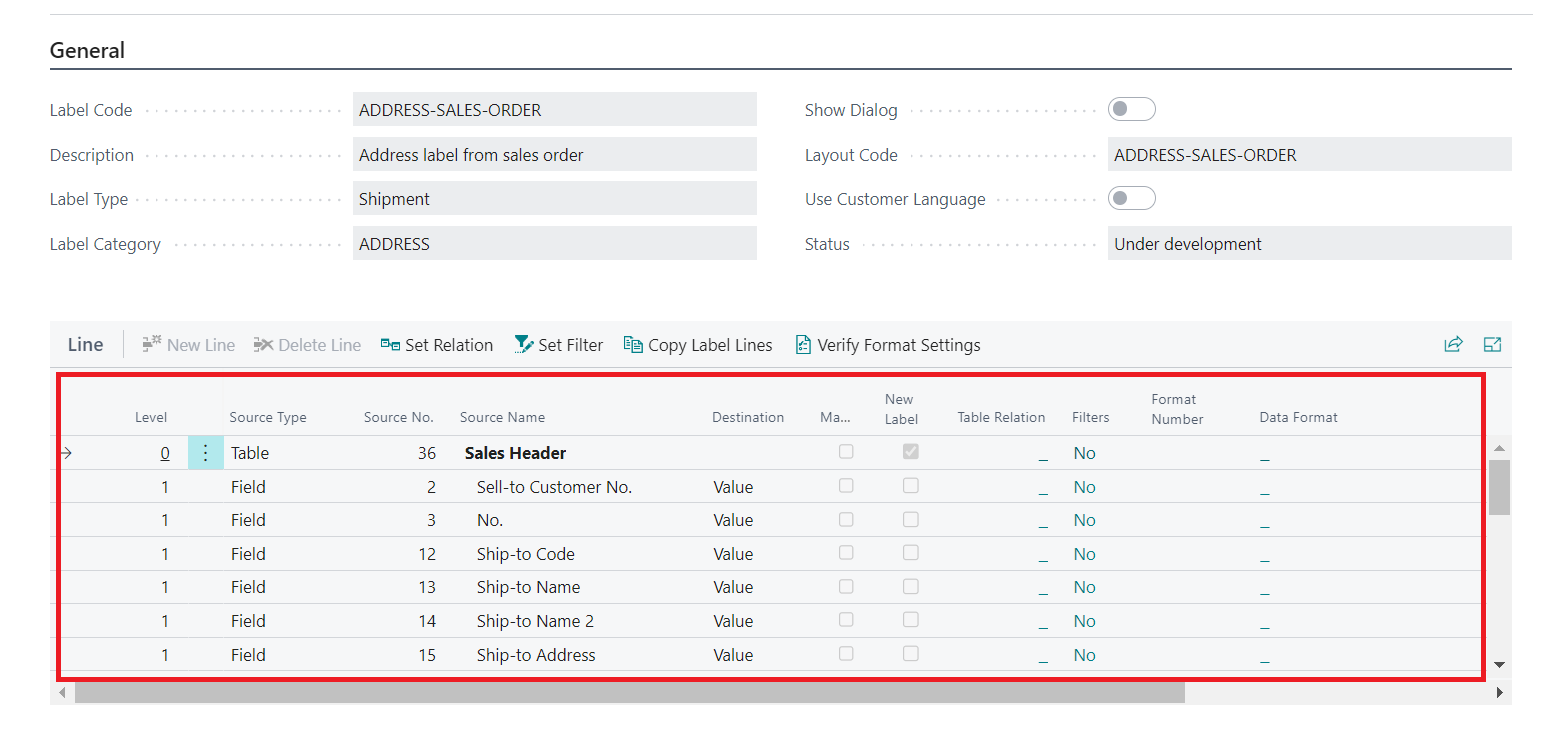
Label setup line
In the label setup line under the Line FastTab on the Label card page, it is possible to enter the tables and fields that are necessary to capture the content for the label.
-
Level specifies the level of the line in order to create a hierarchy. The system can only use the label codes where the table, from where the print function is executed, is used as a "start" table (table with level 0) in the label code.
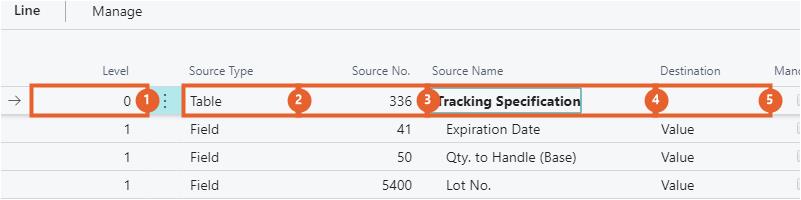
- Source Type specifies the type of the label setup line, such as Table, Field or Text.
- Source No. specifies the number of the source table or source field.
The source name is automatically filled in when entering a source number. It is also possible to enter the source name first, then the source number is automatically filled. - Destination specifies the destination of the label setup line of the type Field. When you want to show the value on the label, choose "Value". Choose "Add to Caption", if the value of the field must be added to the caption. If a label has to be printed in different languages, it is possible to add the language code to the caption.
- Select the Mandatory checkbox if the setup line with source type "Field" must be mandatory. If the field is mandatory, and there is no value present when printing the label an error will be shown in the label output files.
- The New Label checkbox points out from which table the actual label content starts. Furthermore, it specifies from which setup line the printing function will re-run for each source line in the source document when the document contains multiple lines.
-
Select the Add Counter to Captions checkbox if you want the system to loop through data sets that contain multiple lines (such as purchase lines) and apply a counter to each line caption. This field is editable only when the Source Type field is set to Table and the Output Option field value is set to Label Output File on the General FastTab of the Label page.
The counter will increment for each line, starting at 1, and append the value to the corresponding caption. If multiple lines are printed for a label, each line will add a unique counter to its caption for clarity and tracking.
-
Table Relation shows whether there is a relationship and with which table.
- Filters shows whether there is a filter on the setup line.
- Format Number specifies how a numeric value must be formatted. This field is only applicable when the source type of the setup line is Field and the value is numeric. "Reverse sign" will turn a positive number into a negative number and vice versa. "Absolute" will always turn the value to a positive value.
- In the Data Format field, specify the data format for labels using numeric values defined by Business Central. For more information, see Formatting values, dates, and time.
-
In the Time Zone field, set the time zone for labels, which the system uses to update the time on the lines of the Label Output Files page.
Note that the Aptean Mobile Warehouse Registration and Aptean Shop Floor Production extensions use UTC as the data format for printing labels, while the standard Business Central uses the region setting for label printing.
If you need a consistent data format for label printing through the Aptean Mobile Warehouse Registration application and Aptean Shop Floor Production Power App and their corresponding Business Central extensions, you can specify the relevant numeric value defined by Business Central for the data format. This will ensure that the output data format remains the same in all situations.
The system creates a caption for the setup line with source type Field or Text. The caption is composed of a table name, a field name, and a suffix. If the caption is not the same as the field name, it can be adjusted manually. This must be the same as the caption used in the external label program. As an example, this can be used for translations of field names.
Functions
Change status
Each label has a status. Only labels with the status Certified can be printed. When creating a new label, the default status is Open. When changing the status to Certified, the system performs a number of checks.
-
On the Label card page, on the action bar, click Actions > Change Status.
The Choose a new status dialog box opens.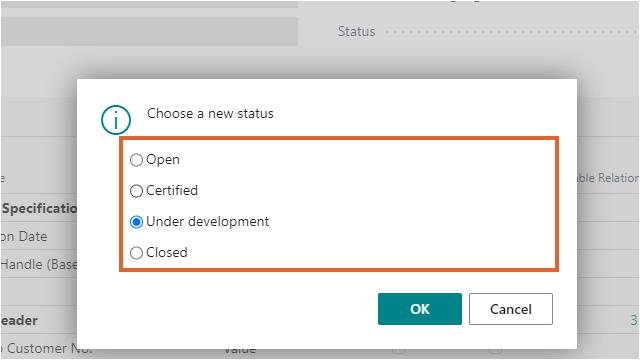
- Select the required option and click OK.
When the Report ID field value is left blank, the system displays an error message when executing this action.
The label status is now changed.
Report Label Fields
You can view the fields that are used in the report for the selected label.
-
On the Label page, execute Report Label Fields.
The Report Label Fields page opens. -
In the line level, enter the following field values to configure the fields required in the report:
Field Description Line No. Specifies the line number displayed in the report. Field Type Select the type to which the field you want to display on the report belongs. You cannot use the same field type multiple times. Barcode Type Select the barcode to be used which is related to the field type. You can select this field value only if the Field Type field is set to a value between Barcode 1 to Bacode 10. Field Name Select the field that you want to display on the report. Label Setup Line No. Specifies the line number of the related label setup line. Table No. Specifies the number of the table for which the label is printed. Table Name Specifies the name of the table for which the label is printed.
Set relation
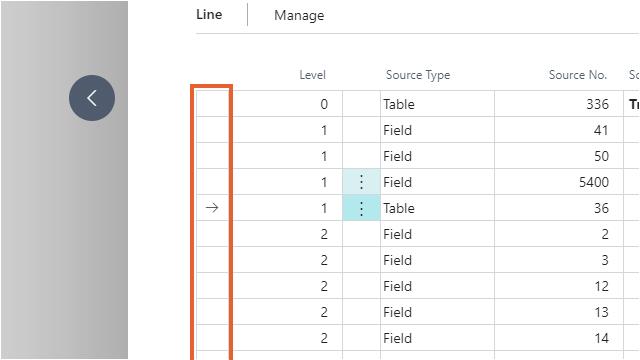
To retrieve the correct data from a table, relationships are needed between the "start" tables and the underlying tables. When creating a relationship, the fields with the same data in both tables must be linked to each other.
-
On the Label card page, select a label setup line with the source type Table.
- On the action bar, click Manage > Set Relation.
The Table Link Setup page opens. - Click the lookup button in the Parent Field No. field.
- Click the required No. to select the field number in the parent table that is related to the field in the table that the link is created from.
- Click OK.
- Click the lookup button in the Field No. field.
-
Click the required No. to select the field number in the table that the link is created from and which is related to the parent field in the parent table.
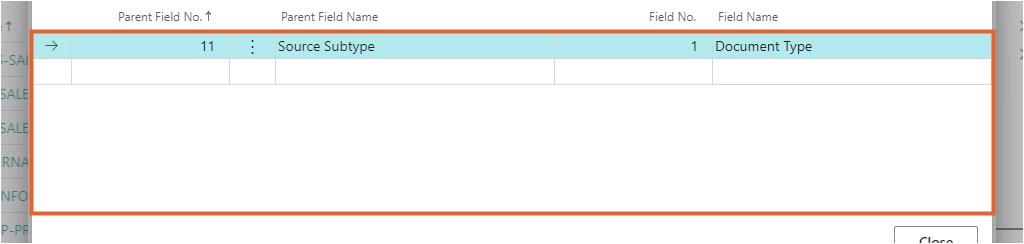
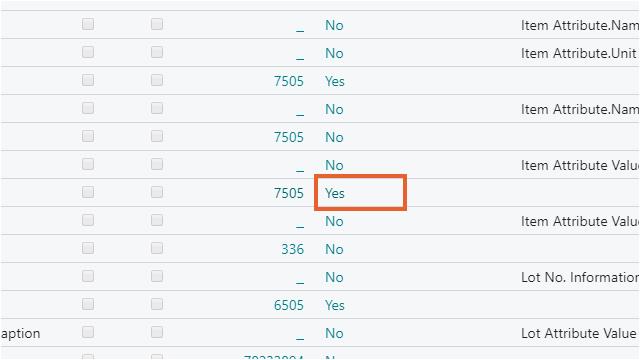
A relationship is now set up. In this example a relation between tables 336 "Tracking Specification" (the table in the selected setup line) and table 36 "Sales Header" (the table one level up) is set up with the fields "Source Subtype" (11) from table Tracking Specification and the field "Document Type" (1) from the table Sales Header.
-
Click Close.
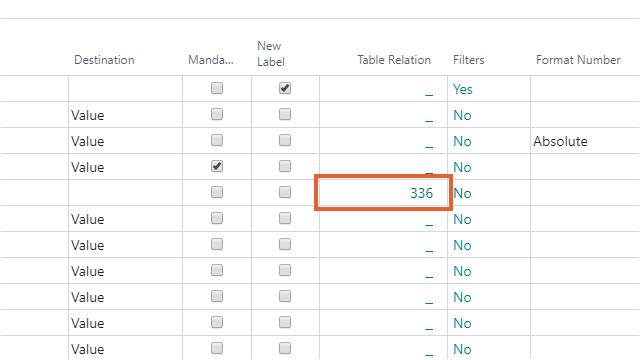
In the label setup line is shown which table the line has a relationship with.
Set filter
A filter can be placed within a table to filter a specific value. An example of using a filter is the activity table in the warehouse. This table is used for both the incoming and outgoing warehouse activity lines. If labels are printed from a warehouse activity line with source "purchase order", then a filter must be placed on the source "Purchase order".
- On the Label card page, select a label setup line with the source type Table.
- On the action bar, click Manage > Set Filter.
The Table Filters Setup page opens. - Click the lookup button in the Field No. field.
- Select the field number that the selected table should be filtered on.
- Click OK to close the Fields Lookup page.
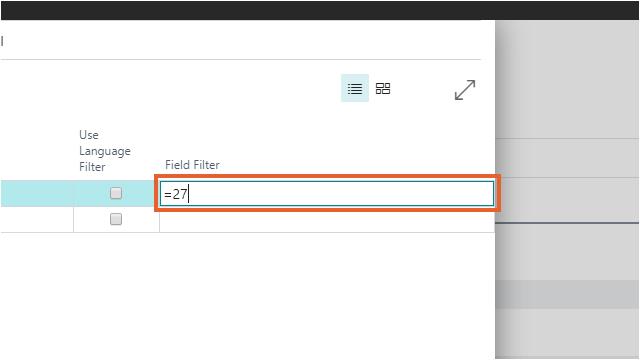
-
Click Field Filter and enter the filter. It is possible to use numbers, letters and special symbols or operators, such as ">"(greater than) or "*"(unknown character(s)).
-
Click Close on the Table Filters Setup page.
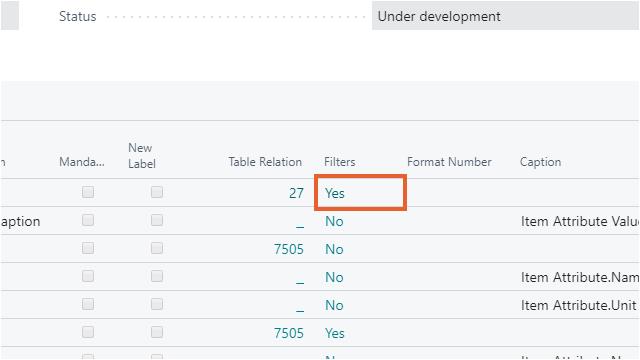
On the Label card page, the label setup line shows that a filter is set.
Use language filter
It is possible to filter on the customer language so that the label can be printed in the language of the customer. This filter only works when in the header the "Use Customer Language" is on. Every time the label is printed the system will search for the customer language (of the customer linked to the source document that the label is printed from) and use this language as a filter within the table. When no customer language can be found, the default company language will be used.
- On the Label card page, select a label setup line with source type Table and where the table includes a field Language Code.
- On the action bar, click Manage > Set Filter.
The Table Filters Setup page opens. - Click the lookup button in the Field No. field.
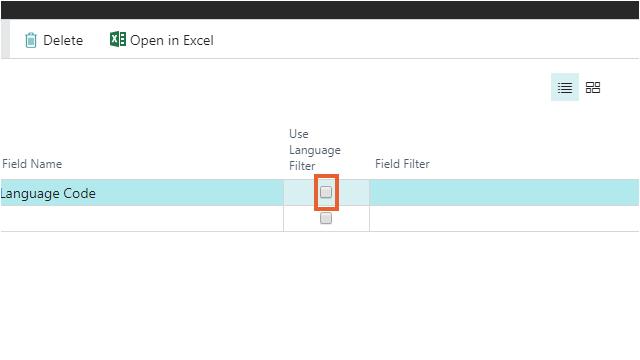
- On the Fields Lookup page, select the row with the field name value Language Code.
-
Click button OK to close the Fields Lookup page.
-
Select the Use Language Filter checkbox.
The label setup line shows that a filter is set.
Copy lines
It is possible to copy the lines of a label to a new label to quickly create a similar label.
- Select the Search icon , enter Labels and then choose the related link.
The Labels list page opens. - On the action bar, click New to create a new label.
The Label card page opens. - Enter Label Code.
- On the Line FastTab, on the action bar, click Manage > Copy Label Lines.
The Labels list page opens. - Select a Label Code from which all the label setup lines must be copied.
The lines are now copied to the new label and is shown on the Line FastTab on the Label card page.