Setup
The components for exporting to Azure Data Lake involved are the following,
- the businessCentral folder holds a BC extension called
Azure Data Lake Storage Export(ADLSE) which enables export of incremental data updates to a container on the data lake. The increments are stored in the CDM folder format described by thedeltas.cdm.manifest.json manifest. - the synapse folder holds the templates needed to create an Azure Synapse pipeline that consolidates the increments into a final
dataCDM folder.
The following diagram illustrates the flow of data through a usage scenario- the main points being,
- Incremental update data from BC is moved to Azure Data Lake Storage through the ADLSE extension into the
deltasfolder. - Triggering the Synapse pipeline(s) consolidates the increments into the data folder.
- The resulting data can be consumed by applications, such as Power BI, in the following ways:
- CDM: via the
data.cdm.manifest.json manifest - CSV/Parquet: via the underlying files for each individual entity inside the
datafolder - Spark/SQL: via shared metadata tables
- CDM: via the

The following steps take you through configuring your Dynamics 365 Business Central (BC) as well as Azure resources to enable the feature.
Configuring the storage account
You need to have a storage account to store the exported data from BC. This is the storage which exposes that data as CDM folders.
Step 1. Create an Azure service principal
You will need an Azure credential to be able to connect BC to the Azure Data Lake Storage account, something we will configure later on. The general process is described at Quickstart: Register an app in the Microsoft identity platform | Microsoft Docs. The one I created for the demo looks like,
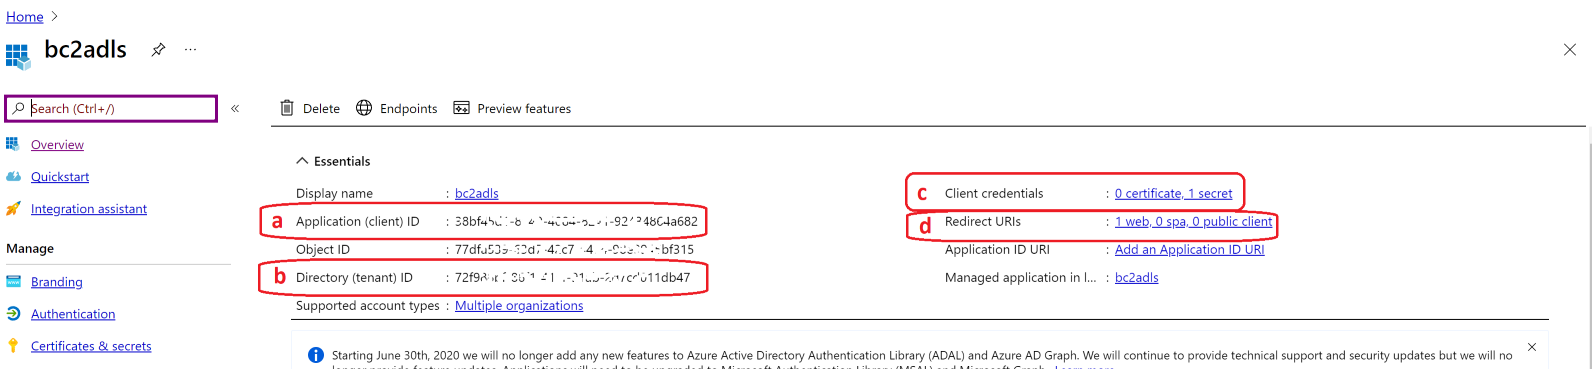
Take particular note of the a) and b) fields on it. Also note that you will need to generate a secret c) by following the steps detailed in the Option 2: Create a new application secret. Add a redirected URI d) , https://businesscentral.dynamics.com/OAuthLanding.htm, so that BC can connect to Azure resources, say the Blob storage, using this credential.
Step 2. Configure an Azure Data Lake Gen2
The tool exports the BC data to an Azure Data Lake Gen2. You may refer to the following to create the resource, Create a storage account for Azure Data Lake Storage Gen2 | Microsoft Docs.
Step 3. Connect credential to the blob storage
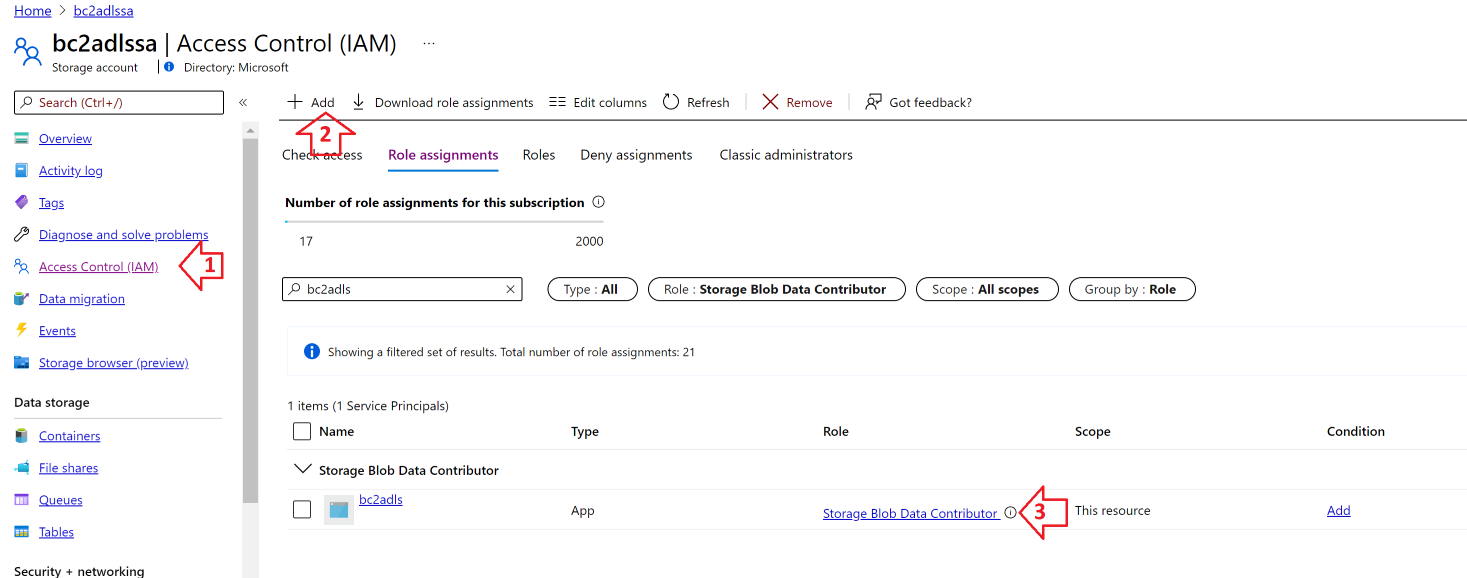
Now you must configure the above storage account to allow changes by the credential created above. Make sure you add a role assignment so that the above credential is granted the Storage Blob Data Contributor role on the storage account. Learn more to do this at Assign an Azure role for access to blob data - Azure Storage | Microsoft Docs. In the following screenshot, a sample storage account called bc2adlssa has been assigned a credential called bc2adls. [Hint: start typing credential name and select it in the list filtered]
Configuring the Dynamics 365 Business Central
Install the extension into BC using the code given in the businessCentral folder using the general guidance for developing extensions in Visual Studio code.
The app exposes 3 permission sets for different user roles that work with this app. Remember to assign the right permission set to the user, based on the scope of their tasks:
ADLSE - Setup- The permission set to be used when administering the Azure Data Lake Storage export tool.ADLSE - Execute- The permission set to be used when running the Azure Data Lake Storage export tool.ADLSE - Track Delete- The permission set used to register the deletion of any record, so that the information of it being deleted can be conveyed to the Azure data lake. A user who deleting a table that is configured for export bybc2adlsshould have this permission.
Once you have the Azure Data Lake Storage Export extension deployed, open the Page 82560 - Export to Azure data lake Storage. In order to export the data from inside BC to the data lake, you will need to add a configuration to make BC aware of the location in the data lake.
Step 4. Enter the BC settings
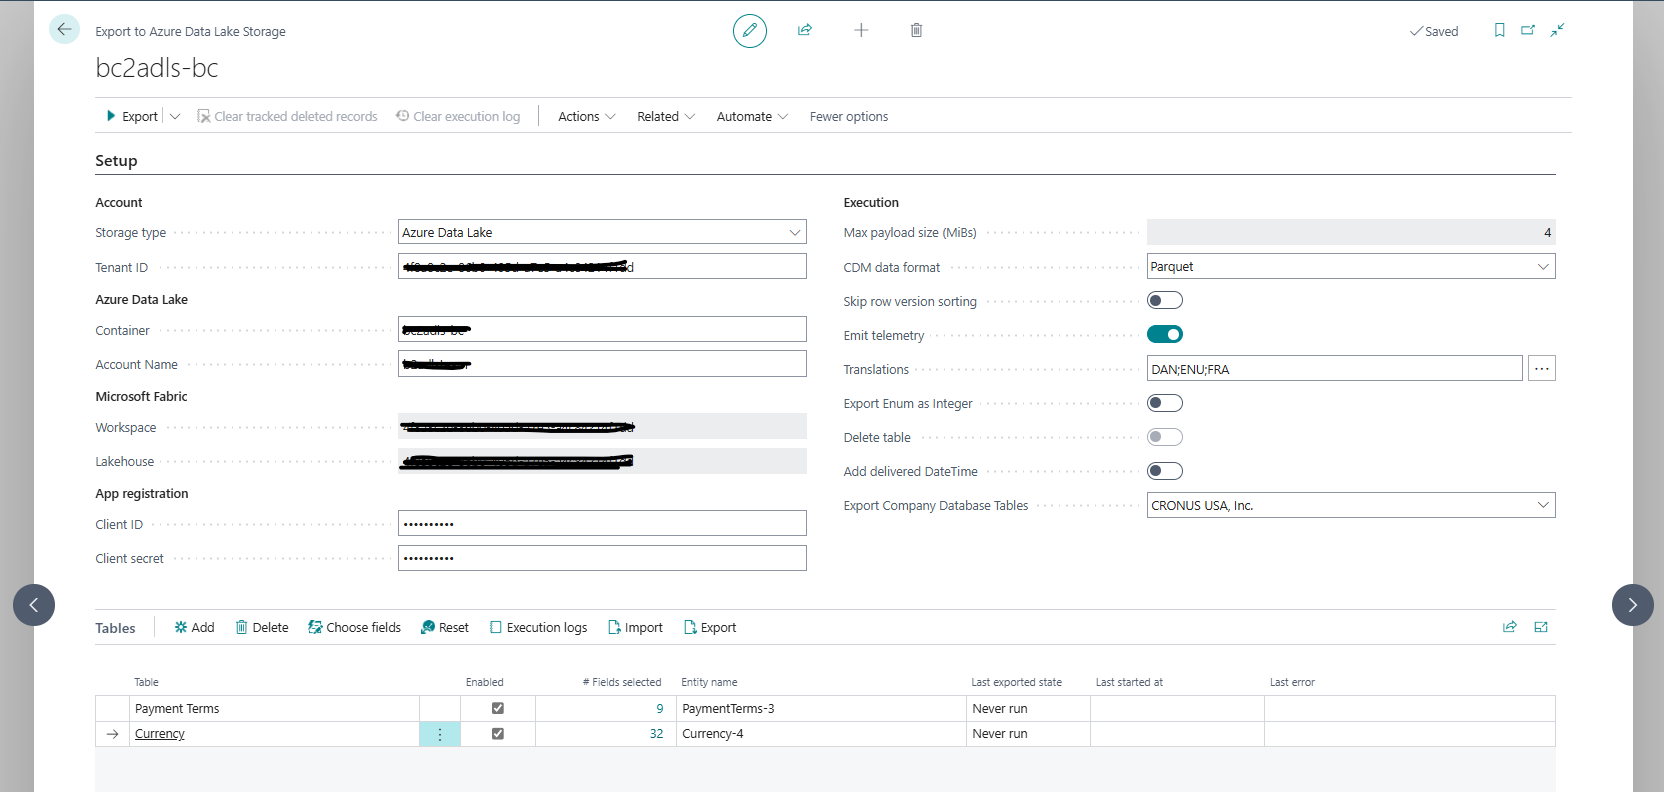
Let us take a look at the settings show in the sample screenshot below,
- Container The container name inside the storage account where the data shall be exported as block blobs. The export process creates this location if it does not already exist. Please ensure that the name corresponds to the requirements as outlined at Naming and Referencing Containers, Blobs, and Metadata - Azure Storage | Microsoft Docs.
- Tenant ID The tenant id at which the app registration created above resides (refer to b) in the picture at Step 1)
- Account name The name of the storage account that you created in Step 2.
- Client ID The Application (client) ID from the App registration (refer to a) in the picture at Step 1)
- Client secret The client credential key you had defined (refer to c) in the in the picture at Step 1)
- Max payload size (MiBs) The size of the individual data payload that constitutes a single REST Api upload operation to the data lake. A bigger size will surely mean less number of uploads but might consume too much memory on the BC side. Note that each upload creates a new block within the blob in the data lake. The size of such blocks are constrained as described at Put Block (REST API) - Azure Storage | Microsoft Docs.
- CDM data format The format in which the exported data is stored on the data lake. Recommended format is Parquet, which is better at handling special characters in the BC text fields. Note that the
deltasfolder will always store files in the CSV format but the consolidateddatafolder will store files in the configured format. - Skip row version sorting Allows the records to be exported as they are fetched through SQL. This can be useful to avoid query timeouts when there is a large amount of records to be exported to the lake from a table, say, during the first export. The records are usually sorted ascending on their row version so that in case of a failure, the next export can re-start by exporting only those records that have a row version higher than that of the last exported one. This helps incremental updates to reach the lake in the same order that the updates were made. Enabling this check, however, may thus cause a subsequent export job to re-send records that had been exported to the lake already, thus leading to performance degradation on the next run. It is recommended to use this cautiously for only a few tables (while disabling export for all other tables), and disabling this check once all the data has been transferred to the lake.
- Emit telemetry The flag to enable or disable operational telemetry from this extension. It is set to True by default.
- Translations Choose the languages that you want to export the enum translations. You have to refresh this every time there is new translation added. This you can do to go to
Relatedand thenEnum translations. - Export Enum as Integer The flag to enable or disable exporting the enum values as integers. It is set to False by default.
- Add delivered DateTime If you want the exported time in the CSV file yes or no.
- Export Company Database Tables Choose the company in which you want to export the DataPerCompany = false tables.
Note
- The above settings are applied for all companies inside BC. Thus, data from all companies in your BC environment will go to the same Azure Data Lake container, using the same export schema. It is recommended to use different containers for different environments.
- Data is exported in parallel through individual sessions for each table and company. There are operation limits to how many sessions can be queued up and executed - please refer to Asynchronous task limits. Tables that got left out because of such limits will likely be exported in one of the next executions.
Configuring the Azure Synapse workspace
This section deals with consolidation of the data that was uploaded to the data lake from BC. It is assumed that you would run the exports from BC periodically and that would generate incremental changes loaded in the deltas CDM folder. These incremental changes will then be consolidated into the final data CDM folder using Azure Synapse.
Step 5. Create an Azure Synapse Analytics workspace
Follow the steps as given in Quickstart: create a Synapse workspace - Azure Synapse Analytics | Microsoft Docs to create a workspace. Here you must provide the following and click on Create to create the workspace
- A unique workspace name
- A storage account and a container in it- that is exclusively for the use of this workspace, say, to store logs of activities. It is recommended that this is a different storage account than the one you use to store data from BC.

Step 6. Create data integration pipelines
This is the step that would create the analytics pipelines in the above workspace and consists of the following sub- steps,
-
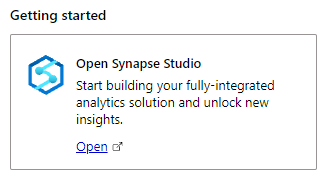
Open the Synapse workspace just created and on the Overview blade, under Getting Started tab, click on the link to open the Synapse Studio.
-
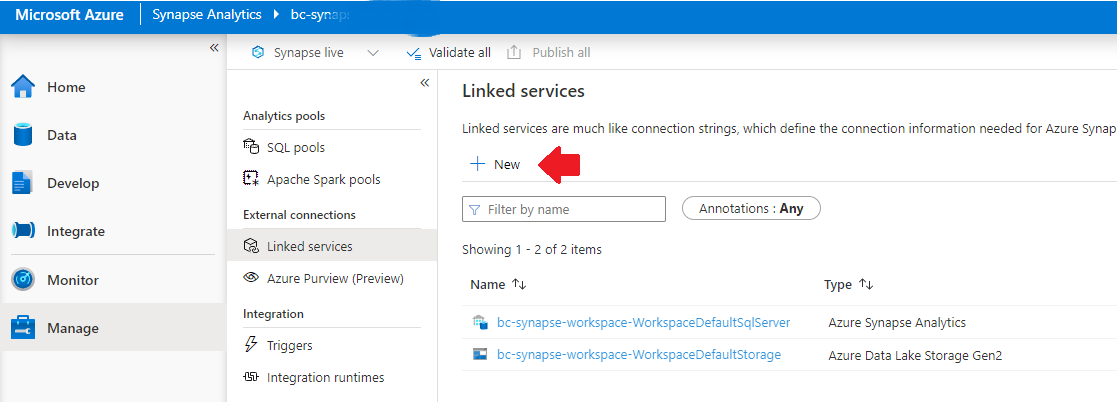
We need a linked service that establishes the connection to the storage account you created in Step 2. Click on New button on the Linked Services under the Manage pane.
-
In the New linked service pop-up, choose Azure Data Lake Storage Gen2 before clicking on Continue.
-
Please enter the following information to configure the data lake linked service
- Set Name to
AzureDataLakeStorage. It is important that you set it exactly to this name as this is a dependency for the next steps when you import the pipeline elements. - You created a Service credential (via an App Registration) in Step 1 and gave it permissions to read from and write to the data lake. We will use those details to configure the linked service. Set the Authentication method to be Service Principal.
- Choose Enter manually for Account selection method.
- Set the URL to point to the data lake store. The URL should be in the following format:
https://<storage-account-name>.dfs.core.windows.net. - Set the Tenant to be the tenant guid for the App Registration (see b) in the picture at Step 1).
- Set the Service principal ID to be equal to the Application ID in the App Registration (see a) in the picture at Step 1).
- Set the Service principal credential type to be Service principal key.
- Set the value of the Service principal key to be one of the secrets that you must have configured in the Certificates & secrets link of the App Registration (see c) in the picture at Step 1).
- It is always a good idea to click and verify that the Test connection button goes green when clicked. Once verified, click on Create.
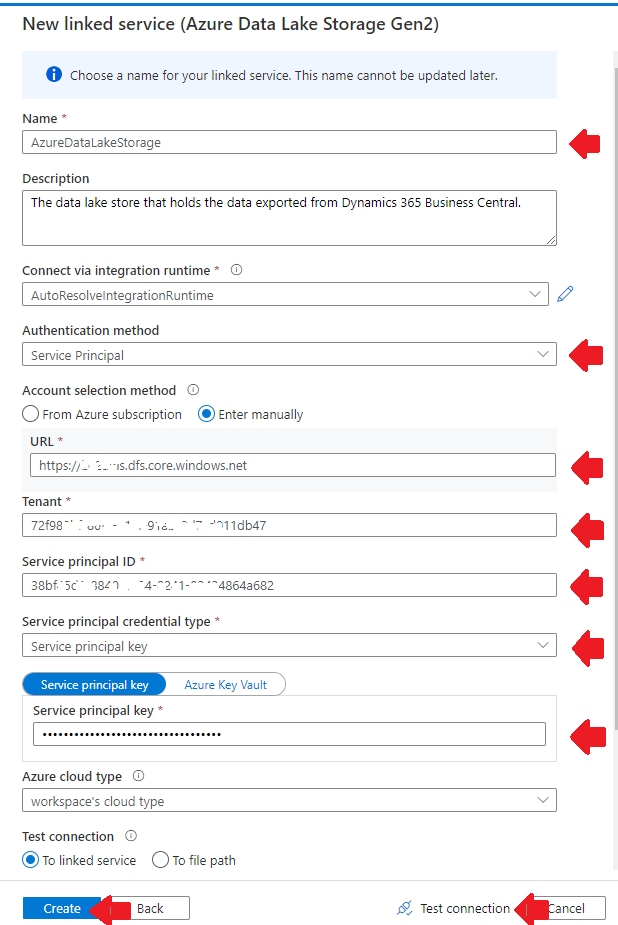
- Set Name to
-
Let us deploy the pipelines and resources now. Note that for each Synapse component, you will have to create a dummy entry in the Synapse Studio first with the name matching the value in the
Namecolumn in the table below. Then the content of the resource should be replaced with the content of the file linked in the table below, after clicking on the curly braces{}on the top right corner of the page.It is important that the components are created in the following sequence:
Sequence # Name & URL Tab Menu to invoke under the +signHelp doc 1 data_datasetDataIntegration datasetCreate an integration dataset 2 data_dataset_parquetDataIntegration datasetCreate an integration dataset 3 dataManifest_datasetDataIntegration datasetCreate an integration dataset 4 deltas_datasetDataIntegration datasetCreate an integration dataset 5 deltasManifest_datasetDataIntegration datasetCreate an integration dataset 6 entity_datasetDataIntegration datasetCreate an integration dataset 7 staging_datasetDataIntegration datasetCreate an integration dataset 8 Consolidation_flowDevelopData flowCreate a data flow 9 CreateParquetTableDevelopNotebookImport a notebook 10 Consolidation_OneEntityIntegratePipelineCreate a pipeline 11 Consolidation_CheckForDeltasIntegratePipelineCreate a pipeline 12 Consolidation_AllEntitiesIntegratePipelineCreate a pipeline Example showing how to add a Synapse component
The following instruction shows how to create a new dataset. Note that the name of the tab is
Dataand the name of the menu to invoke under the+sign isIntegration dataset.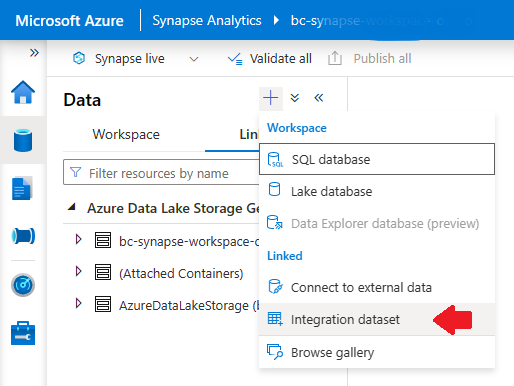
Now choose any of the available types of dataset, as it will be overridden by the content of the json when you replace it later. Here I have chosen a dataset of the type
Azure Data Lake Storage Gen2. Click onContinue.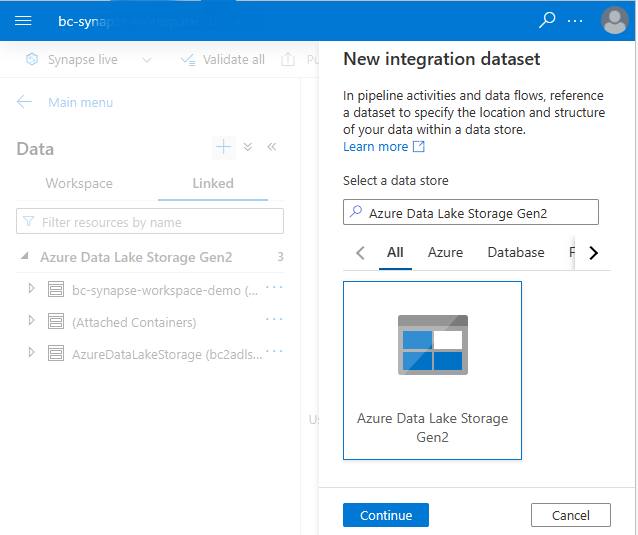
You are then asked to choose the format type of your data. Again, you may choose any. I have chosen the first one shown. Click on
Continue.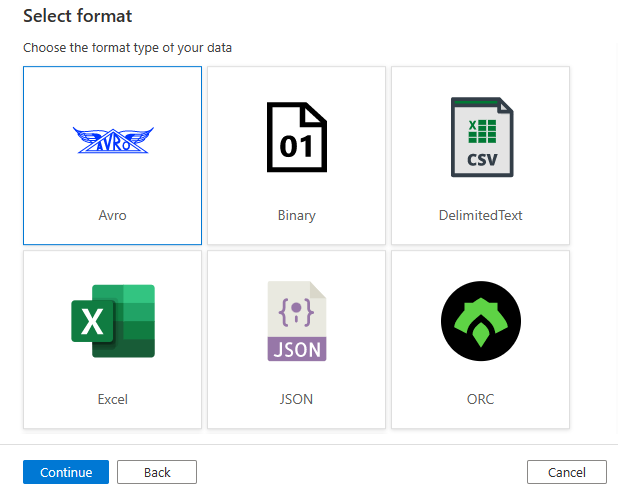
Set
Nameproperty to the name given in the table above. And setLinked serviceproperty toAzureDataLakeStorage. ClickOK.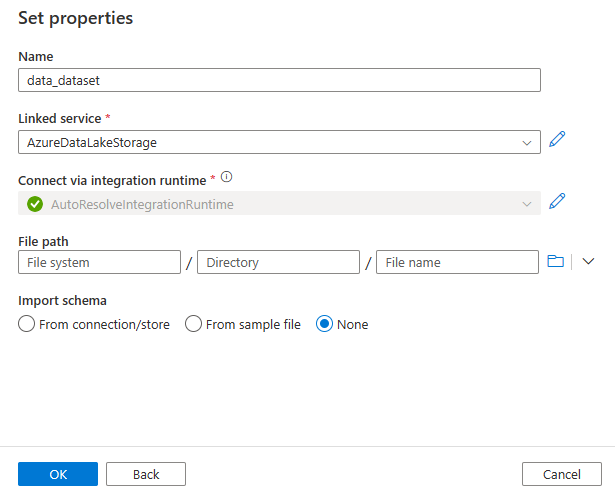
Now, click on the curly bracket
{}button at the top right and replace the content with the corresponding content from the json content in the URL from the table above.Do the same for the rest of the components in the table.
-
At the toolbar of the Synapse Studio at the top, you may now click on Validate all and if there are no errors, click on Publish all.
Step 7. Schedule export
You can also schedule the export. For each company you need to create Job Queue’s. How you can do that you can read here:
How do I run the export to the lake in a recurring schedule
Congratulations!
You have completed configuring the resources. Please proceed to running the tool and exporting BC data to data lake here.