Shop Floor Production
In order to deploy the Aptean Shop Floor Production extension, the following instructions must first be followed:
Please ensure that you have installed the corresponding Aptean Shop Floor Production extension on your Business Central environment before proceeding with the update of the latest version of Shop Floor Production Power Apps. To ensure this, check Release Notes for more information.
- Install or update latest version of the Power Apps Foundation Solution.
- Install or update the Power Apps Shop Floor Production Power Automate Solution.
- Install or update the Power Apps Shop Floor Production Custom Connector Solution. Verify and test the functionality of the Custom Connector action.
- Install or update the Power Apps Shop Floor Production Solution.
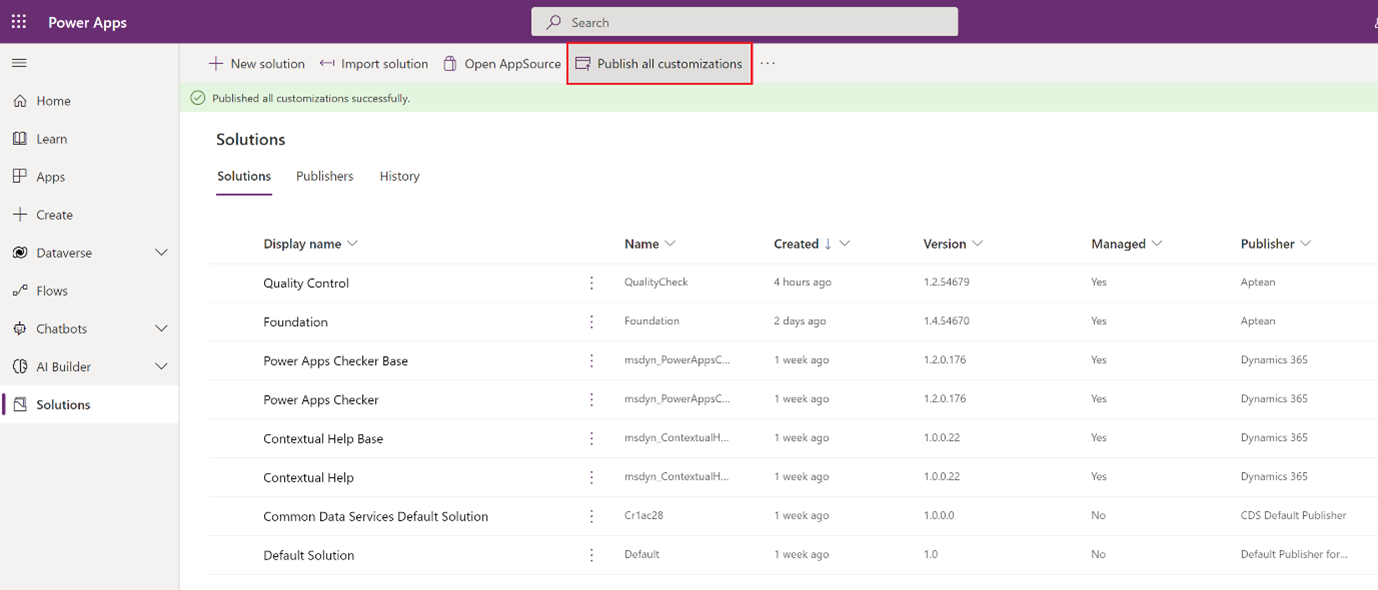
- Publish all customizations.
- Check if the Power Automate feature is enabled in the Power App Shop Floor Production Power Automate Solution. If not, start the Power Automate.
- Import Shop Floor Production translations using XRM Toolkit. You can download the Shop Floor Production package here.
You can find the required instructions for the corresponding tools here:
| Tool | Instructions |
|---|---|
| Prerequisites | Click here |
| Power Apps | Click here |
| Sharepoint | Click here |
| XRM Toolkit | Click here |
The following notification will display when the latest version of Aptean Shop Floor Production is installed. To stop receiving this notification, select Don't show this again.

For the following extensions, another notification is shown if the correct version isn’t installed
- Aptean Packaging for Food and Beverage
- Aptean Labeling for Food and Beverage
- Aptean Process Manufacturing for Food and Beverage
- Aptean Lot Management for Food and Beverage
- Aptean Advanced Comments for Food and Beverage
These notifications display because the Shop Floor Production extension extracts crucial information, which is displayed to the users, from these other extensions.
Before installing any new versions of Power Apps Solutions, ensure that you have installed the latest versions of the Business Central extensions in your Business Central Environment. Use the Business Central Admin Centre to confirm the availability of new versions for installation.
Here is an example:

Deployment Instructions
The Aptean Shop Floor Production in your Power Apps environment incorporates real-time synchronization through a Custom Connector (API). This ensures that any updates or changes in the Shop Floor Production system are instantly reflected in your Business Central environment. To set up this functionality, import and configure the Shop Floor Production Custom Connector Solution in your Power Apps environment. This process establishes a seamless connection and configures the API for efficient system functionality. For more information about custom connectors, click here.
Before doing so first an app registration needs to be created and a Key-Vault setup in Azure which are both requirements for the Custom Connector. This is because the Custom Connector is using OAuth to access Business Central.
For information on how to create an app registration, click here. For information on the setup of the app registration, click here.
Attention points
For both Connection References and Environment Variable values its necessary to:
- Turn off Power Automate and then turn it on again to update the new values.
- Go to the Custom Connector and select Edit. To apply the new values, click the Update button in the window and select Close to leave the edit mode.
- For Canvas apps, the browser must be reopened, and in some cases, you must press CTRL+F5 to refresh again while starting or running the Canvas app to refresh the values in your browser cookies.
Create the App Registration
- Go to https://entra.microsoft.com/#home.
- Select Go to Azure Active Directory.
- In the navigation menu, click Applications > App registrations.
- On the App registrations page, on the action bar, click New registration.
- On the Register an application page, in the Name field, fill in the name of the app.
- Click the Register button on the bottom of the screen.
- After creating the App registration, save the Application (client) ID for later use in the custom connector setup.

- To create a client secret, on the navigation menu, select Certificates & secrets.
- Click New client secret. Enter 'secret' in the Description field and the required value in the Expires field.
- Click Add.
- Copy the secret Value. This value is generated and shown only once. This secret will be required for later setup in the Key Vault Secret setup.

- On the navigation menu, select Authentication.
- Select Add a platform.
- On the Configure platforms pane, select Web.
- In the Redirect URLs field, enter https://global.consent.azure-apim.net/redirect. This is a general URL for all custom connectors.
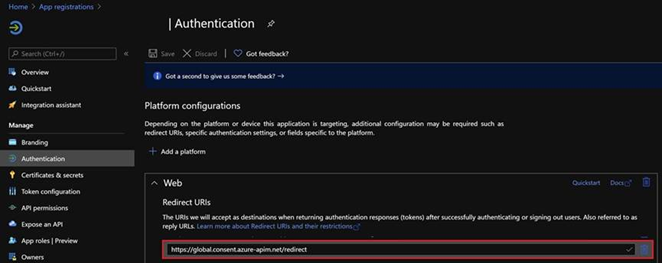
- Click Configure.
- On the navigation menu, select API permissions.
- On the action bar, click Add a permission.
- On the Request API permissions pane, select Dynamics 365 Business Central > Delegated permissions > user_impersonation.
- Click Add permissions.
- After the permissions have been added, on the action bar, select Grant admin consent for <company_name>. You should have admin rights for this Azure tenant to be able to do this. For more information, click here.

Create the Key-Vault and Key-Vault Secret
-
To ensure secure storage of the secret value used by the Custom Connector Solution for the OAuth flow login and the app registration Client Secret Key, you must initiate both a Key-Vault and Key-Vault secret.
For example,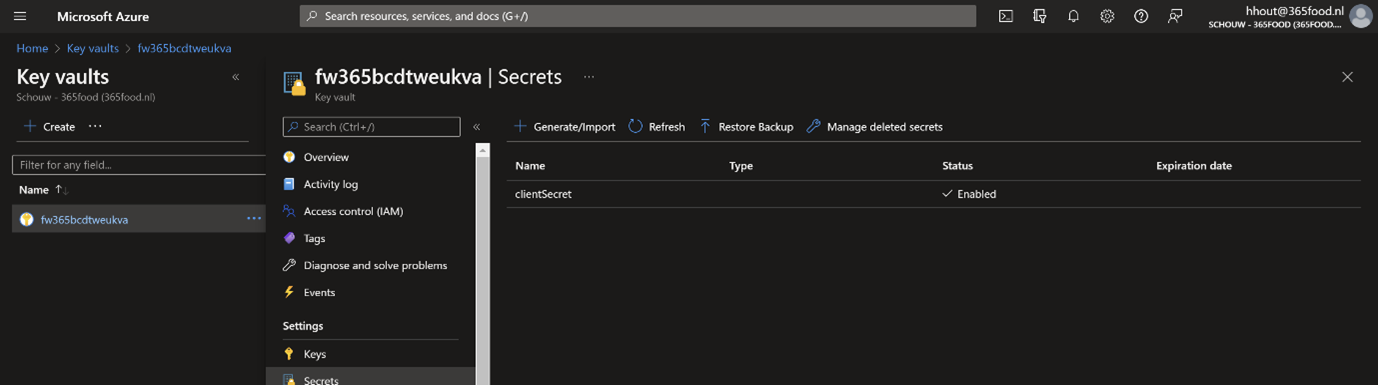
You can also use an existing Key-Vault, taking into account that PowerApps will need access to this Key-Vault.
For more information on how to set up a Key-Vault, see Create Key-Vault | Microsoft Docs
For more information on creating a Key-Vault Secret, see Create Key-Vault Secret | Microsoft Docs. - Save the app registration Client Secret Key as created based on the earlier instruction as the actual value for the Key-Vault secret value for Client Secret.
-
Before integrating the PowerApps environment with KeyVault, it is essential to set up the connection to enable PowerApps to retrieve the secret key from KeyVault and utilize it in the OAuth flow for signing in.
-
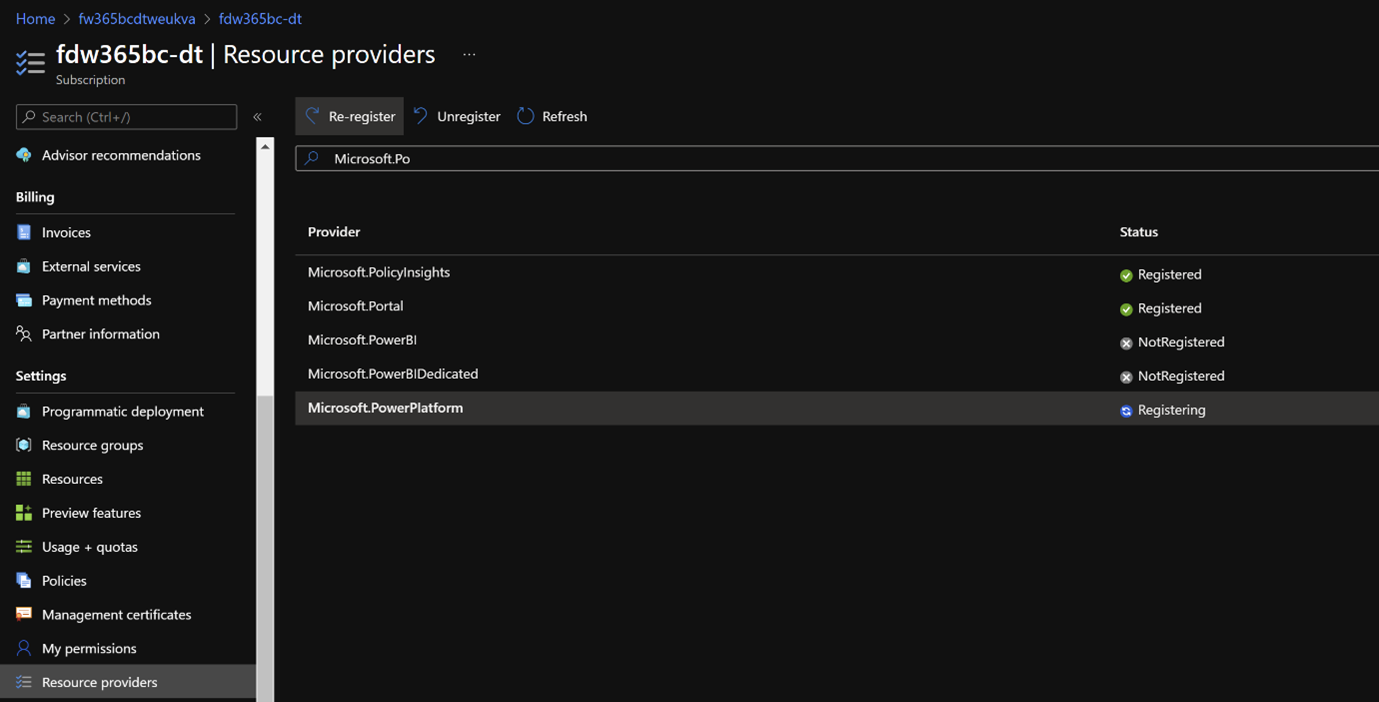
The Power Platform should be added as Resource Provider in your Azure Subscription.
-
Dataverse must get read permission on the Key-Vault Secrets. To enable this, add principal 00000007-0000-0000-c000-000000000000 (Dataverse) in the Key-Vault Access policies and enable Get permission for Secret Permissions.
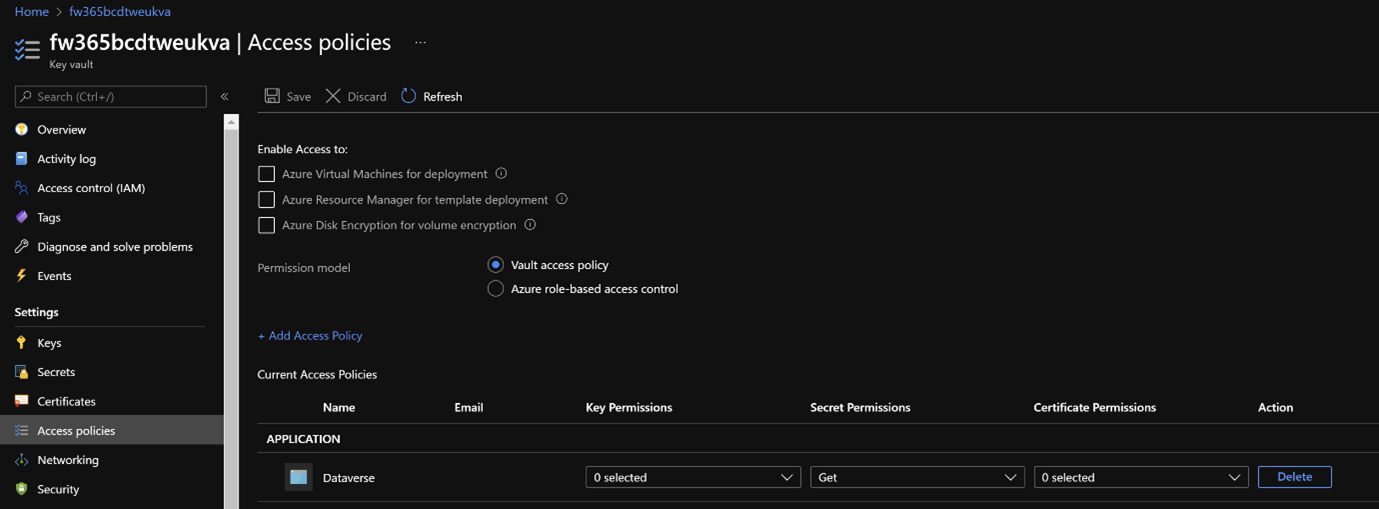
The end result is that PowerApps can now read secrets that enable the use of Secret Data Type for Environment Variable Values with the actual secret values stored and read from the Key-Vault.The user that will set up the Custom Connector Solution and its Environment Variable Values also needs permission to access the Key-Vault and read the secrets to initiate the connection. This is not required for all users that will create new connections based on the new custom connector.
-
Import Shop Floor Production Custom Connector Solution (Managed)
The Custom Connector Solution version represents the highest Shop Floor Production Business Central API version currently supported by the Custom Connector Solution.
The user that will import and set up the Custom Connector Solution and its Environment Variable Values also needs permission to access the Key-Vault and read the secrets to initiate the connection. This is not required for users that will create new connections based on the new custom connector.
During import, the Environment Variable Values will be asked. Enter the values needed for the Custom Connector to connect and log in users to Business Central Online.
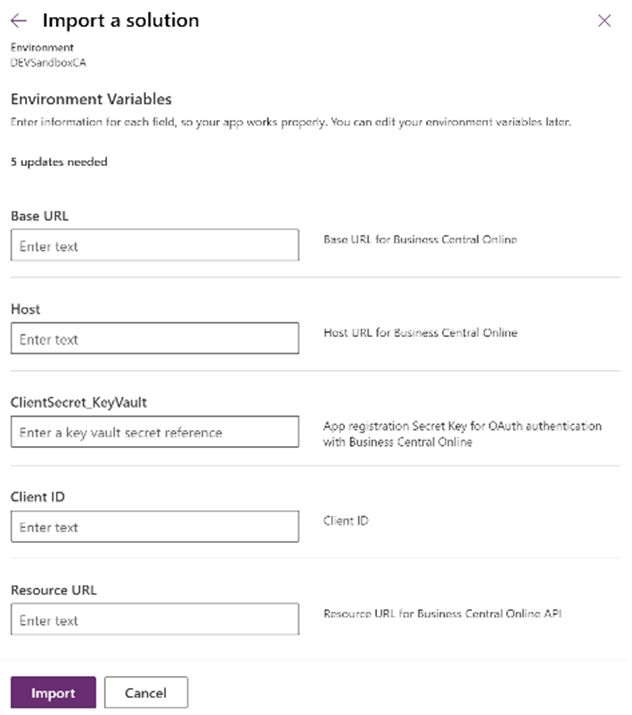
Base URL
Base URL for Business Central Connection.
For Business Central Online environments this needs to be set up with v2.0/
Depending on the setup in Azure Active Directory, the domain name could be used as basePath:
v2.0/<your-domain-name>/<your-business-central-environment-name>/
Or tenant ID can be used (this one should always work, so advised is to use tenant id):
v2.0/<your-tenant-id>/<your-business-central-environment-name>/
For more information on how to find your tenant ID, click here.
Base URL of the Custom Connector already starts with '/', so don’t start the given value with this character because it then will start with two slashes.
Host
Host for Business Central Connection.
For Business Central Online environments this needs to be setup with api.businesscentral.dynamics.com or the specific server URL in case of on prem environments.
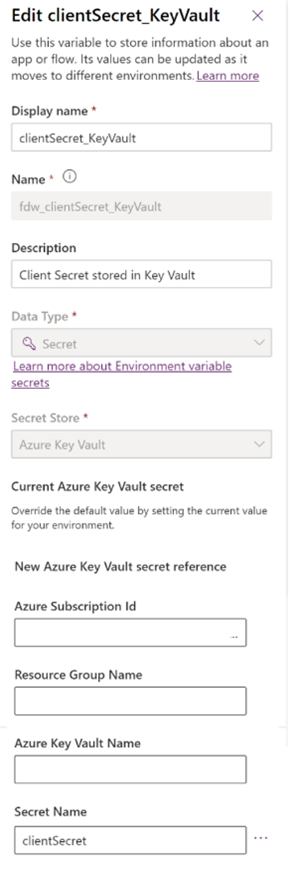
ClientSecret_KeyVault
App registration Secret Key for AAD OAuth authentication with Business Central, safely stored in Key-Vault as set up in the above steps.
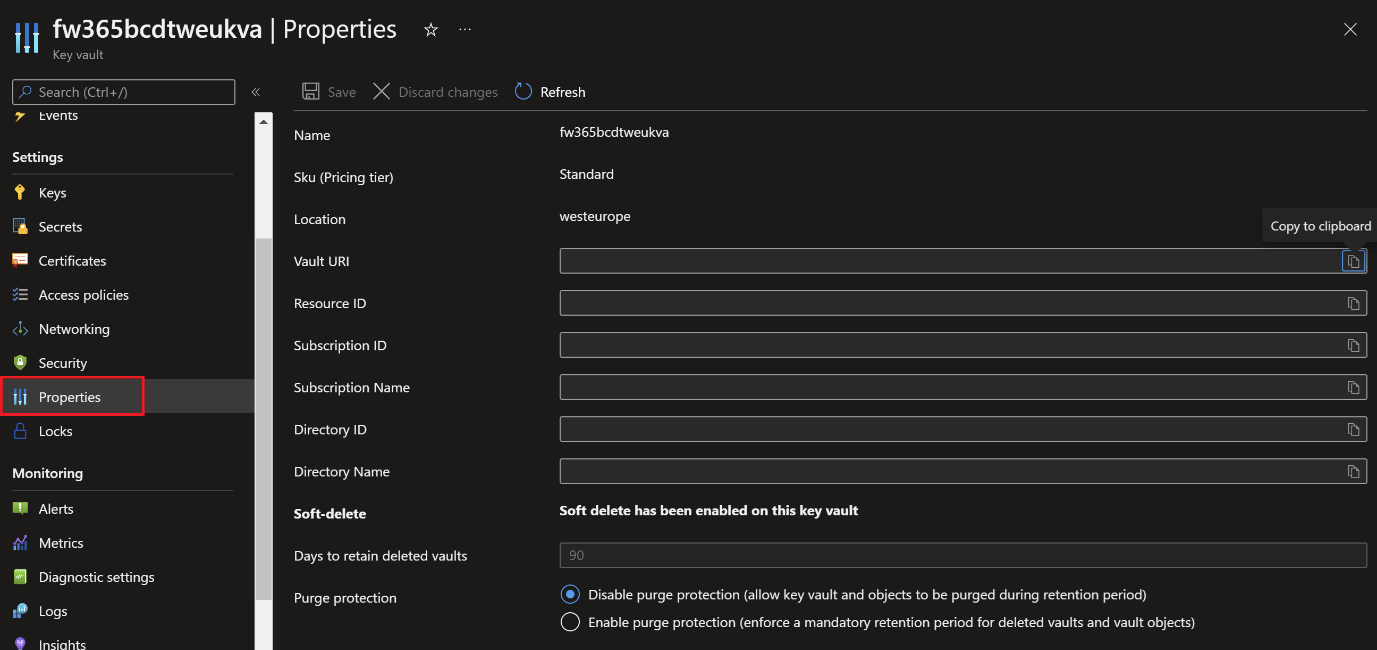
The value needs to be entered as the full path to the secret key stored in the KeyVault.
For example, /subscriptions/<your_subscription_id>/resourceGroups/<resource_group_name>/providers/Microsoft.KeyVault/vaults/<your_keyvault_name>/secrets/<your_secret_name>.
The above information can be found in the Key-Vault Properties; the secret name is the one created as instructed earlier as Key-Vault secret, for example clientSecret.
Client ID
App registration Application (client) ID for AAD OAuth authentication with Business Central.
App Registration Client ID can be found on the App Registration Overview tab for the app registration created earlier as instructed.
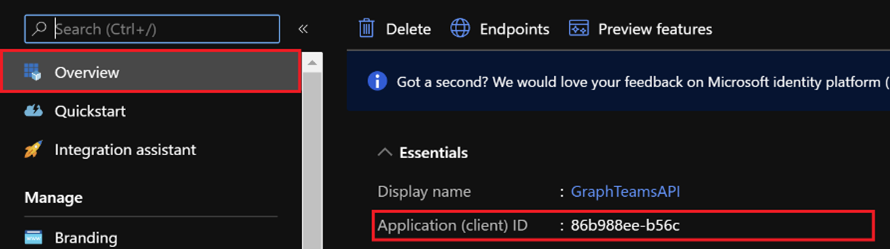
Enter the app registration Application (client) ID as the actual value for the Client ID.
Resource URL
Resource URL for Business Central Connection.
For Business Central Online environments this needs to be setup with https://api.businesscentral.dynamics.com as used in the app registration set up.
Now all fields have a value select Import. The Custom Connector Solution is created, and the Custom Connector is, in addition visible via Dataverse > Custom Connectors.
When the above solution is imported again, the values will not be asked for and the Custom Connector will continue working with the values as saved in the Environment Variable Values (so that it does not overwrite customer specific data).
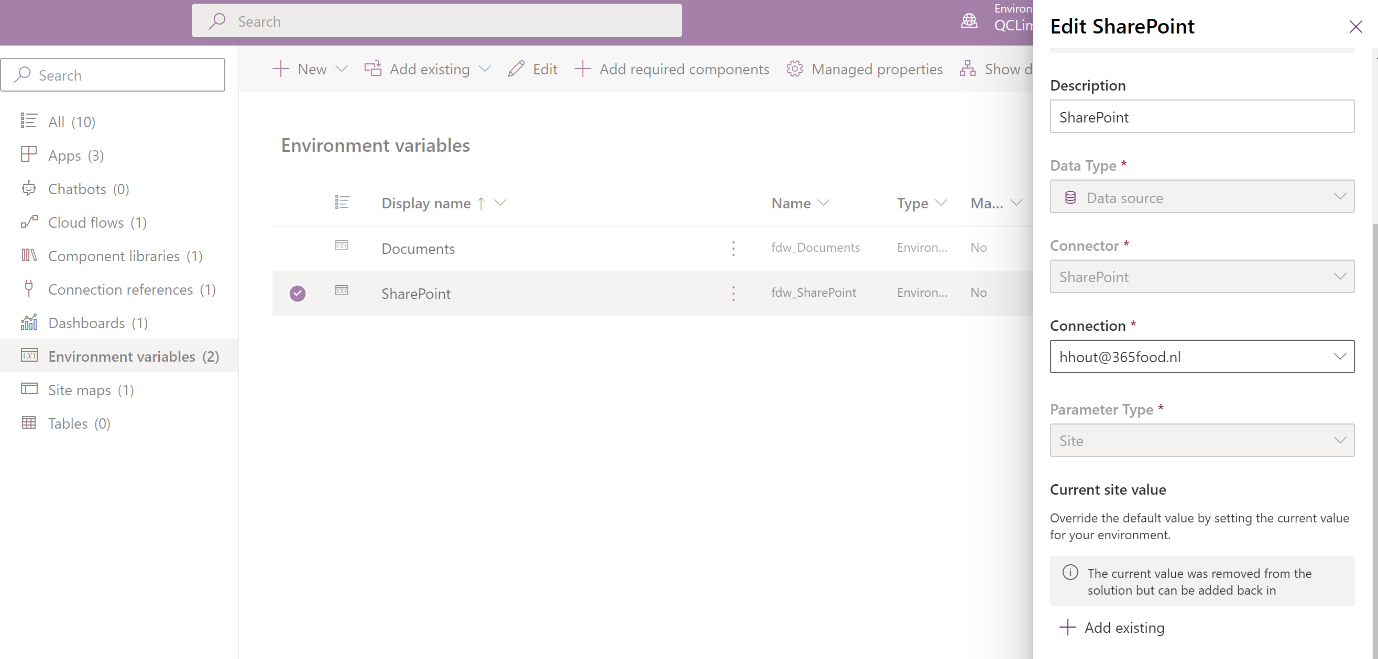
If a mistake has been made or one of the variable values needs to be changed, this is possible by manually editing the environment variable.
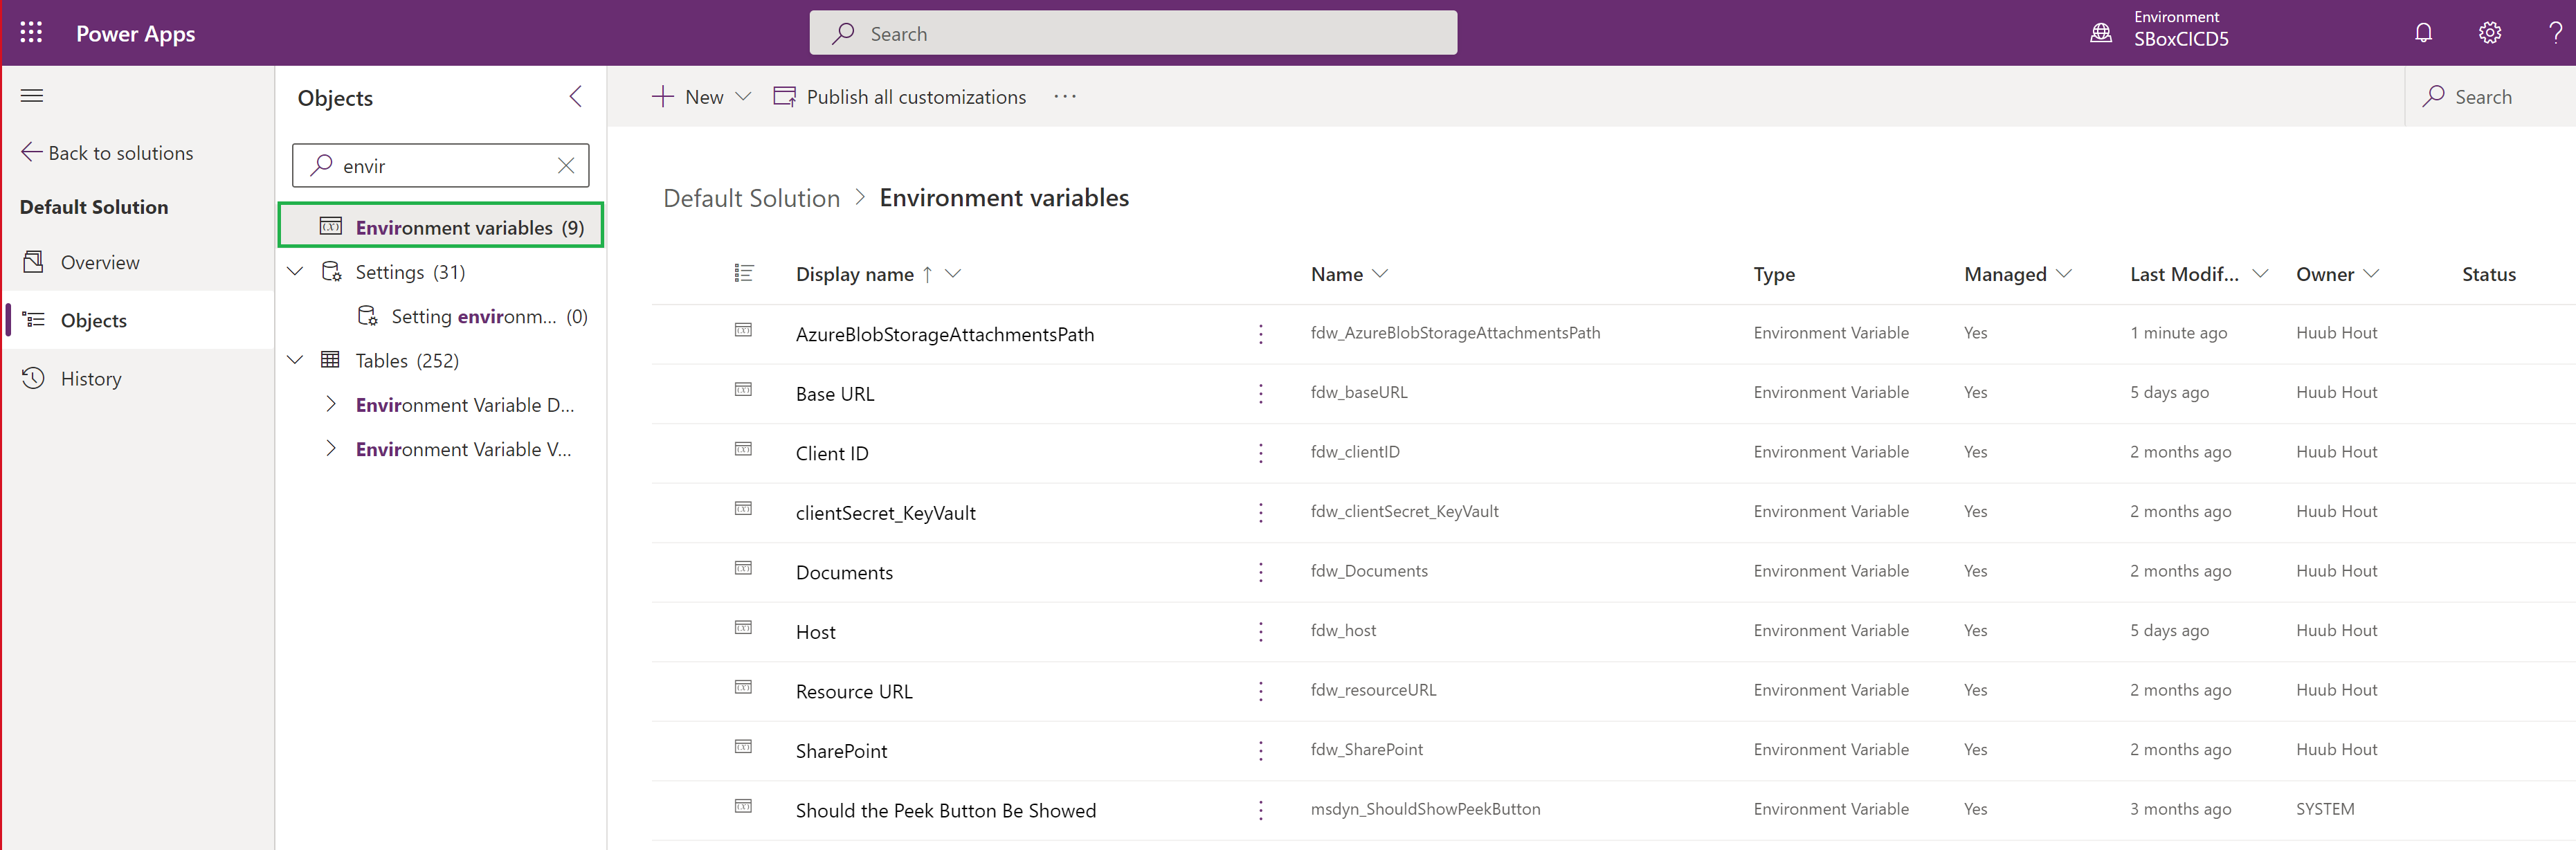
In the Default Solution, search Environment Variables, edit the Environment variable that needs a change and enter the new value as the Current Value.
For the ClientSecret_KeyVault, the path to be entered as the current value, in this case, is shown as separate fields.
The Custom Connector doesn’t automatically pick up the new values. To apply the new values, go to the Custom Connector via Dataverse > Custom Connector and edit the connector.

Select Update Connector and then Close again. The Custom Connector is now using the new values.
To test the connector, go to Dataverse > Custom Connector, select Edit and go to step 4. Test. Select your personal connection and try the Get Companies request.
The custom connector for Shop Floor Production is now ready to use.
Import Shop Floor Production Power Automate Solution (Managed)
This Solution is used by the Shop Floor Production Solution to view PDF files from SharePoint (Work Instructions). It contains a Power Automate and Connection Reference to be able to connect to SharePoint.
Select the SharePoint Connection to be used and/or create the connection during import.
The above connection is now linked to the Connection Reference used in the solution.
For more information about the connection references used, click here.
After successfully importing all the above, publish all customizations.
If an environment variable value needs to be changed this is possible by going to the Default Solution in your environment, search for Environment variables and select the Environment variable you would like to edit.
Power Apps
Create a Power Apps environment using Step 1 and 2 in Power Apps. For more information, click here.
Now, the environment is ready to import the Foundation and Shop Floor Production Solution Packages (.zip); the package files can be requested by contacting Aptean.
Foundation is used for all Skye Power Apps Solutions and contains the tables for all solutions.
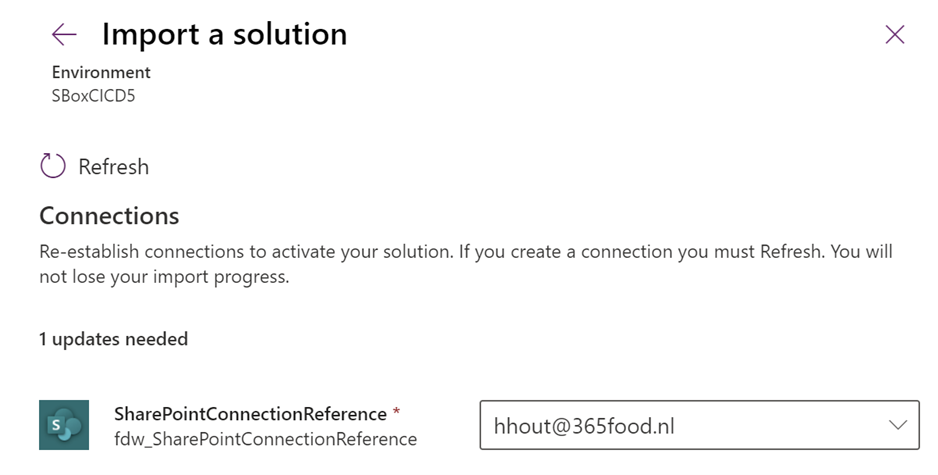
When you import the Shop Floor Production Solution zip file, you will be prompted to provide the SharePoint connection. This connection should be associated with the SharePoint site that holds the relevant Work Instructions, which will be linked and displayed in the Shop Floor Production apps.
Only one SharePoint site is supported.
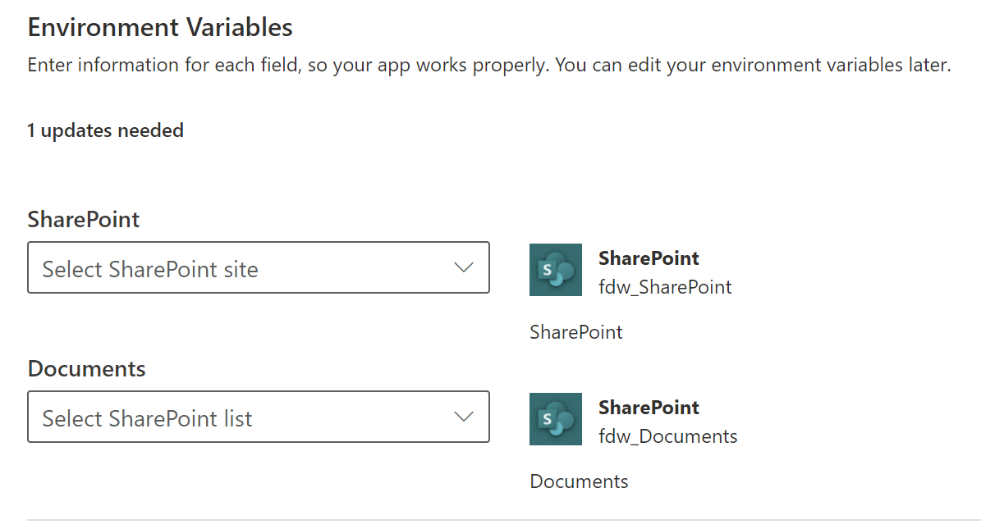
If there are no connection, you can create a new SharePoint connection using the New Connection option. Makesure to Refresh the page to select the newly created connection. Then, the connection will be linked to the Environment Variable SharePoint Connection used in the solution.
If the Environment Variable is already set up in the environment, its value will not be updated during the import process to prevent overwriting the customer-specific data. You can edit the environment variable manually to change the value after importing. If the SharePoint connection is not established during import or modification later, it can be accomplished by editing the Environment Variable within the Default Solution. Search for the Environment Variables section and Edit the SharePoint value accordingly.
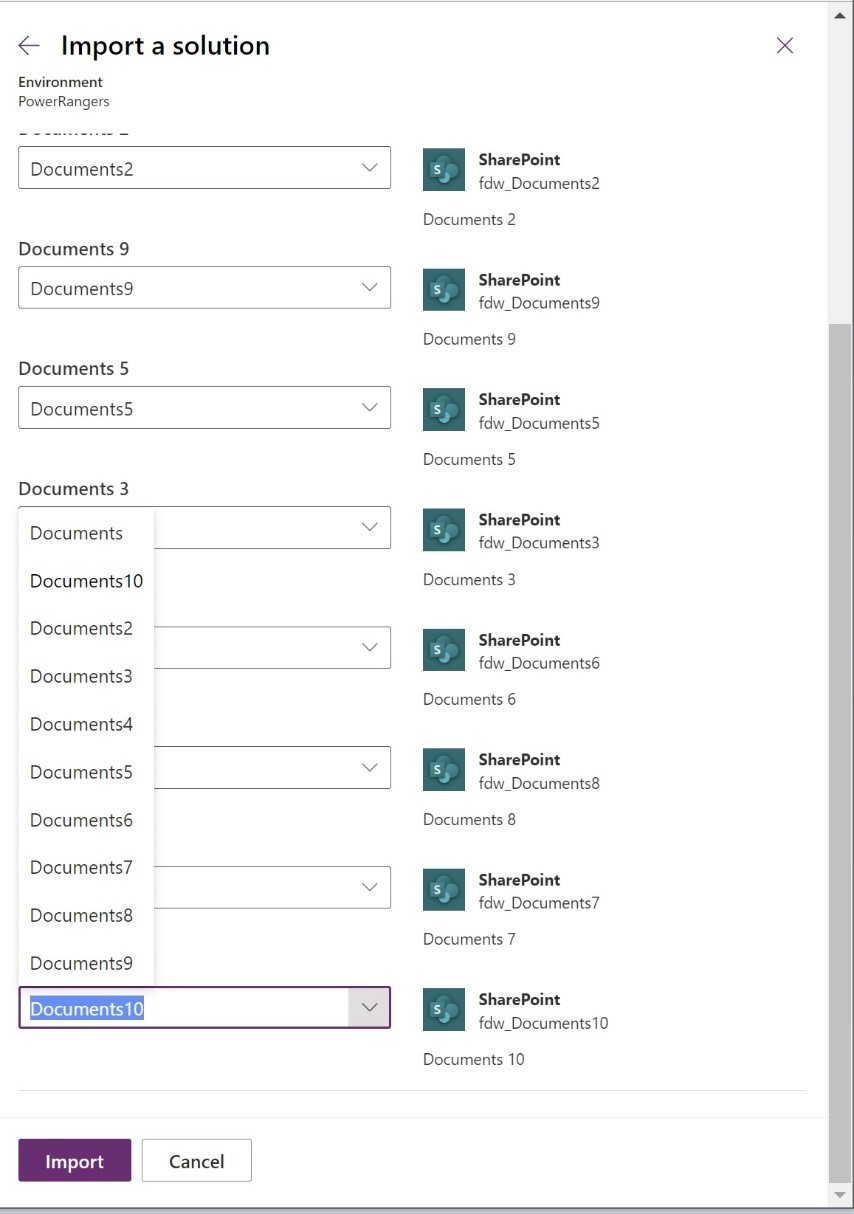
In the SharePoint multiple Document Libraries can be created. In the below image upto ten Document Libraries are created for the site Workinstructions:

Logical naming can be applied to the Document Libraries to easily search for a Work instruction in the corresponding Document Libraries.
The Aptean Shop Floor Production Work Instruction Setup app now offers support for up to ten SharePoint Document Libraries. Each library has a capacity to hold up to 2000 items. The Workinstructions in Power Apps can load and allow searching and selection from these 2000 items. Any additional items stored in the SharePoint Document Library will not appear in the list and cannot be found using the search function in the Workinstructions.
When changing the connection, also make sure the Document Environment Variable values are reset to start using the Document Libraries of the new SharePoint Site that has been configured as connection. The, select the SharePoint Site (site) to be used and the Document Folder (list) where Work Instructions are available.
When importing the solution, both the SharePoint Connection (SharePoint Site) and the Document Library (SharePoint list) will be requested.
Select the SharePoint Site > Documents Folder > Import.
If you have a limited number of work instructions, you can link all the Document Environment Variables to a single document library for setting up work instructions. As you add more instructions, you can later modify the values of the Document Environment Variables to start using additional Document Libraries. This allows you to switch to different libraries within the app and add instructions from another library. For more information, see Environment Variables.
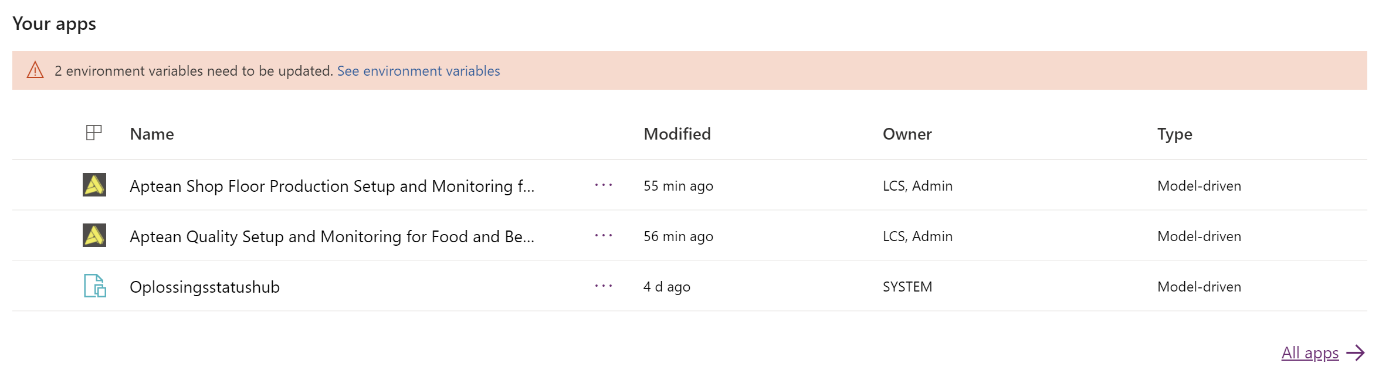
To apply the updated values, the app must be restarted. This will enable the utilization of the new values. A notification will be displayed in the apps overview if certain environment variables have not been setup.
- In the Power Apps admin center, select Manage users to access the users’ section.
- Select the Power Apps environment you want to work with.
A new window opens. - On Users, select See all to view all the users associated with the selected environment.
A new window opens. - Select Manage users in Dynamics 365.
- Select Manage Roles and assign the ShopFloorProduction role to the users who need access to the Shop Floor Production Power Apps Solution.
To create Recurring Quality Checks based on Shop Floor Production processing, you need to initiate a Job Queue process. This is done via the Create and Schedule Job Queue Entry for Recurring Quality Checks action on the Shop Floor Production Setup page.
For more information on setup of users and their roles, click here.
Set up the desired job queue category code and ensure that the Max recurring Quality Checks setting is defined to prevent the creation of Quality Checks without a limit.
The category code will be automatically created and set up if it is not defined manually: SFPJQREC.
User Specific Instructions
The following instructions apply to all end users. Follow these instructions when you start using the PowerApps Solutions.
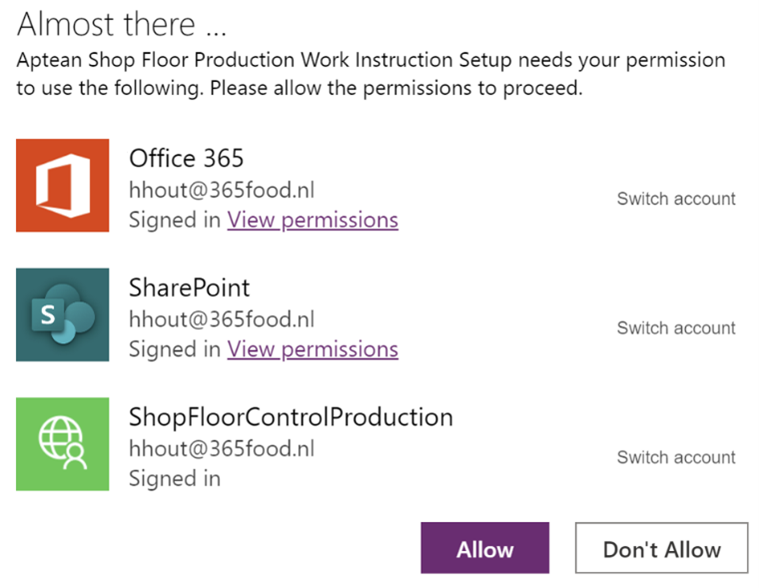
-
Select Sign in for the ShopFloorControlProduction connection.
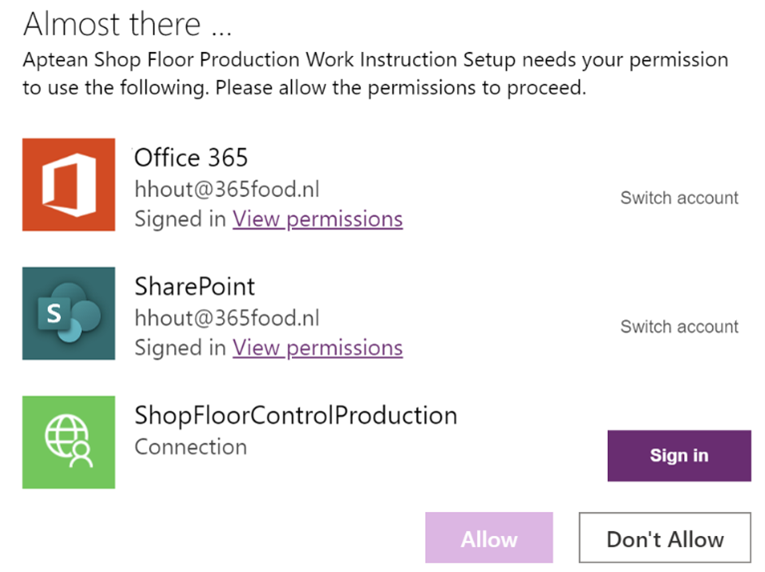
-
A sign in window opens to sign in with your account.
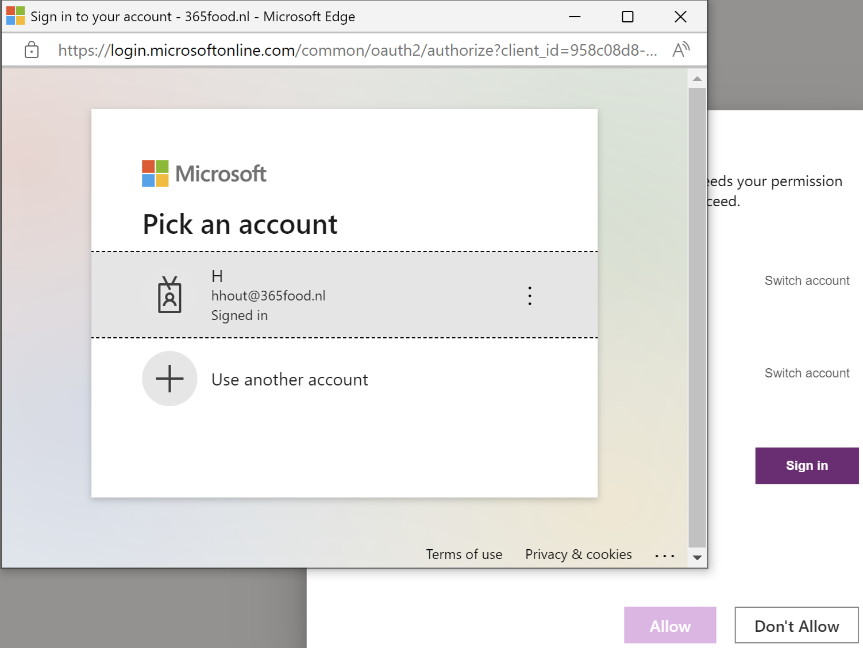
-
When the sign in is successful and all connections are signed in, select Allow for all connections and the app starts and is ready to use.
When you delete a personal connection, for whatever reason, that is created as a result of the above action (via Dataverse > Connections) and start the app right away the following error message will appear.

This is the result of the personal connection stored in memory. To resolve this,
- Wait until it is refreshed by the platform (can take minutes or hours) and start the app again.
- Press CTRL+F5 to refresh and start the app again, sometimes refreshing multiple times is needed.
- Start the browser in Guest mode and start the app again in this session.
License guidelines
In shop floor operations, users must have both Power Platform Premium license and a Dynamics 365 Business Central Device license or Dynamics 365 Business Central Premium License.
A Power Platform Premium license provides access to features and services within Microsoft's Power Platform, which includes Power Apps, Power Automate, Power BI, and Power Virtual Agents.
The Business Central Device licenses provide limited access to a subset of Business Central capabilities which grant access via certain devices, using either assigned or shared logins while the Business Central Premium licenses have access to all functionalities.
With the Business Central Device licenses, you can use all the functionalities available in the Shop Floor Production Power App.