Database Administration Procedures
Importing Aptean EDI Objects
In the Development Environment, you must import the Aptean EDI objects into Microsoft Dynamics 365 Business Central as part of the administrative process. The objects are contained in a standard .fob file, and importing them into a new database is similar to importing any other .fob file. Please follow your usual practices for performing these activities.
The following Business Central objects will be modified by the Aptean EDI solution:
| Type | No. | Name |
|---|---|---|
| Table | 14 | Location |
| Table | 18 | Customer |
| Table | 23 | Vendor |
| Table | 36 | Sales Header |
| Table | 38 | Purchase Header |
| Table | 110 | Sales Shipment Header |
| Table | 112 | Sales Invoice Header |
| Table | 114 | Sales Cr.Memo Header |
| Table | 120 | Purch. Rcpt. Header |
| Table | 122 | Purch. Inv. Header |
| Table | 233 | Item Journal Batch |
| Table | 5107 | Sales Header Archive |
| Table | 5109 | Purchase Header Archive |
| Table | 5740 | Transfer Header |
| Table | 5744 | Transfer Shipment Header |
| Table | 5746 | Transfer Receipt Header |
| Table | 5766 | Warehouse Activity Header |
| Table | 7316 | Warehouse Receipt Header |
| Table | 7318 | Posted Whse. Receipt Header |
| Table | 7320 | Warehouse Shipment Header |
| Table | 7322 | Posted Whse. Shipment Header |
| Table | 7342 | Posted Invt. Pick Header |
| Codeunit | 23 | Item Jnl.-Post Batch |
| Codeunit | 44 | JobQueueManagement |
| Codeunit | 80 | Sales-Post |
| Codeunit | 90 | Purch.-Post |
| Codeunit | 391 | Shipment Header - Edit |
| Codeunit | 414 | Release Sales Document |
| Codeunit | 5752 | Get Source Doc. Outbound |
| Codeunit | 6620 | Copy Document Mgt. |
| Page | 21 | Customer Card |
| Page | 26 | Vendor Card |
| Page | 42 | Sales Order |
| Page | 44 | Sales Credit Memo |
| Page | 50 | Purchase Order |
| Page | 51 | Purchase Invoice |
| Page | 130 | Posted Sales Shipment |
| Page | 132 | Posted Sales Invoice |
| Page | 134 | Posted Sales Credit Memo |
| Page | 507 | Blanket Sales Order |
| Page | 5703 | Location Card |
| Page | 5740 | Transfer Order |
| Page | 5743 | Posted Transfer Shipment |
| Page | 5768 | Warehouse Receipt |
| Page | 7330 | Posted Whse. Receipt |
| Page | 7335 | Warehouse Shipment |
| Page | 7377 | Inventory Pick |
Prior to importing Aptean EDI objects, it is strongly recommended that these objects be exported into a .fob file.
Backup and Restore Procedures
In the Development Environment, you must perform the backup and restore procedure for Microsoft Dynamics 365 Business Central as another administrative process. The backup and restore procedures are not affected by the Aptean EDI solution. Please use your standard practices when performing these activities.
Restoring a Testing Database
When restoring a testing database, the following setup changes should be made to ensure that any testing activities are not accidentally recorded in your live environment:
- Verify that the Job Queue is not running automatically in the testing environment.
- On the EDI Setup page, on the General FastTab, verify that the file path in the Message Directory field is not the same as the directory being used in your live environment. It is recommended that a separate directory be created for testing.
- On the EDI Setup page, on the Notification FastTab, remove any users that should not receive testing messages from the Notify E-Mail Address(es) field.
- On the EDI Setup page, on the Default FastTab, verify that the entries in the Default In. Address and Default Out Address fields are not the same as the corresponding entries in the live environment.
- Review EDI port records and verify that they point to either the default connect addresses that were modified in the previous step or to another dedicated testing location.
Object Merge
Object merging is an administrative function that you must perform in the Object Designer of the Development Environment.
Object Merge Procedure
Aptean EDI has been developed to simplify the merging of objects into an existing customer database. The steps below outline one methodology for merging objects. However, please note that these steps are recommendations based on the assumption that the usual best practices in development have been followed, and the described approach has been proven to be an efficient process. This procedure assumes that the reader possesses a basic knowledge of working with the import of objects into Business Central. If you find any of the following steps unclear, do not attempt this process, and contact Aptean support for assistance.
To merge objects:
- Import all new custom objects.
- From the notification message that appears, click No to open the Import Worksheet.
- Merge all standard tables that were modified by Aptean EDI into the database by selecting the Merge: Existing ← New option in the Action field. Please be aware that any version tags in the version list will be removed. If you want to retain these, they will have to be manually re-applied.
- Add the following keys:
● Table 18 (Customer):
● EDI Vendor No.
● Inv. Inquiry EDI Port Code
● Table 36 (Sales Header):
● EDI Sales Order, EDI Outbound Entry No., EDI Status, Status
● Table 110 (Sales Shipment Header):
● EDI Shipment, EDI Outbound Entry No.
● Table 112 (Sales Invoice Header):
● EDI Invoice, EDI Outbound Entry No.
● Table 114 (Sales Cr. Memo Header):
● EDI Cr. Memo, EDI Outbound Entry No.
● Table 5740 (Transfer Header):
● EDI Transfer, EDI Outbound Entry No., EDI Status, Status
● Table 5744 (Transfer Shipment Header):
● EDI Shipment, EDI Outbound Entry No. - Finally, merge all remaining standard objects that were modified by Aptean EDI using a text comparison tool or any other type of manual merge.
Uninstalling Aptean EDI
If you need to uninstall the Aptean EDI solution, the steps below demonstrate how to remove all Aptean EDI data, Business Central objects, and external objects. We assume that you have basic knowledge of importing and processing objects in Business Central. If you find any of the following steps unclear, please do not attempt this process, and contact Aptean support for assistance.
This procedure will delete all information related to Aptean EDI. It is strongly recommended that a complete database backup be made before proceeding with these steps.
To uninstall Aptean EDI:
-
Remove the Aptean EDI Handler: the Aptean EDI Handler that facilitates the automatic processing of EDI is installed as a separate component on the Service Tier server processing EDI messages, as well as any machine on which codeunits will be compiled. It must be removed from each of these machines using the standard Windows “Remove Program” functionality.
● From the Windows Control Panel, open the Programs and Features window.
● Select the line for the Aptean EDI Handler application and click the Uninstall button.
● Follow the prompts to remove the application. -
Remove the Aptean EDI objects: while Aptean EDI objects can be deleted directly from the database, standard Business Central objects that have been modified for Aptean EDI must be replaced. This will require the recommended .fob database backup that was made prior to the installation of Aptean EDI.
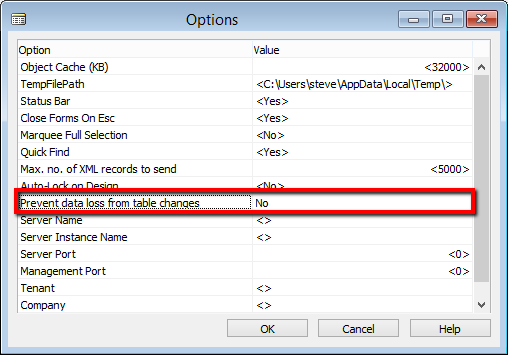
● In the Development Environment, click Tools, and select the Options option.
● In the Options window, change the value in the Prevent data loss from table changes field to No, then click OK.
● Open the Object Designer, then import the .fob file that contains the pre-Aptean EDI objects.
● The program will present a message that asks if you wish to open the Import Worksheet. Open this window.
● Click the Replace All button.
● Click OK. The pre-Aptean EDI versions of the displayed objects will replace the Aptean EDI versions.
● In the Object Designer, select the All option on the left-hand side to display all database objects.
● Select any value in the Version List column (the specific field does not matter).
● Press F7. The Field Filter window opens.
● Enter a filter of EDI and click OK. The Object Designer should now display only the Aptean EDI objects that were not replaced by standard ones.
● Delete all the displayed objects in the Object Designer.